So, you’ve got your new helix piercing—congratulations! The piercing itself is the easy bit. The real journey starts now, and proper aftercare is what will make or break your healing experience. It’s all about keeping things clean, avoiding any unnecessary irritation, and knowing what to expect over the coming months.
Your Essential Helix Piercing Aftercare Journey
Getting a new helix piercing is exciting, but it’s completely normal to feel a bit anxious about looking after it. Let's cut through all the conflicting advice you might find online. The routine you establish now is the single most important factor for a smooth heal. This guide is packed with practical, no-nonsense advice straight from our experienced teams at Timebomb Tattoo & Piercing in Croydon and Bournemouth.
Think of this as your cheat sheet for the first few weeks. We’ll cover the absolute essentials before diving into the finer details later on.
First Steps and Critical Rules
Right now, your main job is to create a clean, low-stress environment for your new piercing. Your body is currently treating that shiny new piece of jewellery as a wound with a foreign object in it, so the goal is to minimise irritation and keep bacteria at bay while your body gets used to it.
This means committing to a simple, consistent cleaning schedule. You're not trying to sterilise your ear—that's impossible. You're just gently removing the daily build-up of bacteria and crust that can stall the healing process. Don't underestimate how important this is. Data from the UK's Health and Safety Executive (HSE) shows a significant 28% of infections in cartilage piercings like the helix are caused by poor aftercare. You can learn more about how proper aftercare prevents piercing complications from their official findings.
The Golden Rule of Healing: Do not touch it, twist it, or sleep on it. Seriously. Unnecessary movement is the number one enemy of a healing cartilage piercing and the main cause of those dreaded irritation bumps. Your body knows exactly how to heal; your job is just to stay out of its way.
Helix Piercing Aftercare Quick Guide
To make things crystal clear, here’s a quick-reference table that boils it down to the most important dos and don'ts.
| Action | What to Do | What to Avoid |
|---|---|---|
| Cleaning | Clean twice a day with a sterile saline solution. | Using alcohol, peroxide, or soap. Over-cleaning. |
| Drying | Gently pat the area dry with clean paper towel or a non-woven gauze. | Using a fluffy towel that can snag or leave fibres behind. |
| Contact | Only touch the area with freshly washed hands during cleaning. | Twisting, turning, or fiddling with the jewellery. |
| Sleeping | Sleep on the opposite side or use a travel pillow to avoid pressure. | Sleeping directly on your new piercing. |
| Lifestyle | Be mindful of hair, headphones, hats, and glasses catching on it. | Submerging it in pools, hot tubs, or baths. |
Stick to this simple advice, and you'll give your new piercing the best possible start.
It's also crucial to have realistic expectations about the healing timeline. This is a marathon, not a sprint. A helix piercing can easily take 6-12 months, sometimes even longer, to be fully healed on the inside, even if it feels fine on the outside. With our guidance, you'll know what to look for at every stage, from the initial soreness to that final, happy, and beautifully healed piercing.
A Realistic Timeline for Healing Your Helix Piercing
So, you've just got your new helix piercing. Congratulations! Now comes the most important part: the healing. Forget what you've heard about vague, one-size-fits-all timelines. Every person's body is different, but knowing the typical day-by-day and week-by-week progression will help you stay on track, spot any issues early, and understand what’s actually happening with your ear.
Think of it this way: your body sees the new piercing as a small wound it needs to repair. Your aftercare routine is simply about creating the perfect, clean environment for it to do its job without any interruptions.
The First 48 Hours: Red, Warm, and Tender
Right after you leave the studio, your immune system gets to work. For the first couple of days, it's completely normal for the area around your new helix to be red, a bit swollen, and tender to the touch. You might even feel a gentle, warm throbbing. That’s just your body's initial inflammatory response—it's sending healing agents to the site.
Your only job right now is to be gentle. Keep it clean with saline spray and, most importantly, leave it alone. The temptation to twist, poke, or fiddle with the jewellery is real, but you have to resist. Introducing bacteria or causing unnecessary movement can irritate the piercing and seriously delay healing from day one.
Days 3 to 7: The Swelling Sets In
This is usually when the swelling hits its peak. Your ear might feel tight, and that long bar we put in, which probably seemed excessive at first, will now make perfect sense. We always use longer initial jewellery specifically to give your ear room for this temporary swelling.
You'll also likely notice some clear or pale-yellow fluid that dries around the jewellery. We call these "crusties," and they are a mix of lymph fluid and dead cells. Don't panic—this is a perfectly healthy sign of healing, not an infection. Just gently soften and wipe them away with your saline solution during cleaning. Never, ever pick at them with your fingers.
This chart gives you a quick visual guide for what to expect in the early days.
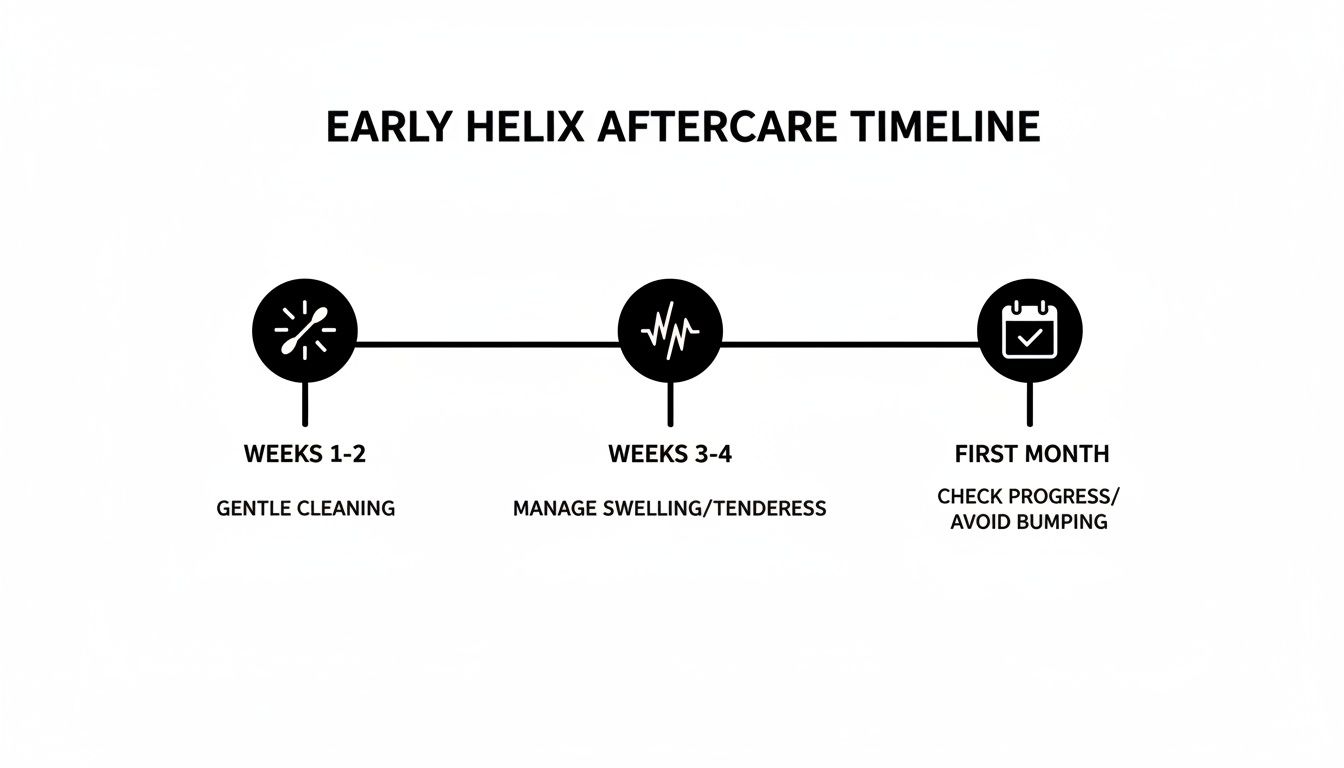
As you can see, the first month is an active healing phase. It starts with managing that initial soreness and swelling and slowly transitions into a more settled period.
Weeks 2 to 4: Things Start to Settle Down
By the second week, the initial intensity should fade. The constant ache will likely be gone, replaced by a general tenderness, especially if you accidentally bump it. You might still see some redness, particularly after cleaning, but things should feel much calmer overall.
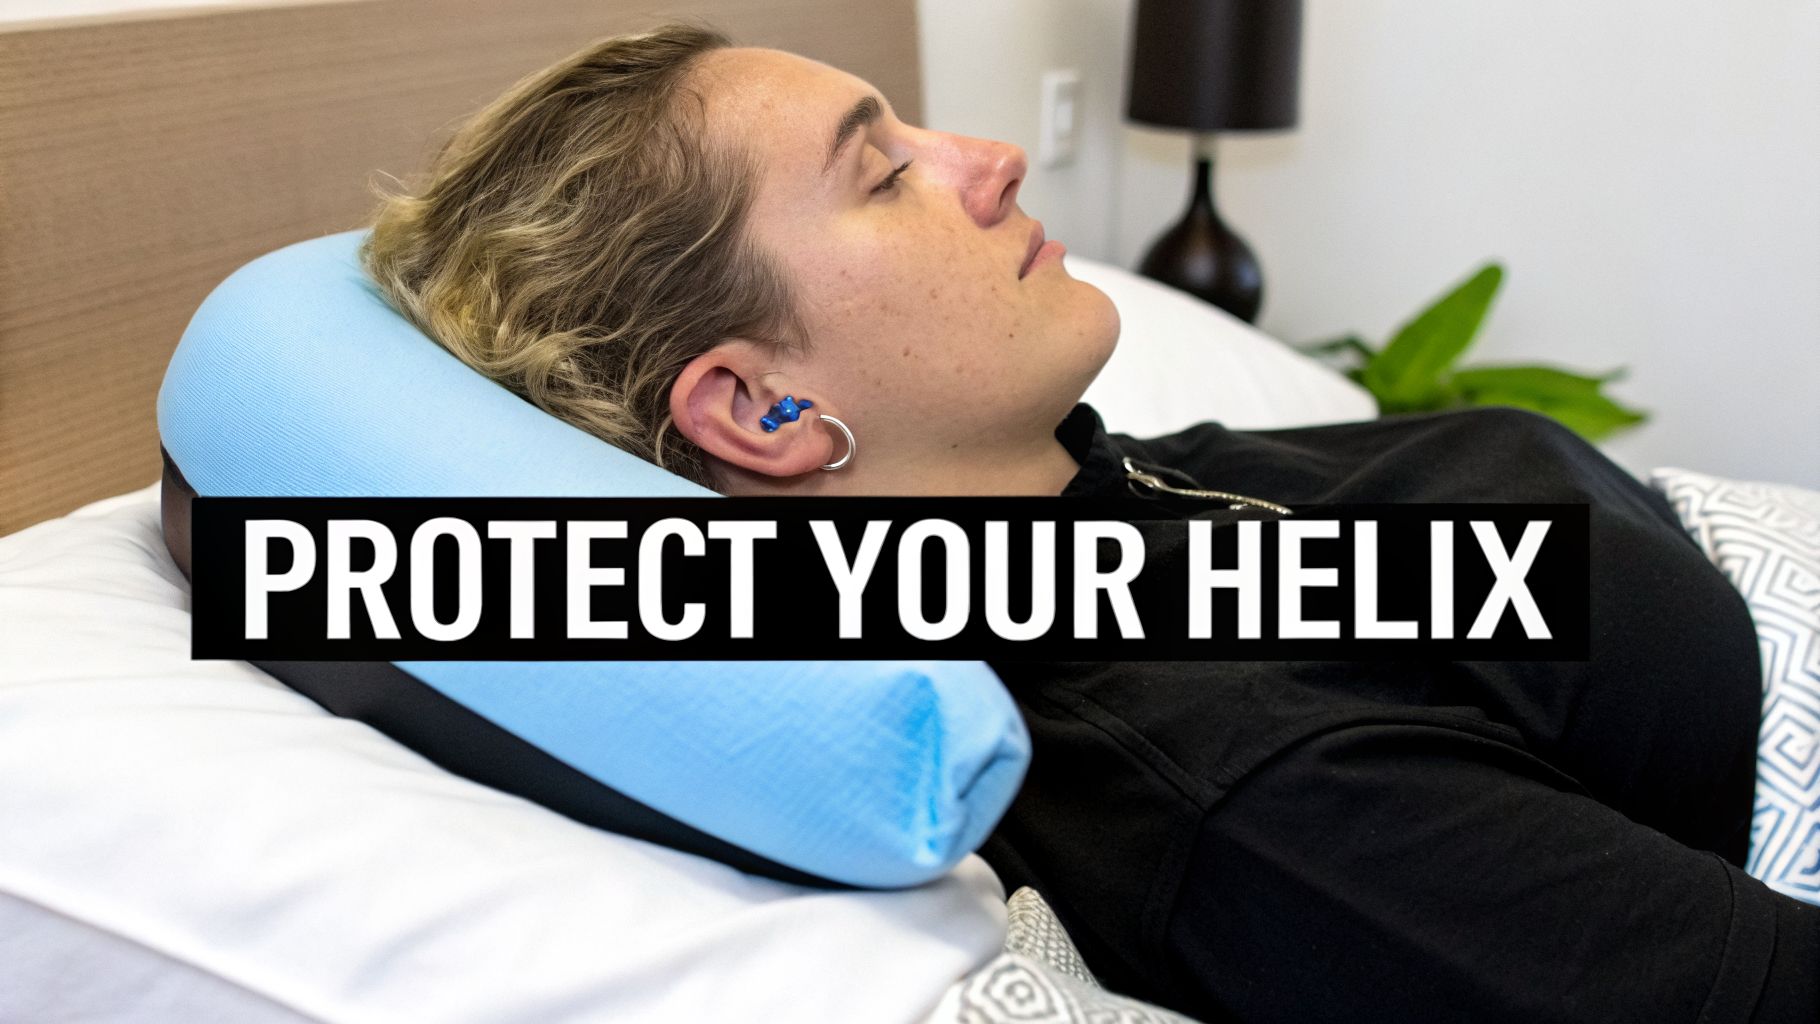
This is a critical time for consistency. It’s so easy to slack off on your aftercare when the piercing starts to feel better, but the real healing is happening deep inside the cartilage. Keep up with your twice-daily saline cleaning and remain cautious. Be mindful of things like snagging it with a hairbrush, pressing your phone against it, or—the big one—sleeping on it. A travel pillow can be a lifesaver; just place your ear in the hole to avoid any pressure overnight.
A Piercer's Perspective: The number one mistake we see in the studio is people getting a false sense of security too early. A helix can feel surprisingly good after a month, but the fistula—the tube of skin forming inside—is still incredibly delicate. One bad knock or a night spent sleeping on it can easily cause an irritation bump to appear.
Months 2 to 6: The Long Haul of Healing
Now you're in it for the long run. During this phase, your piercing is busy strengthening and maturing from the inside out. On the surface, it might look and feel almost healed. The redness and swelling should be long gone, and this is when you’ll come back to the studio for a crucial step: downsizing. We’ll swap the initial long bar for a shorter, snug-fitting one. Our comprehensive guide on ear piercing healing times explains why this cartilage healing journey takes time.
Internally, however, the tissue is still fragile. You'll have good weeks and bad weeks. It might feel perfect for a month and then get a little grumpy for a day or two if you knock it. This is all part of the process.
Here are a few milestones to look out for during this period:
- Fewer "Crusties": As the fistula matures, you’ll notice significantly less discharge.
- More Resilience: The piercing won't be nearly as sensitive to accidental bumps.
- The Downsize: Getting a shorter post fitted is vital. It prevents the jewellery from catching and moving around, which is a major cause of irritation.
A helix piercing isn’t truly and completely healed until it has finished this final remodelling phase, which can take anywhere from 6 to 12 months, sometimes even longer. Patience really is your best tool. Keep protecting it from trauma, and don't be tempted to change the jewellery just for looks until it is 100% healed and you have the go-ahead from your piercer. We're always here to check on it and give you the final all-clear.
A Practical Cleaning Routine for a Healthy Piercing
When it comes to healing a new helix piercing, your daily cleaning routine is everything. Think of it less like a chore and more like giving your body the best possible chance to heal itself. The goal isn't to blast it with harsh chemicals, but to simply keep the area clean and free from irritation.
Consistency is key here. You’ll want to clean your piercing twice a day—once in the morning and once at night. It can be tempting to clean more often, especially if you’re worried about it, but over-cleaning can strip away the helpful fluids your body produces, slowing things down just as much as not cleaning it at all.
Choosing the Right Cleaning Solution
Let’s get straight to the point: the only thing you should be using is a sterile saline solution. That’s it. It’s what we professionals use and recommend for a reason.
A proper sterile saline product is just a simple mix of sterile water and 0.9% sodium chloride. This formula is isotonic, meaning it matches the salt content of your own body, so it cleanses the piercing without causing any stinging, dryness, or irritation.
You can grab a can of sterile saline spray from most chemists or from our studios. The spray cans are fantastic because they keep the solution sterile and the fine mist makes it easy to apply without having to touch the piercing directly.
Now, for what you absolutely must not use. Please steer clear of these, as they often do more harm than good:
- Rubbing Alcohol & Hydrogen Peroxide: These are far too aggressive for a new piercing. They kill bacteria, sure, but they also destroy the fragile new skin cells your body is working so hard to grow.
- Antibacterial Soaps & Gels: Most soaps are loaded with dyes, scents, and chemicals that will only irritate your piercing. They can also leave behind a sticky residue that traps bacteria.
- Ointments & Creams: Never put thick creams on a piercing. They starve the wound of oxygen (which is vital for healing) and create a perfect, sticky trap for dirt and germs, which is a one-way ticket to an infection.
Key Takeaway: A healing piercing isn't a dirty wound that needs to be disinfected. It's a clean puncture that just needs to be kept that way. Gentle, simple, and consistent is the mantra.
This isn’t just our opinion; the data backs it up. Helix piercings are incredibly popular, making up about 22% of all cartilage piercings in the UK. However, Public Health England (PHE) also notes a 15% infection rate for these piercings, a number heavily influenced by aftercare. A 2026 HSE audit even highlighted that using a professional saline spray twice daily can reduce bacterial build-up by half compared to soap and water. You can find more info on helix piercing aftercare and safety on UrbanBodyJewelry.com.
The Cleaning Process Explained
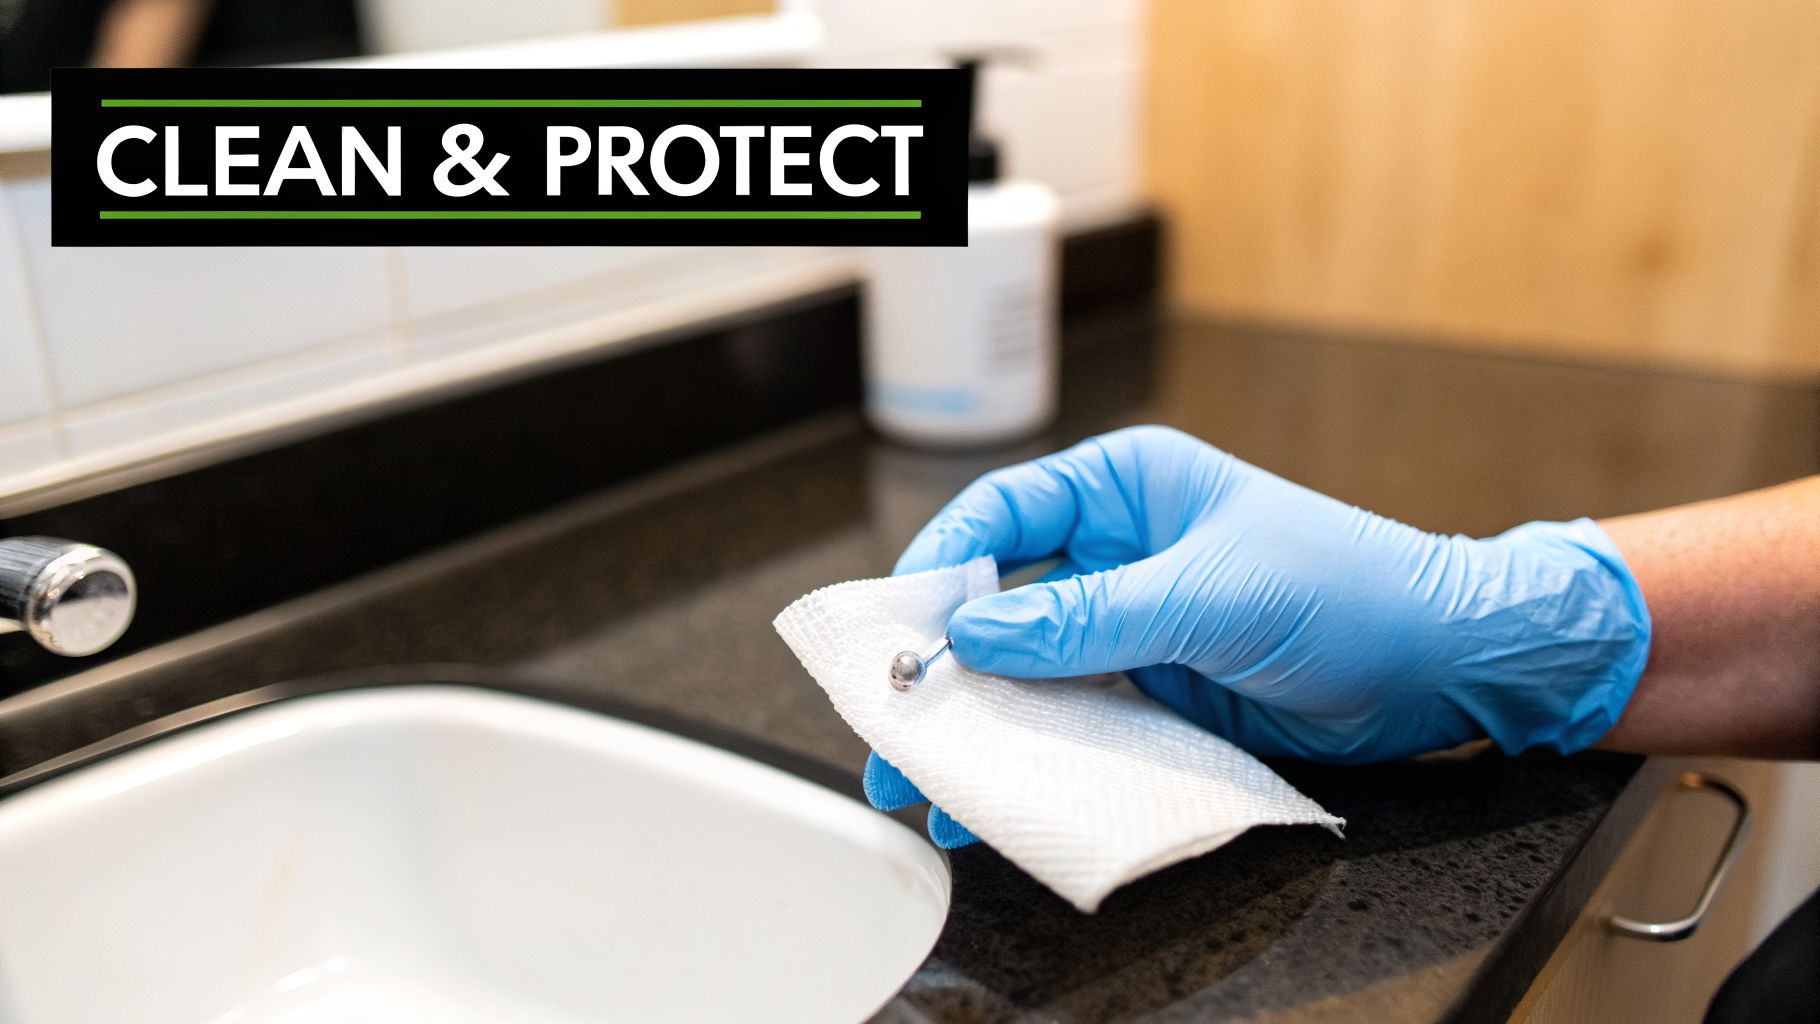
Okay, let's walk through the actual cleaning process. First and most importantly, always wash your hands thoroughly with soap and water before touching anywhere near your piercing.
Start by generously spraying your sterile saline onto a piece of non-woven gauze or a clean paper towel. Don't use cotton balls or buds—their tiny fibres can snag on your jewellery and cause a world of irritation.
Next, gently hold the soaked gauze against your piercing for 2-3 minutes. This warm compress will soften up any "crusties" (which is just dried lymph fluid, a normal part of healing) so they can be wiped away easily without any force.
Once you’ve done the compress, take a fresh piece of saline-soaked gauze and carefully wipe around the front and back of the piercing. Be gentle. No need to scrub.
The final step is absolutely crucial: get it dry. Use a clean paper towel to gently pat the piercing and the skin around it completely dry. A damp piercing is a breeding ground for bacteria, so don’t skip this.
The No-Touch, No-Twist Rule
I can't stress this enough: leave your jewellery alone. One of the biggest myths that still does the rounds is that you need to twist your jewellery to stop it from getting "stuck." This is completely wrong and will actively harm your piercing.
Every time you move or twist the jewellery, you’re tearing the delicate new tissue (the fistula) that’s trying to form inside. You’re essentially re-injuring the area and resetting the healing clock. Your body is smart; it will heal around the jewellery just fine on its own. Your only job is to leave it still outside of your twice-daily cleaning. This is one of the most important parts of all piercing aftercare.
Troubleshooting Common Helix Piercing Problems
Even if you follow your aftercare routine to the letter, your new helix piercing can still hit a few bumps in the road. It’s totally normal. Your body is healing, and sometimes the process isn't perfectly linear. The important thing is knowing how to spot a problem and what to do about it, without panicking.
Most of the time, what looks like a big deal is just a bit of irritation. Let's walk through what you might see and how to handle it.
Identifying and Managing Irritation Bumps
Ah, the dreaded irritation bump. If you’ve had a few piercings, you’ve probably met one of these before. They’re those small, angry-looking bumps that can pop up right next to your jewellery, and they’re the most common issue we see.
First things first: these are not infections. They're your piercing’s way of screaming, “I’m annoyed!” This is usually a form of hypertrophic scarring caused by a few classic culprits:
- Getting Knocked or Snagged: Catching it with your hairbrush, a towel, or yanking a jumper over your head can do it.
- Too Much Pressure: This is a big one. Sleeping directly on your new piercing is almost guaranteed to make it angry.
- Trapped Moisture: Not drying the area properly after cleaning can lead to a fussy piercing.
- The Wrong Jewellery: Jewellery that’s poor quality, the wrong shape, or a bar that's now too long since the initial swelling went down can cause constant friction.
If you spot a bump, don't reach for the tea tree oil or any other internet "cures." They’ll only make things worse. Go back to basics: be strict with your sterile saline soaks, keep it dry, and get serious about not sleeping on it. A travel pillow is your best friend here—pop your ear in the hole and sleep soundly.
When Redness and Swelling Return
Has your helix been healing beautifully for weeks, only to suddenly flare up, looking red, swollen, and feeling sore again? It happens. Before you worry, think back over the last 48 hours. Did you sleep on it by accident? Wear tight headphones? Get a bit rough while washing your hair?
Nine times out of ten, a flare-up is just irritation. Your job is to calm it back down. Treat it like it’s brand new again—gentle saline cleaning twice a day, no touching, and be extra mindful of it.
If the swelling is making your jewellery feel tight, that's your cue to come and see us at Timebomb. A bar that’s too short can start to sink into the skin (embedding), which is a much more serious problem to fix. We can pop in a longer bar to give it room to breathe.
Is It Irritation or a Real Infection?
This is the most important distinction you need to make. A genuine infection is a medical issue, whereas irritation is something we can usually manage by adjusting your aftercare. It’s easy to mix them up, but the signs are quite different once you know what to look for.
A table can be a quick way to check your symptoms, but remember, this is a guide, not a diagnosis.
Irritation vs Infection: What to Look For
| Symptom | Irritation Bump | Infection |
|---|---|---|
| Pain | Can be tender or sore, but generally low-level. | Intense, throbbing pain that gets worse. |
| Swelling | Localised swelling, maybe a distinct bump. | Widespread, significant swelling around the entire area. |
| Discharge | Clear or whitish fluid that dries into "crusties." | Thick, opaque yellow or green pus. May have a foul odour. |
| Colour | Pinkish or reddish around the piercing site. | Angry, dark red or red streaks radiating from the piercing. |
| Heat | Might feel slightly warm to the touch. | The area will feel noticeably hot. |
While irritation is common, true infections are actually quite rare if you're following a solid hygiene routine.
Crucial Tip: If you see thick, yellow or green pus and the area is hot and throbbing, you may have an infection. Do not remove the jewellery. Taking it out can trap the infection inside and cause an abscess. Contact us or your GP right away for advice.
Data backs this up. A 2026 NHS Digital health survey noted that while 82% of UK piercers suggest a 6-9 month healing timeframe, simple lapses in aftercare are a leading cause, contributing to 19% of GP visits for ear piercing problems. That's why we’re so strict about telling you what not to use—things like alcohol or peroxide are proven to cause 33% more irritation according to HSE findings. You can even read more about helix piercing healing journeys on Cosmopolitan.com.
Ultimately, you know your body. If you're ever worried about how your helix piercing is healing, don't just hope it gets better. Get a professional opinion. That’s what we’re here for.
Lifestyle Tips and Jewellery Guidance for Your Helix
Getting a new piercing is more than just the cleaning routine. It's about tweaking your daily life to give it the best chance to heal without a fuss. Honestly, a few small habit changes can make all the difference, and understanding the jewellery in your ear is key to a happy, healthy helix.
Here, we'll get into the real-world advice that will protect your piercing from the bumps, snags, and pressures of everyday life. From how you sleep to the metal you choose, consider this your insider's guide to living peacefully with your new helix.
Adapting Your Daily Habits
The number one enemy of a healing helix is physical irritation. I’m not just talking about big knocks; it's the small, repetitive things that cause the most trouble. A little bit of awareness goes a very long way.
Sleeping is, without a doubt, the biggest hurdle. If you sleep on your side, you simply cannot put pressure on that new piercing. It restricts blood flow, slows down healing, and is a guaranteed way to develop those angry, painful irritation bumps.
The Ultimate Pro Tip: Get a travel pillow. Seriously. Pop your ear in the hole, and you can sleep on your favourite side without any pressure on the piercing. It’s a complete game-changer and the best bit of advice I can give.
Beyond sleep, you need to watch out for other daily hazards. Hair is a notorious culprit for catching and pulling. Try to tie it up, especially at night, to stop it from getting tangled around the jewellery post.
A few other quick adjustments will save you a lot of grief:
- Phone Calls: Get used to using your other ear or just put it on speaker. Pressing your phone against a fresh piercing introduces both pressure and a whole lot of bacteria.
- Headphones & Headsets: Big over-ear headphones are a no-go for a few months. They sit right on the helix. Earbuds are usually fine, but be careful not to bump the piercing when you're putting them in and out.
- Getting Dressed: Be mindful when pulling jumpers and t-shirts over your head. It's a classic snag-fest. Just cup a hand over your ear to shield it as you pull clothing on or off.
Understanding Your Piercing Jewellery
The jewellery we use for your initial piercing isn’t just for looks; it’s a specific tool chosen to promote healing. In our studios, we only use implant-grade titanium, and there’s a very good reason for that. It’s incredibly biocompatible (so your body won't reject it) and completely nickel-free.
You’ll also notice the first piece of jewellery has a long bar. That’s deliberate. It’s there to accommodate the swelling that always happens in the first few weeks. If that bar were too short, the swelling could swallow it, leading to a nasty complication called embedding.
This brings us to one of the most critical parts of the healing process: the downsize.
The All-Important Downsize Appointment
At around the 6-8 week mark, the initial, most dramatic swelling will have gone down. This is when you absolutely must come back to see your piercer to swap the long bar for a shorter, more snug one. This is not an optional step.
If you leave the long bar in, it will start to cause problems. The extra length allows the jewellery to move and snag constantly. This persistent wiggle-room irritates the delicate healing tissue (the fistula), which is the main cause of those stubborn irritation bumps. A properly fitted bar keeps movement to a minimum, letting the piercing finally heal in peace.
Think of the downsize as a major milestone. It means you’ve made it through the trickiest phase of healing and are well on your way.
Changing to New Jewellery Styles
Everyone wants to know: "When can I put a hoop in it?" The answer is always the same: only when it is fully healed. For a helix piercing, that's a minimum of 6-12 months, and sometimes even longer depending on the person.
Switching to a new style too soon, especially a hoop, can completely derail a piercing that was healing perfectly. The curve of a hoop puts a totally different type of pressure on a fistula that is still fragile. Going from a straight bar to a curved ring before that healing channel is mature is just asking for irritation, bumps, and potential rejection.
Once you’ve passed that full healing period and your piercer has given you the green light, then it’s time to have fun with new styles. To keep your piercing happy for the long haul, always stick to high-quality materials like implant-grade titanium or solid 14k-18k gold.
Your Helix Piercing Questions Answered
Even after we've walked you through the aftercare, we know there are always a few more questions buzzing around. Here are the answers to the queries we hear most often in our Croydon and Bournemouth studios, giving you clear, straightforward advice.
When Can I Go Swimming?
We can't stress this enough: you must keep your new piercing out of pools, hot tubs, lakes, and the sea for at least 6 to 8 weeks. These bodies of water are essentially a soup of bacteria just waiting to cause an infection.
After that initial period has passed, you still need to be cautious. It’s always best to wait until your piercing feels properly settled and well on its way to being fully healed before you consider taking a dip.
What Should I Do If I Snag It?
First off, take a deep breath. It happens to everyone—that dreaded snag on a jumper, your hair, or a towel is almost a rite of passage. Carefully have a look at it in a clean mirror.
If it's just a bit red and angry, give it some extra TLC for a few days with your saline solution and be mindful not to knock it again. If the jewellery has been yanked out or you've caused some serious trauma, don't try to fix it yourself. Just get in touch with the studio, and we'll guide you.
Expert Tip: A snag is a form of trauma, and your piercing's first reaction will be inflammation. The best thing you can do is soothe it with your regular saline clean and then simply leave it alone to calm down.
Is It Normal for My Piercing to Be Itchy?
Yes! An itchy piercing can feel alarming, but it's almost always a good sign. It's a natural part of the healing process, indicating that your body is busy building new skin cells to repair the area. The sensation is most common in the first few weeks.
Whatever you do, don't scratch it. Touching or scratching introduces bacteria and will only make it more irritated. If the itching comes with a rash, significant swelling, or any nasty-looking discharge, it could be a sign of an allergic reaction or an infection. That's your cue to seek professional advice.
When Can I Use Earbuds Again?
With most helix placements, you can start using earbuds again fairly quickly, provided they don’t put any pressure on the piercing itself. The main thing is to be incredibly gentle when putting them in and taking them out.
You also need to make sure your earbuds are kept clean. They can harbour a surprising amount of grime, and you definitely don't want to transfer that to a healing piercing. A quick wipe with an alcohol swab before you use them is a great habit to get into.
Ready to Book Your Piercing in Croydon or Bournemouth?
Feeling much more confident about helix aftercare? That’s great news. The single most important decision you'll make for a smooth healing process happens before the needle even gets close—choosing the right piercer. The advice in this guide is a direct reflection of the professional standards you'll find at our partner studios, Timebomb Tattoo & Piercing.
Their teams in both Croydon and Bournemouth are known for their exceptional skill, strict hygiene protocols, and commitment to using only high-quality, implant-grade jewellery. When you go with a pro, you’re not just paying for a piercing; you're investing in your own peace of mind.
Why You Should Always Start with a Consultation
Booking a consultation first is always a smart move. It's your chance to sit down with an expert, discuss the look you're going for, and have them assess your unique ear anatomy. They can help you find the absolute perfect spot for your helix, walk you through their stunning collection of implant-grade titanium jewellery, and give you aftercare advice that’s specific to you.
This one-on-one time takes all the guesswork out of the equation. You’ll walk away not just with an amazing new piercing but with the confidence that you know exactly how to look after it.
A professional piercer doesn't just make the hole—they become your guide throughout the entire healing journey. They provide the sterile environment, the correct jewellery, and the expert support you need for a happy, healthy piercing.
So, if you're ready to take the leap, do it with the experts. Whether you’re near London or down on the South Coast, the teams at Timebomb are ready to help. If you'd like to understand more about what makes a great studio, you can read up on our criteria for quality body piercing in Bournemouth and what you should be looking for.
Your path to a beautifully healed helix piercing begins the moment you choose the right studio.
Ready to get started? Visit Piercing Near Me to find your local studio and book your appointment with the trusted professionals at Timebomb Tattoo & Piercing today.
https://piercingnearme.co.uk