
Six weeks is the absolute minimum before changing jewellery in a normally healing earlobe piercing, while cartilage piercings require at least 12 weeks. The genuine green light is a symptom-free piercing with no swelling, crusting or tenderness, rather than just a date on the calendar.
You may be looking at a new stud in the mirror, counting down the days until you can wear a hoop or a different style. That temptation is understandable, but a piercing can look settled on the outside while the channel inside remains fragile. A rushed change can cause bleeding, renewed irritation, or a setback that keeps the jewellery uncomfortable for much longer.
The safest approach is to treat the calendar as a minimum checkpoint, then assess the tissue. Earlobes and cartilage don't heal on the same schedule, and discomfort, heat, discharge or persistent crusting means the piercing isn't ready, whatever the date says.
Healing Timelines for Lobes and Cartilage
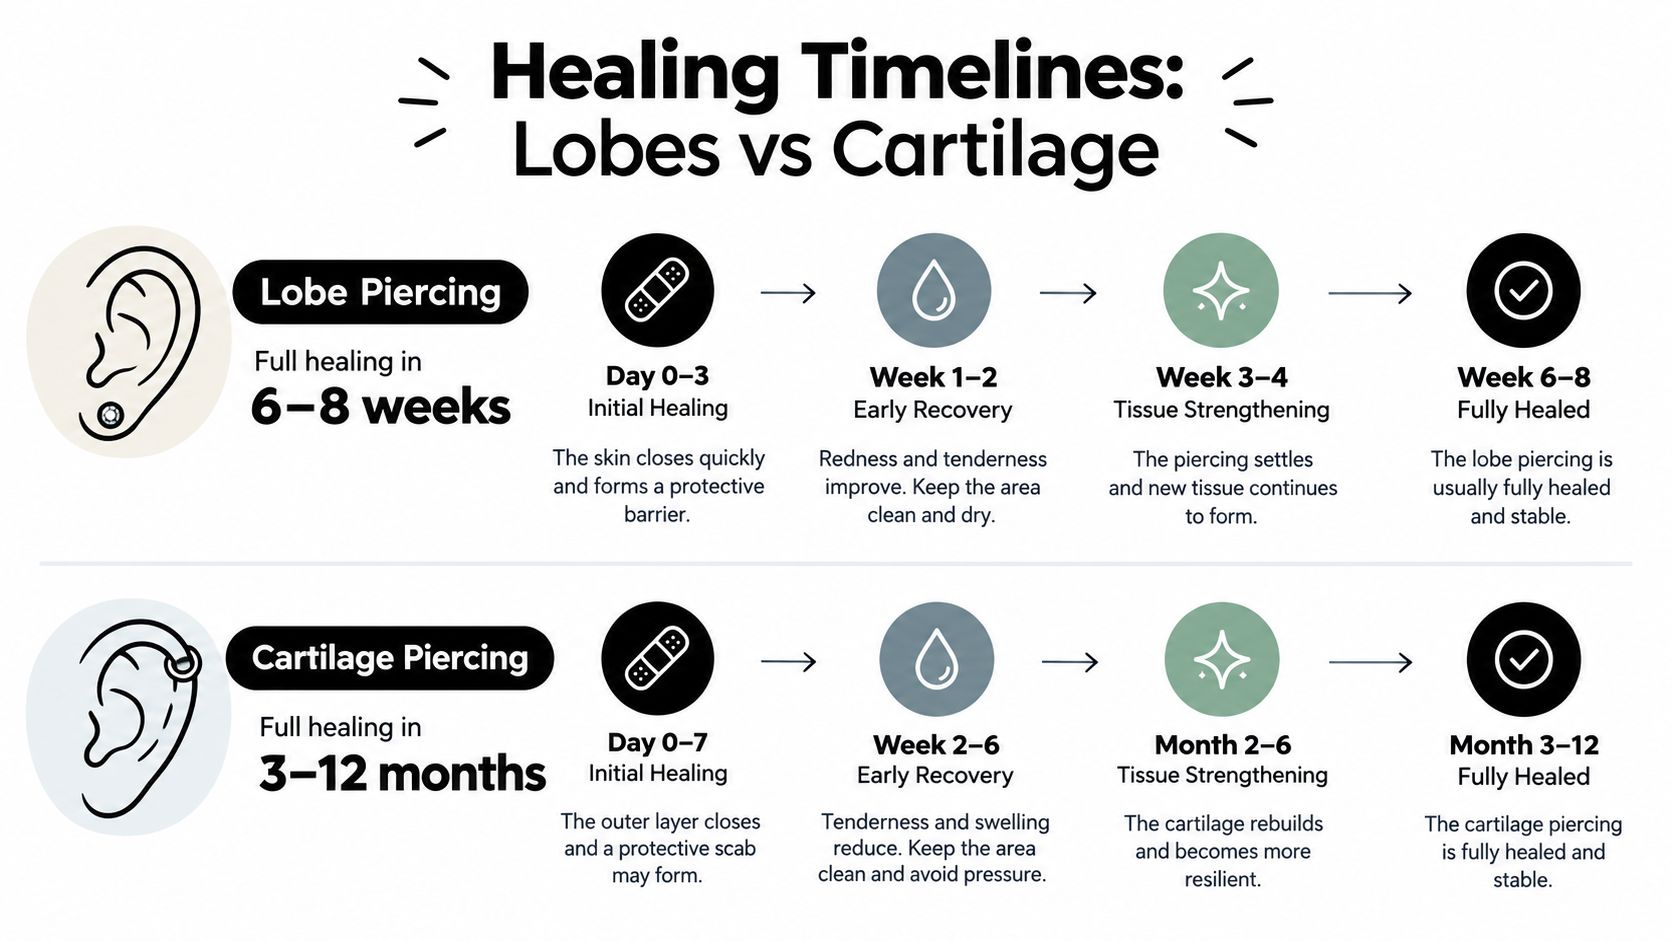
An earlobe is soft tissue with a better blood supply than cartilage, so a straightforward lobe piercing usually settles sooner. Six weeks is the minimum commonly advised period before changing earrings in a normally healed lobe, according to clinical guidance on caring for pierced ears. That doesn't make six weeks a guaranteed finish line. It means the earliest point at which a symptom-free lobe may be considered for a careful change.
Cartilage is less forgiving. Helix, conch, tragus and other upper-ear placements have denser tissue and a slower healing process. A UK ear-piercing service recommends leaving cartilage jewellery in place for at least 12 weeks, while general clinical guidance notes that cartilage healing can take up to a year. A calendar milestone alone can't prove that the deeper channel has matured.
Why cartilage needs more patience
The outside opening may appear calm while the inside remains vulnerable to pressure and friction. Changing a helix or conch too soon can disturb the channel, particularly if the new jewellery is a different gauge, has a sharp edge, or sits at a different angle.
Practical rule: Six weeks can be a minimum for a healthy lobe. It isn't permission to change a sore lobe, and it isn't an appropriate target for a cartilage piercing.
For a closer look at placement-specific recovery, see these ear-piercing healing times. If a cartilage stud feels tight, catches on clothing, or has developed a persistent bump, have a qualified piercer assess it rather than treating the first possible date as a deadline.
Signs Your Piercing Is Ready for a Change
Readiness is physical, not mathematical. Before removing the starter jewellery, check the front and back of the piercing in good light and consider how it feels during ordinary movement and gentle cleaning.
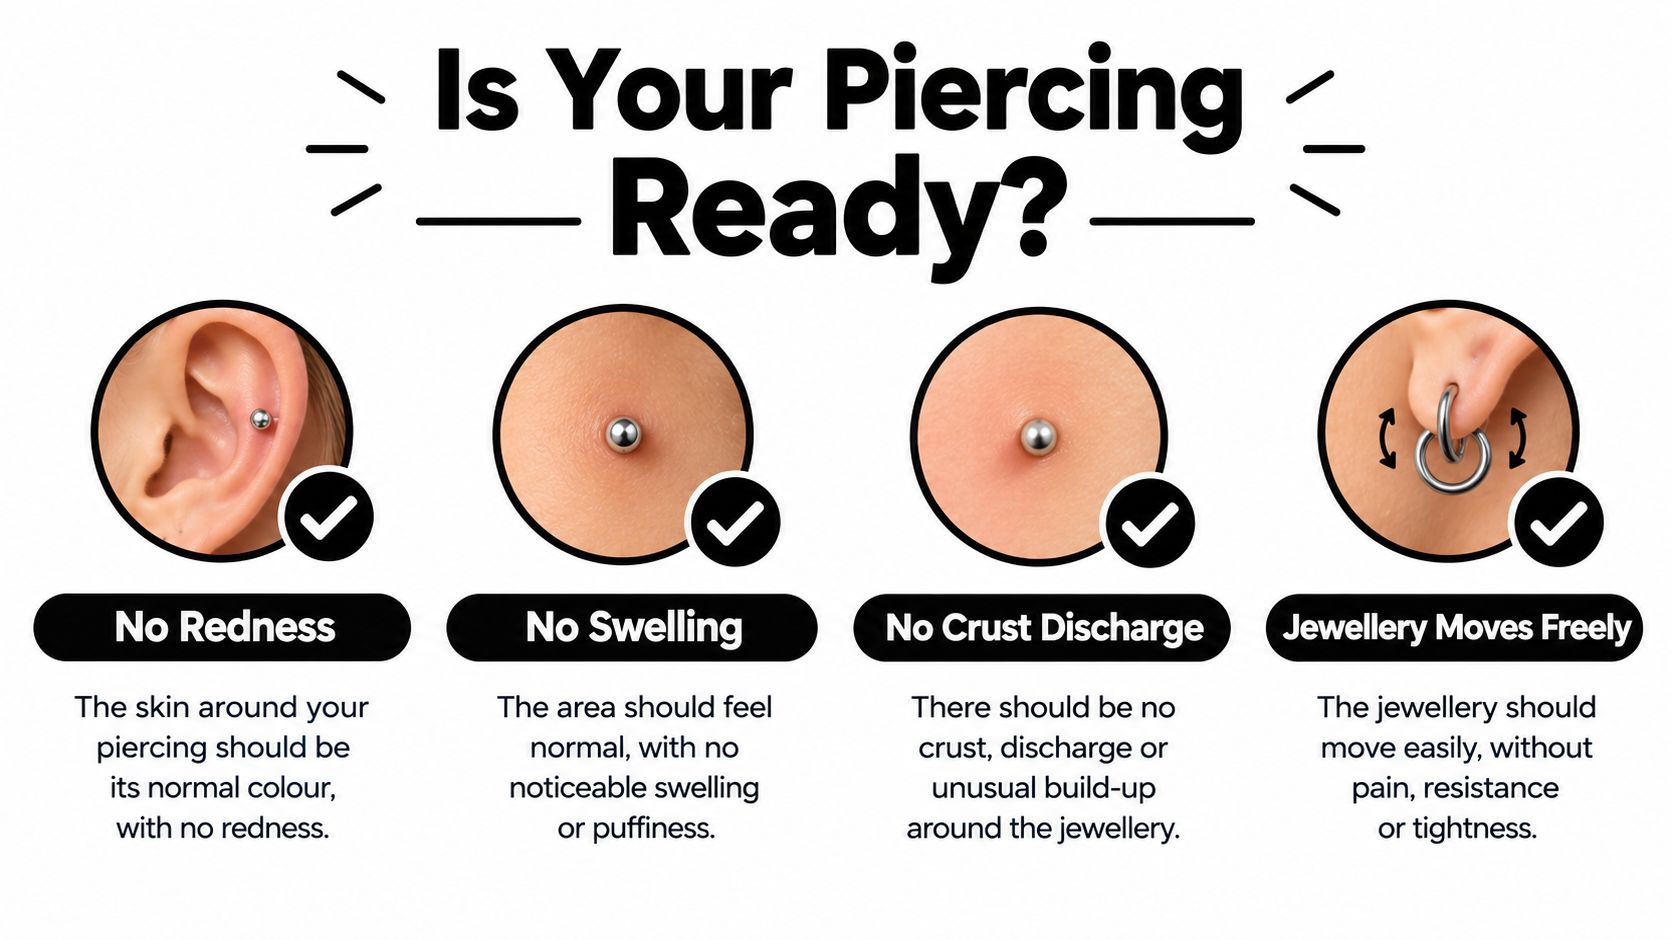
A suitable lobe candidate should have:
- No worsening tenderness: Light awareness can occur during healing, but pain when touched or bumped means the channel may still be fragile.
- No heat or persistent redness: The surrounding skin should look settled rather than increasingly flushed or feel warmer than the other ear.
- No swelling or bleeding: Jewellery shouldn't appear tight, embedded or difficult to move because of pressure from swollen tissue.
- No active discharge: Persistent fluid, pus or heavy crusting isn't a green light. It needs assessment before a jewellery change.
- A calm response to normal care: Cleaning shouldn't trigger fresh bleeding or a sharp, lingering sting.
Crusting needs context
A small amount of dry residue can occur during healing, but repeated crusting alongside tenderness, heat, swelling or redness suggests the tissue is still unsettled. Don't pick it off or rotate dry jewellery to test the piercing. That movement can scrape delicate tissue and create irritation that wasn't present before.
For cartilage, use a stricter standard. Even if the surface looks normal, a professional check is sensible before the first change, especially if the jewellery needs downsizing or feels difficult to remove. If you can't insert replacement jewellery smoothly without force, stop. Resistance is information, not an obstacle to push through.
Choosing Safe Metals for Fresh Channels
The first replacement earring needs to be judged by its composition, not just its appearance. A polished fashion stud may look harmless but still contain nickel, poor-quality plating or an undisclosed alloy that irritates a fresh channel.
Allergy UK explains that nickel allergy can develop after ear piercing and jewellery exposure, producing localised eczema or dermatitis. It lists 18-carat-or-higher gold, solid silver and platinum as usual alternatives. A reaction may appear as itching, an eczematous rash and persistent irritation rather than the heat and escalating pain more associated with infection.
Don't rely on the word hypoallergenic
“Hypoallergenic” isn't a sufficiently precise material specification. Ask what the jewellery is made from and choose a clean, lightweight piece with a biocompatible composition. Implant-grade titanium is often a practical option for a sensitive or recently healed channel, while suitable solid gold can work when its composition is transparent and the jewellery is properly fitted. You can review examples of titanium piercing jewellery before booking a fitting.
Plating also deserves caution. A surface finish can wear, chip or expose a base metal that the buyer didn't realise was present. If irritation begins after a jewellery swap, repeatedly changing styles won't solve the cause. Remove the guesswork by having the material assessed and the jewellery changed professionally if the channel is still reactive.
Material check: Choose transparent composition over vague marketing language. A new style isn't an improvement if the metal keeps the piercing inflamed.
Step by Step Guide to Swapping Jewellery
A first change should be organised before the original earring comes out. Use liquid soap to wash your hands thoroughly, prepare clean replacement jewellery of the correct gauge, and work in a well-lit area where you won't drop small components.
A careful changeover
-
Wash and prepare: Clean your hands with liquid soap, then handle only clean jewellery made from a suitable biocompatible material. Keep the replacement ready before loosening the starter piece.
-
Soften residue: If there is dry discharge around an otherwise settled piercing, use a warm saline compress to soften it. Don't scrape the area or twist jewellery while the skin is dry.
-
Remove gently: Hold the front and backing securely, then release the fastening without pulling the post sideways. Move slowly and keep the jewellery aligned with the existing channel.
-
Insert the replacement: Guide the new post through in the same direction as the original. Don't force or rotate it, and don't use pressure to create a new path through the tissue.
-
Stop at resistance: If the jewellery catches, causes sharp pain or produces bleeding, stop immediately. The UK guidance on body-art and skin-piercing aftercare advises stopping when resistance or bleeding occurs.
A professional piercer can assess the angle, gauge and condition of the channel without turning a difficult change into a traumatic one. Cartilage changes and downsizing are particularly well suited to an in-studio appointment.
Handling Irritation and Suspected Infections
Removing an earring at the first sign of trouble feels intuitive, but it can create a serious problem. If an infected channel closes over while fluid remains inside, discharge may become trapped rather than draining. That risk matters particularly in cartilage, where infection can become more serious.
UK evidence illustrates the concern. A peer-reviewed investigation of a national Pseudomonas aeruginosa outbreak linked to ear piercing identified 162 cases, including confirmed, probable and possible cases. Cartilage piercings accounted for 93% of confirmed cases, and pus discharge was reported in 105 cases, or 92%, in that outbreak report. These figures don't mean every irritated piercing is infected, but they do show why upper-ear symptoms shouldn't be dismissed.
Use a clear triage rule
Leave the jewellery in place unless a doctor tells you to remove it. NHS guidance advises seeking medical help for swelling, pain, heat, marked redness or darkening, blood or pus, or feeling hot, cold, shivery or generally unwell. You can also use this guide to tell if a piercing is infected while deciding whether you need a piercer, a GP or urgent NHS advice.
- Mild irritation: Reduce touching and friction, keep the area clean and dry, and arrange a piercer review if it doesn't settle.
- Increasing symptoms: Contact a healthcare professional, particularly when redness spreads, pain increases, heat develops or discharge appears.
- Urgent concern: Seek urgent medical advice for severe pain, marked swelling, fever, uncontrolled bleeding or a misshapen cartilage ear.
Don't replace jewellery independently when infection is suspected. Medical advice takes priority over preserving a particular style or changing the metal at home.
Professional Aftercare and Studio Support
Good aftercare is deliberately uneventful. Wash your hands before touching the area, keep the jewellery stable, and avoid twisting or turning it while the skin is dry. A warm saline soak or compress can soften discharge, but aggressive cleaning, picking and repeated inspections usually create more irritation than they remove.
The first change is a useful point for professional oversight. A qualified piercer can check whether the post is too long, whether swelling remains, whether the jewellery sits at the correct angle and whether the replacement is appropriate for the channel. That matters even more for cartilage, where surface appearance can be misleading.
When a studio visit makes sense
Book an assessment if the jewellery is tight, embedded, difficult to remove, or impossible to insert smoothly. Professional support is also sensible when you suspect a metal reaction, want to change a cartilage piece, or feel nervous about handling the piercing yourself.
Timebomb Tattoo & Piercing supports clients through its Croydon and Bournemouth studios, with consultations, jewellery selection, changes and aftercare guidance. For appointments or practical advice, call 01202 900050 (Bournemouth) / 020 8686 7730 (Croydon) or message WhatsApp on 07752 913846 (Bournemouth) / 07902 490584 (Croydon).
The safest decision is usually the least dramatic one. Wait when symptoms remain, choose a verified material, and ask a professional to handle the change when the channel doesn't cooperate.
Piercing Near Me helps clients find professional piercing services, suitable jewellery and personalised aftercare for changes in Croydon, Bournemouth and beyond. Visit Piercing Near Me to explore studio options and arrange support before changing your earrings.