
You've saved reference photos, chosen the ear you want pierced, and perhaps even decided that a neat hoop is the finished look. Then your piercer asks you to think about where the conch should sit, not just whether you prefer inner or outer placement. That question matters because the position affects jewellery pressure, cleaning access, sleeping comfort, headphones, masks, and how resilient the piercing will be during healing.
A conch piercing passes through ear cartilage, not soft lobe tissue. UK guidance places cartilage healing in the 3 to 6 month range, while broader clinical guidance commonly extends that to 4 to 12 months, so a conch needs patience even when the surface looks settled. UK cartilage aftercare guidance also explains why pressure and repeated handling can cause problems long after the initial appointment.
Why Conch Piercing Placement Matters More Than You Think
A client may arrive with a saved image showing a small gemstone centred perfectly in someone else's ear. The image looks simple, but the ear in the photograph has its own bowl depth, cartilage thickness, folds, and jewellery angle. If the same mark is copied onto another ear without an anatomical assessment, the result may sit too close to a fold, press against a headphone, or leave too little room for swelling.
That's why conch piercing placement is a safety decision before it's a styling decision. A mark that looks balanced in a mirror must also leave enough tissue for secure jewellery, allow access to clean both sides, and avoid the daily pressure created by hair, glasses, masks, earbuds, or sleep.
Aesthetic rule: The most attractive mark is the one your anatomy can support comfortably.
Cartilage doesn't heal like a lobe. UK local authority guidance gives 6 to 8 weeks as a benchmark for some ear cartilage piercing recovery, but that figure shouldn't be mistaken for complete internal healing. UK public-sector piercing aftercare guidance makes the practical distinction clear: the surface may become calm enough for routine care changes while deeper tissue continues to mature.
A client who sleeps on the pierced side may need a more recessed position or a different ear altogether. Someone who wears over-ear headphones for work may find an inner placement easier to protect, while a person who wants a prominent hoop may need a mark closer to the outer curve. Your routine belongs in the consultation, because placement determines whether the piercing fits your life after the appointment.
Understanding Inner and Outer Conch Anatomy
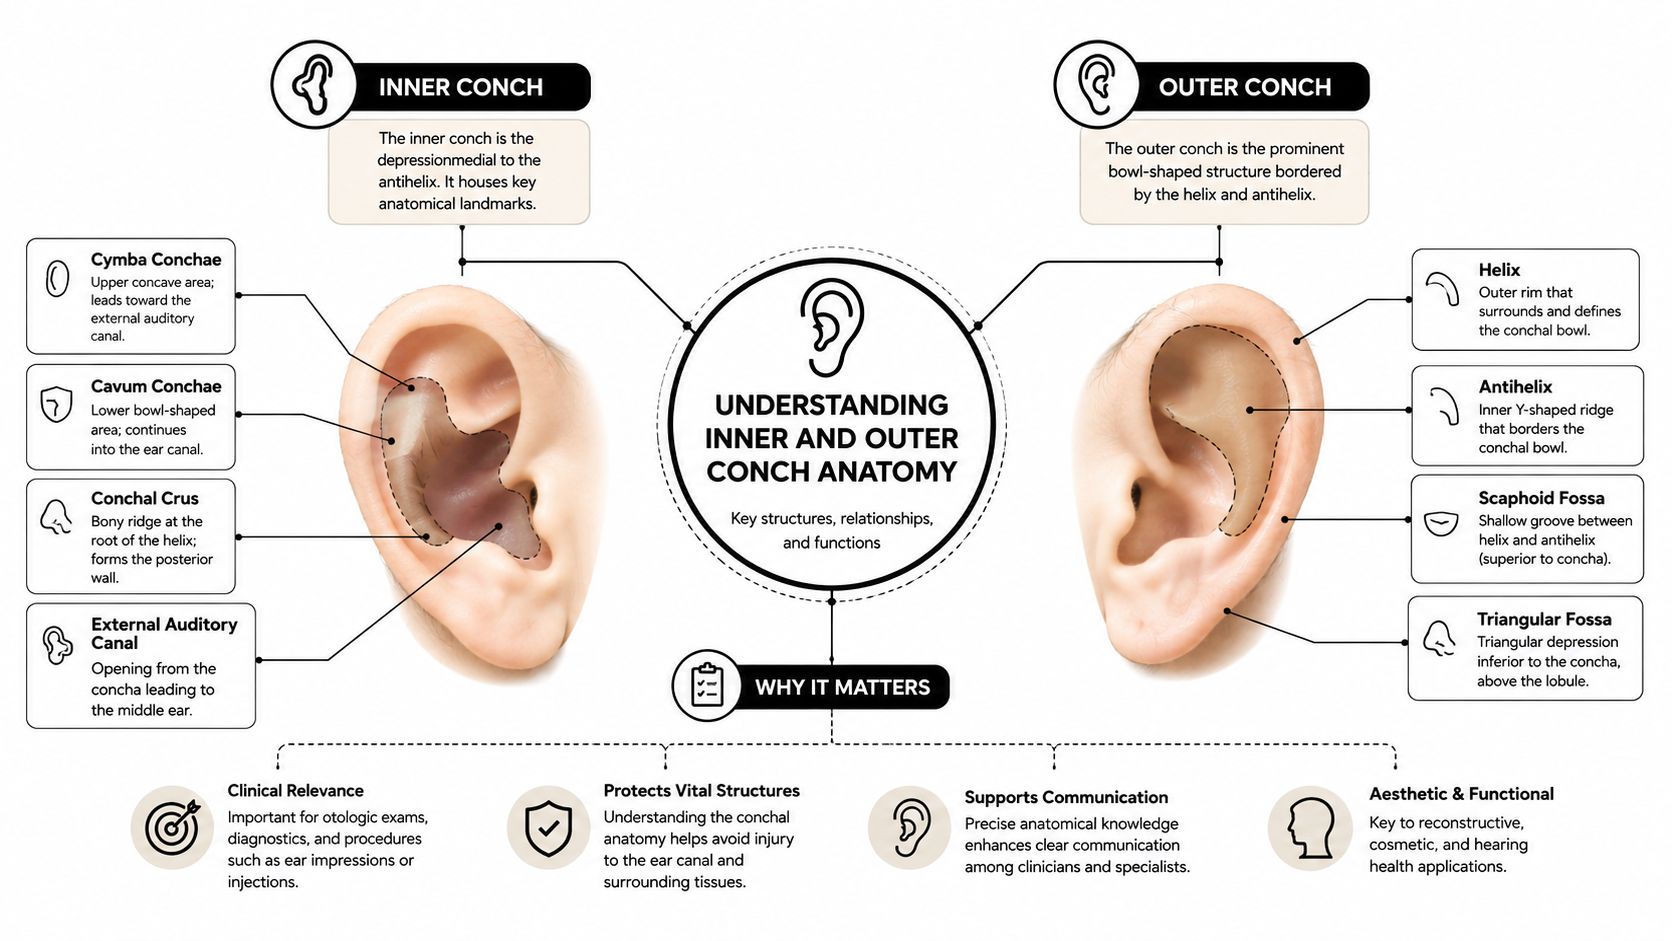
The conch is not a flat, interchangeable surface. It has two distinct zones, and their shape affects where jewellery can sit safely. The inner conch is the deeper bowl nearer the ear canal. The outer conch sits higher, closer to the helix, the ear's outer rim.
Inner conch structure
You can feel the inner conch by pressing gently into the centre of the ear. It is the recessed bowl that partly reduces sound. This area often offers a broad, stable cartilage surface for a flat-back stud. From straight on, the jewellery may look slightly tucked away, although its visibility depends on your ear's contours and the angle selected.
The bowl can shelter a low-profile backing, much like a fitting that sits within a recess rather than projecting from an outer edge. That does not remove contact risks. Earbuds, hair, and headphones may still press against the jewellery, so your piercer should assess those points before marking.
Outer conch structure
The outer conch follows the flatter ridge above the bowl and below the helix. Its position is usually more visible from the front and side, but photographs can hide important differences. The cartilage may be curved, thick, or too narrow for a stable placement.
Some ears do not have a suitable outer ridge. UK National Occupational Standards state that upper flat cartilage can be pierced safely and hygienically when the ear shape permits it and pre-sterilised jewellery is used. UK ear-piercing occupational standards support choosing placement from anatomy rather than copying a jewellery photograph.
Your piercer will check the available flat space, cartilage density, curvature, and nearby folds. They will also consider how the position may interact with headphones, masks, glasses, and sleeping pressure. A surface that looks generous on one ear may be too narrow or sharply curved on another.
Comparing Inner vs Outer Conch Placement Options
A client who sleeps on one side, wears headphones daily, or adjusts a face mask often learns quickly that conch placement is a practical decision as much as a visual one. The mark needs enough clearance for swelling, suitable jewellery, and the pressure points created by normal routines.
An inner position may keep a small stud visually contained within the bowl. An outer position may show the jewellery more clearly along the ridge. Those descriptions are only a starting point, because the safest option depends on the ear's shape and the direction the jewellery would take through the cartilage.
Choose by routine, not by photograph
For inner placement, ask whether the bowl leaves room for the backing without pressing into a fold. Check whether earbuds or over-ear headphone cushions would sit against the area. A recessed position can reduce some knocks, but it does not make the piercing protected from pressure.
For outer placement, assess whether the ridge is broad and stable enough for the chosen jewellery. A sharply curved or narrow ridge can make the post sit under uneven pressure. Hair, mask straps, glasses arms, and headphone edges may also catch more readily when the mark sits closer to the ear's outside contour.
The same accessory can affect each position differently. Over-ear headphones may clear an inner mark but press on an outer one. Sleeping pressure depends on the exact spot, not the label “inner” or “outer”. Your piercer should test these contact points during marking, rather than relying on a standard diagram.
The position also guides jewellery planning. A discreet flat-back stud may suit a deeper bowl, while a visible outer mark may need a low-profile design that follows the ridge without being pulled sideways. Hoops should not be chosen just because they look attractive in a reference photograph. Their curve and movement must suit the healed channel and surrounding anatomy.
Healing is still a cartilage process in either location. During the early period, pressure, swimming, and frequent handling can disturb the piercing. The UK cartilage piercing aftercare guide explains these common restrictions and the need to protect the area while it settles.
Bring your everyday items to the consultation if possible, or describe how they sit against your ear. The most useful question is: which mark gives the jewellery enough room while creating the fewest conflicts with sleeping, headphones, masks, and glasses? That answer may differ between your two ears, and it may not match the placement shown in a jewellery photograph.
How Placement Affects Jewellery Safety and Comfort
Jewellery has to fit the piercing's depth, angle, swelling pattern, and surrounding contours. A flat-back labret may be an excellent starter style in one inner conch, yet a post that's too short or a backing that presses into a fold can create persistent irritation in another ear.
A professional won't choose a post by appearance alone. The initial length needs to allow for expected swelling without leaving excessive excess that catches on hair or clothing. Once swelling has reduced and the tissue is ready, a piercer may recommend downsizing. That decision should be based on the piercing's condition, not a calendar reminder.
Material is part of the safety decision
The UKAPP states that initial jewellery should be implant-grade titanium meeting ASTM F136 or F1295, or implant-grade steel meeting ASTM F138. UKAPP jewellery verification guidance makes material verification a practical concern, not a luxury preference.
Wales licensing rules also identify suitable body-piercing jewellery materials, including surgical stainless steel, gold, niobium, titanium, platinum, and dense low-porosity plastic. This supports a straightforward consultation question: ask what the jewellery is made from and how the studio verifies its grade.
Match the profile to your routine
Low-profile jewellery can reduce snagging, but “low profile” must not mean “compressed”. A backing that digs into the bowl, or a hoop that pulls against a curved channel, can create pressure and repeated trauma. Consider your most frequent contact points:
- Headphones: Cushion edges and earbud tips can press directly on a conch mark.
- Masks: Loops may catch outer jewellery while being removed.
- Glasses: Arms can brush an outer placement or its decorative attachment.
- Sleep: Side pressure can irritate either placement, especially with a protruding ring.
- Hair: Long hair and styling products can pull on exposed jewellery or cling around the post.
If you're considering a ring later, the initial placement must allow the ring to follow a natural path without pulling the channel sideways. You can explore the styling differences in this conch hoop piercing guide, but a healed appearance shouldn't dictate an unsafe starter position.
What to Expect During Your Consultation and Marking
A good consultation should feel measured, not rushed. You'll normally discuss which ear you prefer, your intended jewellery, sleeping habits, headphones, glasses, masks, work equipment, and any previous piercing or ear surgery that could affect the available tissue.
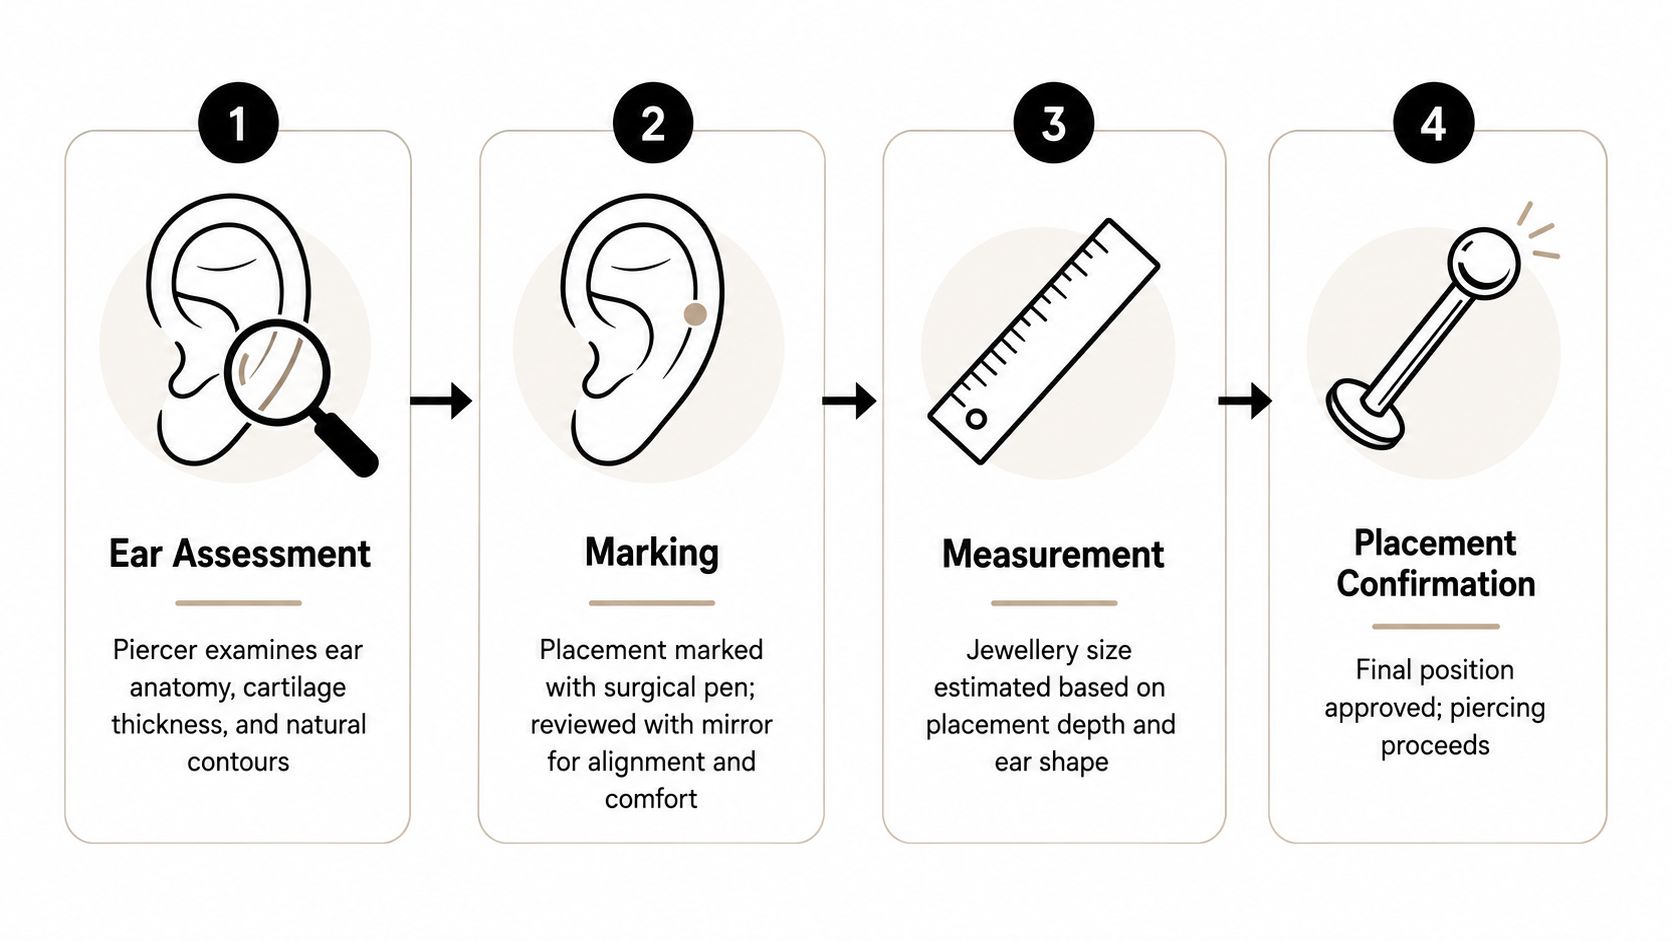
The ear assessment
The piercer examines the bowl and outer ridge from several angles. They're checking cartilage thickness, natural contours, nearby folds, the distance from the ear canal, and whether the jewellery can sit without pressing against another structure.
A placement may be declined if the cartilage is too thin, the curve is too pronounced, or the proposed mark leaves poor cleaning access. That refusal protects the piercing from pressure, migration, prolonged irritation, and an awkward healing angle.
Marking and measurement
The piercer marks the proposed entry and exit points with a suitable surgical pen, then asks you to inspect the position in a mirror. Look while your ear is relaxed, and consider how it appears from the front, side, and at rest. This is the moment to request a small adjustment.
The angle matters because the jewellery should pass through the tissue cleanly and allow the front and back ends to sit naturally. The post also needs room for swelling at first, without being so long that it constantly catches.
You should approve the final mark before the piercing begins. If you're looking for a professional consultation in your area, you can use this conch piercing appointment guide to prepare questions about anatomy, jewellery, and aftercare.
Healing Timelines and Cartilage Infection Risks
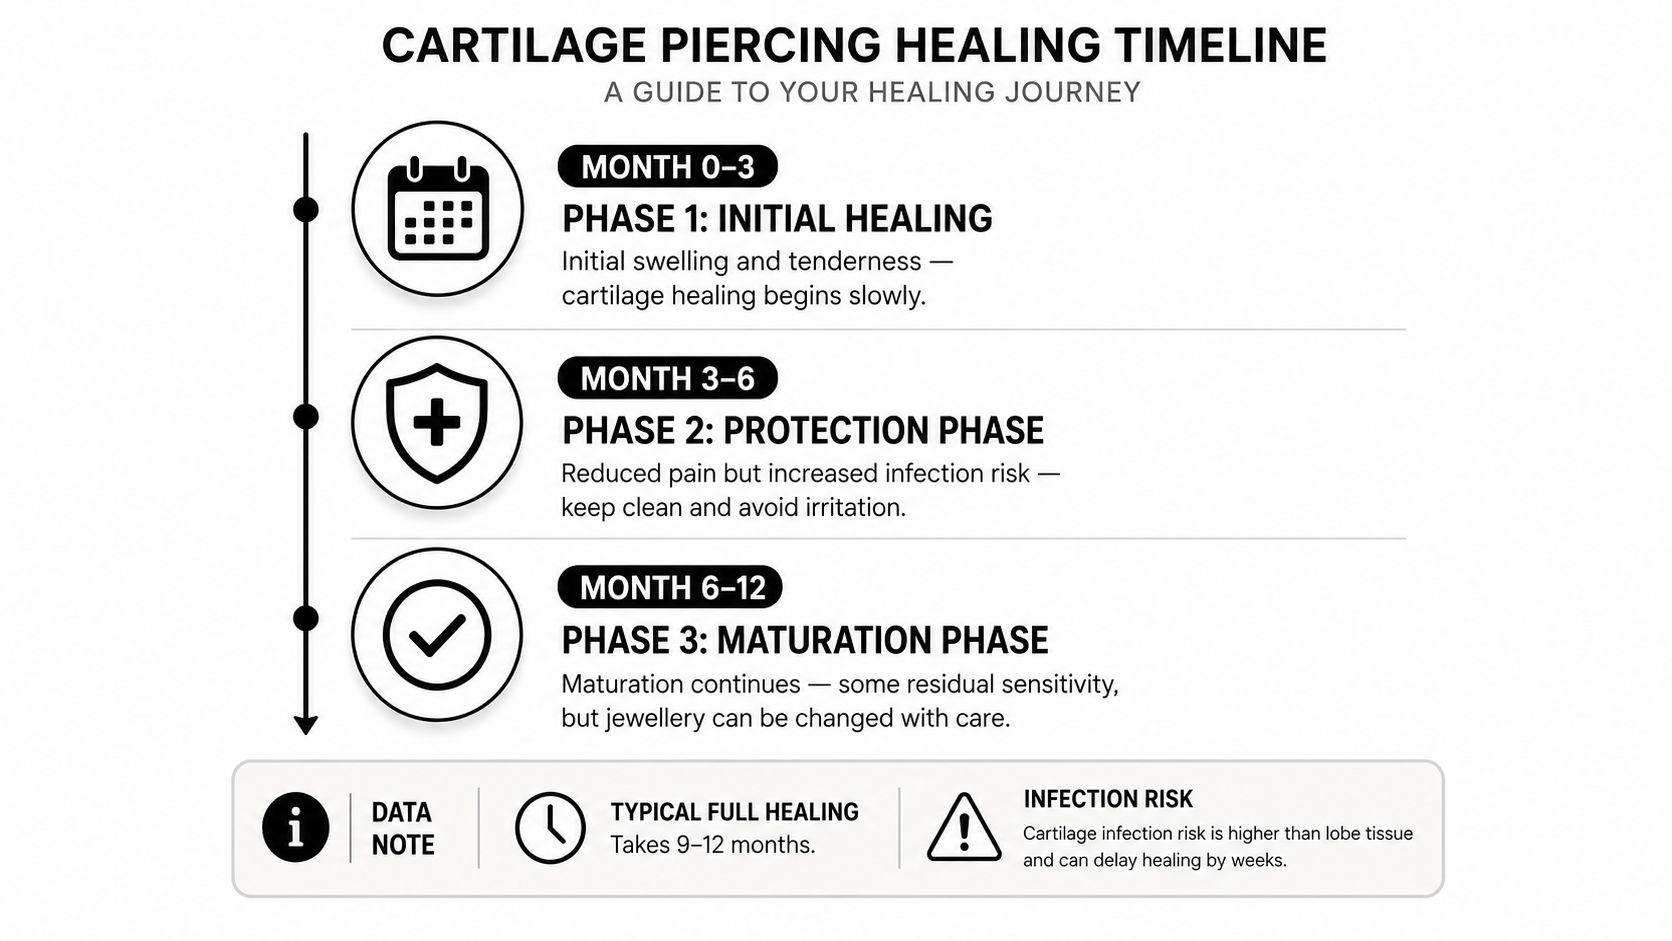
A conch can feel comfortable before it is fully healed. Cartilage has less direct blood supply than soft lobe tissue, so the deeper channel strengthens slowly and may become tender again after an apparently settled period.
UK-facing guidance commonly gives cartilage a healing range of 3 to 6 months, while broader clinical guidance places it at 4 to 12 months. This cartilage piercing healing timeline explains why a conch may remain vulnerable after visible redness and tenderness have faded.
The 6 to 8 week timeframe found in some UK public-sector guidance is better treated as an early recovery reference. It does not confirm complete internal stability. The channel can look calm while deeper tissue still reacts to pressure, jewellery changes, or accidental knocks.
Irritation and infection need different responses
Mild tenderness, limited swelling, light redness around the channel, and small amounts of clear or pale dried fluid can occur during normal healing. Repeated touching, twisting, over-cleaning, snagging, and sleeping directly on the jewellery can keep irritation active.
Arrange medical advice if symptoms worsen instead of settling. Spreading redness, increasing heat or pain, escalating swelling, or pus needs prompt attention. The NHS advice on infected piercings recommends holding a pad soaked in warm water against an infected piercing once a day and contacting a clinician when symptoms worsen.
Cartilage infections require particular care because they can affect the tissue covering the ear cartilage. UK government guidance describes perichondritis and identifies Pseudomonas aeruginosa as a common cause. Read the UK government guidance on piercing-associated perichondritis if the ear becomes increasingly painful, hot, swollen, or visibly inflamed.
A UKHSA England survey recorded complications in 31.0% of piercings among people aged 16 to 24. Professional help was sought in 15.2%, and hospital admission occurred in 0.9%. The UKHSA survey on body piercing complications provides that context. Conch tissue is cartilage, so pressure from sleeping, headphones, masks, or unsuitable jewellery can make a developing channel less resilient.
Aftercare Routine for a Healthy Conch Piercing
Good aftercare is deliberately uneventful. Your aim is to remove surface build-up without turning the jewellery into a handle that you move throughout the day.
Clean gently and consistently
UK cartilage-aftercare guidance commonly recommends a twice-daily sterile saline routine, cleaning both the front and back before drying carefully with disposable paper towel or non-woven gauze. Conch aftercare guidance from Torbay Council advises against twisting the jewellery and warns that over-cleaning can increase tissue trauma.
Use sterile wound-wash saline, apply it without forcing the jewellery back and forth, and let softened crusting release naturally. Don't pick at firmly attached material, and don't add harsh household antiseptics unless a healthcare professional tells you to.
Protect the channel from daily pressure
- Sleep: Avoid direct pressure on the pierced ear. A travel pillow can create an opening for the ear, although you'll still need to keep the cover clean.
- Hair and skincare: Keep hair products, creams, oils, and make-up away from the channel. Tie hair back when it repeatedly catches.
- Headphones: Avoid earbuds while the piercing is healing if they press or rub the site. Clean headphone surfaces and ask your piercer about over-ear fit.
- Masks and helmets: Put on and remove straps slowly so they don't hook the jewellery. If protective equipment presses on the mark, discuss alternatives before piercing.
- Hands: Wash your hands before any necessary contact, then leave the jewellery alone.
Downsizing can improve comfort once swelling has reduced, but only a piercer should decide when the post is ready to change. Replacing jewellery too early can injure the channel, while leaving an unnecessarily long post may increase snagging and movement.
Deciding If a Conch Piercing Is Right for You
Start with anatomy. Some ears have a broad inner bowl but no suitable outer ridge, while others may have curvature or folds that make a particular mark impractical. A photograph or online placement filter can't confirm tissue thickness, angle, or jewellery clearance, so an in-person assessment remains the reliable way to judge suitability.
Next, test the idea against your routine:
- Healing commitment: Are you prepared for cartilage healing to continue for several months, potentially within the 4 to 12 month clinical range described in broader cartilage guidance?
- Sleep: Can you avoid direct pressure on that ear?
- Accessories: Will headphones, masks, glasses, helmets, or hair regularly touch the mark?
- Jewellery: Are you comfortable beginning with verified implant-grade jewellery rather than choosing a ring solely for the finished photograph?
- Follow-up: Can you return for an assessment if swelling, pressure, or jewellery length needs attention?
Inner placement may offer a more sheltered home for a stud, while outer placement can create stronger visibility when the ridge supports it. Neither should override safe tissue, sensible jewellery clearance, or your ability to protect the area.
Choose a studio that can explain its marking process, jewellery material, sterile technique, and aftercare in plain language. A calm consultation is a positive sign. You should be able to ask for a different mark, understand why a placement is refused, and leave without feeling pressured to proceed.
If you're ready to discuss your ear shape and daily habits, contact Piercing Near Me on 01202 900050 (Bournemouth) / 020 8686 7730 (Croydon) or WhatsApp 07752 913846 (Bournemouth) / 07902 490584 (Croydon). For consultations and professional placement advice in Croydon or Bournemouth, visit Piercing Near Me and arrange a conversation before choosing your jewellery.
Trackbacks/Pingbacks