So, you’ve just left the studio with your new piercing—the excitement is real. But what you do from this moment on is what truly counts. The absolute golden rule is to start a simple cleaning routine right away: twice daily with a sterile saline solution. That’s it. This one habit is the bedrock of a happy, healthy piercing.
The Fundamentals of Piercing Aftercare
Proper aftercare is your best defence against infection and your ticket to a piercing that heals without a hitch. Here at Timebomb Tattoo & Piercing, we stick to what works. Forget the myths and complicated potions; successful healing is all about using the right solution, consistently.
Your mission is to keep the piercing clean without irritating the delicate healing tissue. This means no harsh chemicals, no fiddling, and sticking to your cleaning schedule. Honestly, getting this right from day one makes all the difference. We see it all the time—improper aftercare is the number one reason things go wrong. In fact, a UK survey revealed that 31% of piercings in 16-24-year-olds resulted in complications, with many needing medical attention.
Quick Aftercare Dos and Don'ts
To cut through the noise, we've put together a quick cheat sheet. These are the non-negotiables for those first crucial weeks.
| Action | Why It's Important |
|---|---|
| DO use a sterile saline spray. | It's perfectly balanced for your body and won't damage healing skin like harsh soaps or alcohol. |
| DON'T twist or turn your jewellery. | This just tears the delicate healing channel (the fistula) and drags in bacteria. Leave it be! |
| DO pat the area completely dry. | Dampness is a breeding ground for bacteria. A gentle pat with a clean paper towel is essential. |
| DON'T use cotton wool or buds. | Their tiny fibres love to snag on jewellery and get trapped in the piercing, causing major irritation. |
Nailing these basics will help you feel confident you're doing everything right. If you're wondering how long this all takes, you might find our guide on ear piercing healing times helpful for setting realistic expectations.
Your Daily Piercing Cleaning Routine
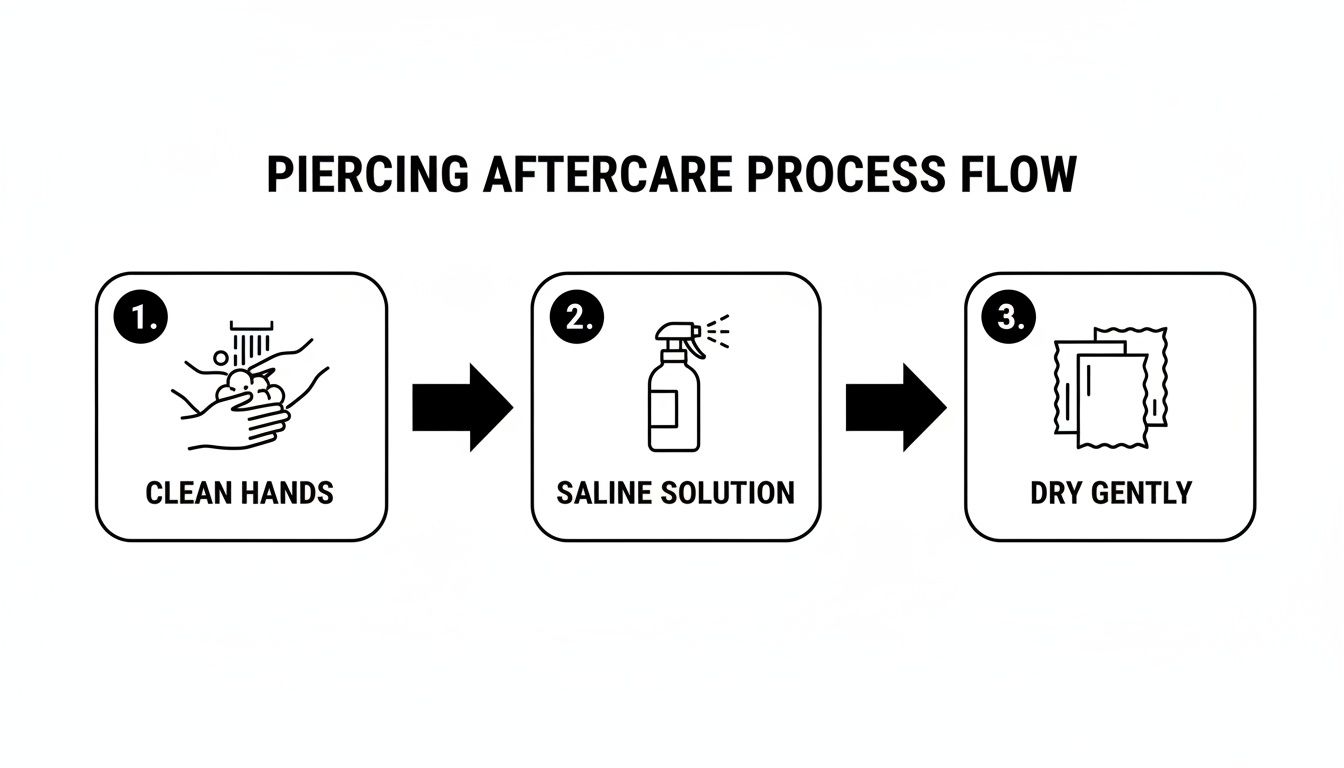
Alright, let's get down to what you’ll actually be doing every day. Getting the cleaning routine right from day one is the single most important thing you can do to make sure your new piercing heals without a hitch. It’s all about consistency and being gentle.
Think of it less like "cleaning a wound" and more like tidying up. You're simply clearing away the natural buildup so your body can focus on what it does best: healing. Follow this simple process twice a day, and you'll be giving your piercing the perfect environment to thrive.
This is the exact routine we give to every client who walks out of our studios. But remember, if you’re ever worried or just need a bit of reassurance, give our Bournemouth team a ring on 01202 9000 50. We’re always here to help.
First Things First: Clean Hands
Before you go anywhere near your new piercing, you need to wash your hands. Seriously. This is non-negotiable. Your hands are covered in germs, and a fresh piercing is an open door for infection.
Scrub your hands thoroughly with antibacterial soap and warm water for at least 20 seconds. Get in between your fingers, on the backs of your hands, and under your nails. When you're done, dry them off with a clean paper towel, not a shared hand towel.
The Saline Soak: Your Piercing’s Best Friend
You'll notice some dried fluid, or 'crusties', forming around your jewellery. This is just dried lymph fluid and is a totally normal part of healing. The goal is to soften this buildup so it comes away easily, without you having to pick or force it, which can damage the delicate new tissue.
A sterile saline solution is the perfect tool for the job. While pre-made sprays are super convenient, mixing your own is easy.
Just dissolve 1/4 teaspoon of non-iodised sea salt into 250ml (about a mugful) of boiled water that's cooled down enough to be comfortably warm.
- Grab a piece of non-woven gauze or a sturdy paper towel and soak it in your warm saline solution. Don't use cotton wool or buds! Their tiny fibres can get caught on the jewellery and work their way into the piercing, causing major irritation.
- Gently press the saturated gauze against the piercing, making sure you cover both the entry and exit holes. Hold it there for 2-5 minutes. This warm compress does all the hard work for you, softening any crusties.
- Once everything has softened up, use a fresh piece of saline-dampened gauze to gently wipe away any loose bits. If something doesn't wipe away with a gentle touch, it's not ready to come off. Leave it for your next clean.
To get the full picture on why saline is so effective, have a look at our detailed guide on using saline spray for your piercing. It's packed with extra tips.
Don't Forget to Dry It
This is the step everyone forgets, but it’s so important. A damp piercing is a breeding ground for bacteria, which can derail your healing process fast.
After cleaning, take a fresh, clean piece of paper towel and gently pat the area completely dry. Be thorough and make sure no moisture is left behind, especially around the jewellery itself. For piercings in awkward spots, a quick blast with a hairdryer on the cool setting can be a great, touch-free way to make sure it's perfectly dry.
Expert Tip: Between cleanings, your mantra is "LITHA" – Leave It The Heck Alone. Other than your twice-daily cleans, don't touch, twist, or fiddle with your jewellery. Your body is doing the healing; your job is just to keep things clean and then stay out of the way.
It really is that simple. Clean hands, a gentle saline soak, and a proper dry. That's the foundation of happy healing.
If you're ever second-guessing yourself or something doesn't feel right, don't just hope for the best. Ping us a picture or a question on WhatsApp at 07752913846, and one of our piercers will get back to you with advice.
How Aftercare Changes for Different Piercings

While the golden rule of cleaning—a gentle saline clean, twice a day—applies to almost every new piercing, where that piercing is on your body changes the game entirely. Think about it: a navel piercing faces totally different daily challenges than a nostril stud, and a delicate helix piercing needs a unique kind of TLC compared to a classic lobe.
The way you sleep, the clothes you wear, and even your daily skincare routine can all impact how well your piercing heals. Understanding these nuances is the key to avoiding frustration, irritation, and potential complications. Let's walk through the specifics for some of the most common placements.
Earlobes vs. Cartilage Piercings
We see it all the time—people assume all ear piercings are created equal. They’re not. There’s a world of difference between healing the soft, fleshy lobe and the tough, unforgiving cartilage.
Lobe Piercings: These are generally the easiest and quickest to heal. Thanks to great blood supply, you can expect them to be settled in about 6-8 weeks. The main hurdles are simple mechanics: catching them on jumpers, tangling them in your hair, or pressing on them with your phone. A little awareness goes a long way.
Cartilage Piercings (Helix, Tragus, Conch, etc.): This is where patience becomes a virtue. Cartilage has very little blood flow, which means healing is a marathon, not a sprint. We're talking 6-12 months, sometimes even longer, for it to fully mature. This slow timeline makes it much more prone to getting upset.
- The Infamous Bump: Cartilage is notorious for developing those pesky irritation bumps. Nine times out of ten, these aren't infections; they’re your piercing's way of telling you it's annoyed by pressure, being knocked about, or incorrect cleaning.
- Your New Best Friend: A Travel Pillow: The number one culprit for angry cartilage is sleeping on it. Consistent pressure can literally change the angle of the jewellery and cause major swelling. The fix? A travel pillow. Sleep with your ear in the hole, and your piercing will thank you for it.
- Stay the Course: Don't get disheartened if your cartilage seems moody. It’s normal. Just stick with consistent, gentle aftercare, and you’ll get there.
For anyone with a new helix, it’s worth getting into the nitty-gritty. We break it down even further in our specific guide on aftercare for helix piercings.
Facial Piercings
Facial piercings are front and centre, which means they're exposed to everything—your hands, your makeup, the elements. Diligence is everything.
Nostril and Septum Piercings: Your nose is a surprisingly active place. Every smile, sneeze, or bout of hay fever can affect your new jewellery.
- The Makeup Minefield: This is a big one. Please, do not put foundation, powder, or concealer over or right next to a new nostril piercing. It's a surefire way to clog the healing channel (the fistula), trap bacteria, and invite infection. Always clean your piercing after you’ve done your makeup, maintaining a small, product-free circle around the jewellery.
- Navigating a Cold: If you have to blow your nose, be gentle. Afterwards, a quick spritz with your saline spray is a great idea to wash away any lingering germs and soothe the area.
- Septum Specifics: Septums have a reputation for being an "easy heal" because they're tucked away inside your nose. While often true, you still need to be mindful of bumping or snagging the jewellery when washing your face or pulling a shirt over your head.
A non-negotiable tip for any new facial piercing: Change your pillowcase every night or two. They are a breeding ground for oils, skincare residue, and bacteria—all things you want to keep far away from a healing wound.
Body Piercings
Body piercings spend most of their time hidden under clothes, which brings a whole different set of problems, mainly friction and moisture.
Navel Piercings: The arch-nemesis of a healing navel piercing? Your waistband. The constant rubbing and pressure from high-waisted jeans, belts, and tight tops can cause serious irritation and even lead to migration, where the piercing shifts from its original spot.
- Wardrobe Adjustments: For the entire healing period, think low-rise bottoms and looser-fitting tops. Anything that puts direct pressure on the area is off-limits.
- Sweat and Exercise: Hit the gym? Make sure you clean your piercing straight after. Trapped sweat is a playground for bacteria. A quick saline rinse is all it takes.
- The Moisture Trap: The belly button is a perfect little nook for trapping dampness. After every clean and shower, you must get the area completely dry. Pat gently with a clean paper towel, but the real pro-tip is a quick blast with a hairdryer on the cool setting to get it bone dry.
Dermal Piercings: These single-point piercings have no exit hole; the base sits anchored beneath the skin. This makes them incredibly easy to catch and snag. Towels, loofahs, and even loose-knit jumpers are potential threats. For the first few weeks, consider covering it with a small, breathable plaster while you sleep or during sports to give it a fighting chance.
If you ever feel lost or unsure about your aftercare routine, don't just guess. Our piercers have seen it all and are here to help. You can call our studio at 01202 9000 50 or drop us a message on WhatsApp at 07752913846 for advice tailored to you.
What to Do When Your Piercing Feels Wrong

It’s completely understandable to feel a bit of panic when your new piercing looks red or feels tender. Every little twinge can feel like a massive red flag, sending you straight to Dr. Google. But the most important thing is to stay calm and learn to spot the difference between normal healing and a genuine problem.
For the first few weeks, expect your piercing to be a bit fussy. That’s totally normal. You’ll likely see some localised tenderness, a bit of swelling, and maybe some itching as the skin heals. You’ll also definitely see the infamous 'crusties'—that clear or whitish fluid that dries around your jewellery. This isn't pus; it’s lymph fluid, a perfectly healthy sign your body is doing its job.
Your body is also brilliant at letting you know when something is actually wrong. Knowing the difference between standard irritation and a true infection is the most valuable skill you can learn in piercing aftercare. It helps you react properly without making things worse.
Is It Irritation or Infection?
First things first, you need to play detective. The vast majority of piercing "problems" we see are just simple irritation. This is often caused by something physical, like accidentally sleeping on it, snagging it on your jumper, or using the wrong aftercare product. An infection, on the other hand, is a bacterial issue and comes with much more aggressive symptoms.
Let’s break down what to look for.
- Normal Healing: Expect mild redness right around the piercing, slight swelling that might come and go, and those clear or whitish crusties. The area might be tender if you knock it, but the pain shouldn't be constant or severe.
- Irritation: The redness might be more obvious, and you could see a small, angry-looking bump form near the piercing hole (we call this an irritation bump). It can be quite sore, but any discharge will still be clear or white. The culprit is almost always physical—too much pressure, friction, or a snag.
- Infection: This is a whole different ball game. Look for widespread redness that radiates out from the piercing site, significant and painful swelling, and the area feeling hot to the touch. The dead giveaway is the discharge: it will probably be thick, opaque, and yellow or green in colour, and may even have a foul odour.
If your symptoms are ticking the infection boxes, it's time to act—but not to panic.
Crucial Safety Warning: If you suspect an infection, NEVER remove the jewellery. Taking it out can cause the piercing channel to close, trapping the infection inside. This can lead to a much more serious and painful abscess.
When You Spot a Red Flag
If it looks more like an infection than just a bit of irritation, the first step is to seek professional advice. Don't fall for risky DIY remedies you find online. We’ve seen it all—crushed aspirin paste, tea tree oil, harsh antiseptics like TCP. These things can cause chemical burns and severe irritation, making the problem ten times worse.
Instead, stick to the basics. Gently continue your sterile saline soaks twice a day. This helps clean the area and encourages drainage, which is exactly what you want when you’re trying to clear out bacteria.
Your next move should be to get a professional opinion. Your piercer is your best first port of call. With thousands of healing piercings under our belts, we can usually identify the issue immediately and give you a clear plan. We'll help you figure out if it’s a simple fix or if it's time to see a doctor.
If you’re ever worried, please don't wait. Give our studio a call at 01202 9000 50 or send a clear photo of the piercing to our WhatsApp at 07752913846. Our team can take a look and give you immediate guidance.
For severe symptoms like a fever or red lines streaking away from the piercing, you should contact your GP straight away, as you may need antibiotics. But always keep us in the loop so we can help manage the jewellery and support your healing alongside any medical treatment.
Common Aftercare Mistakes to Avoid
Knowing the right way to clean your new piercing is only half the battle. Just as important is knowing what not to do, because some of the most common habits can actually do more harm than good.
Think of these less as rules and more as hard-won advice from our years of experience. We've seen what works and what really, really doesn't. Avoiding these classic mistakes is your fastest route to a happy, perfectly healed piercing.
Over-Cleaning and Using Harsh Chemicals
It’s a tempting thought: "If I clean it more often, it'll heal faster, right?" Wrong. This is probably the biggest myth we have to bust. Cleaning more than twice a day strips your skin of its natural oils, leaving the area dry, red, and irritated. Your body knows how to heal; constant interference just slows it down.
Even worse than cleaning too often is using the wrong stuff. Please, step away from the old-fashioned remedies you might find on Google. They cause far more problems than they solve.
- Alcohol and Hydrogen Peroxide: These are far too aggressive. They don't just kill bad bacteria; they destroy the fragile new skin cells your body is working so hard to build. Using them is like hitting the reset button on your healing every single time.
- Antibacterial Soaps and Scented Products: Most of these are loaded with harsh chemicals, dyes, and fragrances that can trigger irritation or even allergic reactions. They also tend to leave a residue that can clog up the piercing.
- Ointments (like Savlon or Vaseline): These thick creams essentially suffocate your piercing. They create a seal that traps moisture and bacteria, which is the last thing you want. A healing piercing needs to breathe.
The bottom line? Stick to sterile saline solution. It’s perfectly balanced to clean the area without causing damage. There's simply no need for anything stronger.
The Myth of Twisting Your Jewellery
For generations, the advice has been to twist your jewellery to stop it from getting "stuck." This is completely outdated and actively harmful. Your body is forming a delicate new skin tube (called a fistula) through the piercing. Every time you twist the jewellery, you’re tearing that fragile tissue.
It’s the piercing equivalent of picking a scab—it causes trauma, delays healing, and can drag bacteria from the outside straight into the wound. Trust us, your jewellery won't get stuck. Just gently clean away any 'crusties' and then leave it the heck alone.
Other Common Healing Blunders
Your daily cleaning routine is crucial, but so are your general habits. A few wrong moves can easily derail an otherwise perfect healing process.
Changing Jewellery Too Soon
After a few weeks, your piercing might look and feel pretty good on the outside. Don't be fooled. The tissue on the inside takes much longer to strengthen and mature. Swapping out your jewellery before it's fully healed can tear the fistula, introduce bacteria, and set you back weeks. Wait the full healing time we recommended, and when in doubt, book a check-up with us first.
Swimming in Untested Waters
Public swimming pools, hot tubs, lakes, and the ocean are basically a soup of bacteria and chemicals. Submerging your new piercing is asking for an infection. For at least the first 4-6 weeks, you need to avoid going for a swim. If you can't avoid it or get accidentally splashed, clean it immediately with your saline spray.
Applying Makeup and Skincare Products
Be careful with foundation, concealer, fake tan, and lotions. These products can easily clog your piercing, trapping bacteria and leading to irritation or infection. Always leave a small, clean, product-free circle around your new piercing.
If you realise you've made one of these mistakes, don't panic. Just stop what you were doing and get back to proper aftercare. If you're ever worried or have questions, our team is always here to help. Just give us a call on 01202 9000 50 or drop a message to our WhatsApp at 07752913846.
Your Piercing Aftercare Questions, Answered
Even with the best instructions, you're bound to have a few questions as your new piercing starts to heal. It's completely normal! Here are some of the most common queries we get at the Timebomb studios, answered by our experienced piercers to give you total peace of mind.
Should I Use Antiseptics or Soap to Clean It?
This is a classic one, and the answer is a firm no. It might seem like a good idea, but things like TCP, alcohol, hydrogen peroxide, and even antibacterial soaps are far too harsh for a healing piercing.
These products will only irritate the area and destroy the delicate new cells your body is working so hard to build, which can seriously delay your healing time. All you need is a simple, sterile saline solution. It’s gentle, effective, and works with your body, not against it.
How Can I Tell if It's Healing or Infected?
It's easy to worry about every little twinge, but most of what you'll experience is perfectly normal. For the first few weeks, expect some mild swelling, redness, and tenderness. You'll also likely see some clear or whitish fluid that dries into 'crusties'—this is lymph fluid, and it’s a sign of healthy healing!
A real infection is much more obvious. You'd be looking for signs like intense, throbbing pain, significant swelling that doesn't go down, thick yellow or green pus, and the skin feeling hot to the touch. If you spot these signs, don't panic and definitely don't remove your jewellery. Give your piercer or GP a call right away.
What If I Accidentally Snag My New Piercing?
First off, don't panic. It happens to the best of us! The most important thing is to resist the temptation to touch or fiddle with it. Just give it a gentle saline soak for a few minutes to clean and soothe the area, pat it completely dry, and then simply carry on with your usual aftercare routine.
When Can I Ease Up on the Cleaning Routine?
You don't need to clean your piercing twice a day forever. Once you're past that initial healing phase—usually around the 6-8 week mark for most piercings—you can start to reduce the frequency.
Try cutting back to cleaning just once a day. If your piercing feels happy and shows no signs of irritation, you can eventually switch to just giving it a good rinse with water in the shower. Listen to your body; it'll tell you what it needs.
If you ever have a question that isn't covered here, we're always here to help. Just give the studio a call on 01202 9000 50 or pop a message over to our WhatsApp at 07752913846 for some professional advice.
Your Piercing Aftercare Partner in the UK
Getting a new piercing is a two-way street. We handle the technical side with expert precision, but a beautiful, well-healed piercing truly comes from the partnership we build with you. Here at Timebomb Tattoo & Piercing, that partnership doesn't end when you walk out our door.
We set you up for success from the very beginning. That means using only implant-grade, internally threaded jewellery and following sterile procedures that are second to none. But we know the real work—and sometimes, the worry—starts during the healing process. That's why we're always here to back you up.
Your Questions Answered by Professionals
Even with the best cleaning routine, questions are completely normal. Is this much swelling okay for a cartilage piercing? Did I just snag my nostril stud too hard? When can I finally change this jewellery? Instead of falling down an internet rabbit hole of conflicting advice, just come straight to us. Our piercers in Croydon and Bournemouth are your go-to resource.
We genuinely mean it when we say no question is too small or silly. If something feels off, or you just need a bit of reassurance, we want you to reach out. Your peace of mind is our priority.
Whether this is your very first piercing or you're an experienced collector dealing with a tricky new spot, our support is part of the package. We’re here to give you guidance based on years of hands-on experience, helping you sidestep common healing hiccups and solve any issues that pop up.
How to Reach Us
Please don't hesitate to get in touch. For professional advice, a quick check-up, or any concerns about your healing piercing, our friendly team is ready to help. We're here to make sure your experience is a great one, from start to finish.
- For our Bournemouth studio, give us a call on: 01202 9000 50
- For quick questions or to send a photo for us to assess, message our WhatsApp: 07752913846
Choosing where to get pierced is a big decision. By choosing Timebomb, you’re not just getting a piercing—you’re getting a dedicated team committed to helping you heal it safely and beautifully.
Book your next piercing with confidence at Piercing Near Me, knowing you have a dedicated team supporting you throughout your entire healing journey. Find your nearest studio and book today.