
You're sitting in the studio chair, comparing a simple lobe stud with the helix hoop saved on your phone. Both look appealing, but they won't ask the same thing of your ear. The ear piercing position affects the tissue pierced, jewellery fit, healing routine and potential complication profile, so the most attractive option isn't automatically the most suitable one.
A good decision starts with anatomy and daily life. Can you avoid sleeping on that side? Do headphones, helmets, hair or sport regularly press against your ear? Are you comfortable with a longer healing period and follow-up checks? A senior piercer will work through those questions before marking the skin.
The guide below maps the main placements, compares UK evidence on lobe and cartilage risk, sets out realistic healing guidance, and explains how technique and jewellery change from one position to another. It also shows why a lobe can be a sensible first step, while helix, conch, tragus, daith, rook and industrial placements need more careful planning.
Choosing Your First Ear Piercing Position
A client may arrive wanting a “high lobe” because it looks subtle in a curated ear, then point to a helix because a hoop appears effortless online. The studio conversation begins by separating the image from the lived experience. A photograph shows the finished jewellery. It doesn't show the months of avoiding pressure, managing snagging and waiting before a jewellery change.
The lobe is fleshy, soft tissue and usually gives a more forgiving starting point. Cartilage positions sit in firmer tissue with a poorer blood supply, so the same small bump or sleeping pressure can create a more difficult recovery. UK government guidance states that infection risk is higher in ear cartilage than in the earlobe, a distinction that makes position a health and healing decision, not only a styling choice (UK government guidance for piercing businesses).
Start with your routine
Think through an ordinary week rather than an idealised one. If you sleep heavily on one side, use over-ear headphones, play contact sport or wear work equipment that touches the ear, those details may favour a lobe or a different ear. A professional should also look at the folds, ridges and available tissue before promising a placement.
Practical rule: Choose the position you can protect consistently, not just the one that photographs best.
The next decision is your tolerance for commitment. A first lobe can help you learn how your skin responds and how reliably you follow aftercare. Someone with previous well-healed piercings may reasonably consider cartilage sooner, provided they understand that the attractive result comes with more patience and closer attention.
Mapping the Main Ear Piercing Placements
Before choosing jewellery, locate the tissue. The ear isn't a flat canvas. Its outer rim, inner folds and central bowl create different angles, depths and pressure points, which is why a piercer marks the ear while you're seated and checks the position from several views.
The outer and lower ear
- Lobe: The fleshy, non-cartilage area at the bottom of the ear. It's the most versatile position for studs, hoops, charms and drop earrings, and the needle generally passes straight through the soft tissue.
- Upper lobe: This sits higher in the fleshy lobe, close to the point where cartilage begins. The piercer must leave enough tissue and spacing for the jewellery to sit comfortably without drifting towards the cartilage.
- Helix: The upper, outer curved rim of the ear. The needle follows the thickness and angle of that rim rather than passing through a broad, flat surface. A flat-back stud often suits a fresh helix; a hoop can be considered once the channel has settled.
- Forward helix: Found at the front of the ear where the upper rim approaches the head. The fold is narrow and anatomy-dependent, so the piercer may angle the needle to follow the available tissue and avoid placing jewellery where glasses or hair constantly catch it.
The inner folds and bowl
- Conch: This sits in the central bowl of the ear, in fairly thick cartilage. It can suit a flat-back stud, while a healed conch may accommodate a hoop that curves around the ear's front.
- Tragus: The small protruding cartilage flap in front of the ear canal. Its size and angle vary, and a flat-back stud usually keeps the front discreet while leaving room for swelling behind the ear.
- Daith: The inner fold above the ear canal. The piercer needs to see and support that fold clearly, and circular jewellery such as a captive bead ring can follow its shape.
- Rook: This passes through the raised antihelix ridge inside the upper ear. It requires a defined ridge with enough depth to hold the channel, so it isn't suitable for every ear. Curved barbells are commonly associated with its shape.
- Industrial: Two cartilage points, usually across the upper ear, connected by one straight barbell. Both points must align with the same jewellery, which makes anatomy and marking especially important.
A visual placement chart can help you compare these locations before a consultation. You can also review the ear piercing placement guide for a broader map, but an online image can't confirm whether your own rook ridge, conch bowl or helix curve can support the jewellery you want.
How Position Changes Infection and Healing Risk
You may start with a lobe piercing, then consider a helix or conch because the placement looks more distinctive. The decision also changes the tissue being pierced, the possible complications and the care your ear will need while the channel heals.
Cartilage has a poorer blood supply than the lobe, and UK public-health guidance warns that infection risk is higher in ear cartilage. An infection in upper-ear cartilage can develop into auricular perichondritis, which may cause deformity without prompt treatment (UK public-health information on Pseudomonas and ear piercing).
UK clinical evidence shows the difference between these areas. Among females aged 18 to 28, infection after cartilage piercing was reported at 41.4%, compared with 29.6% after earlobe piercing, a gap of 11.8 percentage points (UK clinical review of infected and irritated ear piercings). These figures do not predict what will happen to every client, but they support a more careful discussion before choosing helix, conch, tragus or another cartilage placement.
The risk is more than surface irritation
A Scottish review of 52 children with ear-piercing complications found local infection in 65% and embedded earrings in 79% (UK review of piercing complications). Swelling, jewellery length and follow-up therefore affect safety. Jewellery that allows room initially may feel tight as swelling changes, while pressure from a pillow, phone or helmet can keep the channel irritated.
| Piercing position | Tissue type | Infection rate | Complication severity |
|---|---|---|---|
| Earlobe | Soft, well-supplied tissue | 29.6% in the cited clinical comparison | Usually local complications, but embedded jewellery can occur |
| Cartilage positions | Firmer cartilage with poorer blood supply | 41.4% in the cited clinical comparison | Infection can progress to perichondritis and deformity |
The table reports the specific UK comparison above, not a universal rate for every placement. Cartilage remains a reasonable choice when anatomy, jewellery, technique and aftercare are assessed properly. Select a trained piercer who uses sterile single-use equipment, fits suitable jewellery and explains when worsening symptoms require medical attention.
Practitioner knowledge is another part of the safety picture. A London study found that 96% recognised infection risk, while 4% recognised keloid scarring, 12% recognised hypertrophic scarring and 0% recognised cauliflower ear. Only 28% advised clients to seek medical attention after a complication (London study of practitioner knowledge). Before booking, ask who will assess your anatomy, what aftercare you will receive in writing and which symptoms should be referred to a healthcare professional.
Healing Timelines for Lobe and Cartilage Piercings
You may leave the studio with a calm-looking piercing, then find that pressure from a pillow or headphones makes it sore again. Healing time depends on the tissue, jewellery, anatomy and daily contact, so a responsible piercer will not promise one identical timetable for every ear.
UK guidance is not completely uniform. Torbay Council advises allowing both lobe and cartilage piercings 6 to 8 weeks to heal (Torbay Council ear and face piercing aftercare). Another UK studio guide gives the earlobe around 6 weeks, while listing helix, conch, tragus, daith, rook and industrial piercings at 3 to 6 months, sometimes longer. Use these ranges for planning, not as permission to change jewellery on a fixed date.
The outer skin can look settled while the internal channel is still fragile. Cartilage positions often need more patience because their rims and folds catch on hair, phones, pillows and headphones.
What your daily routine changes
Keep fresh jewellery still and follow the written aftercare from your studio. Avoid sleeping directly on the piercing, and take particular care with swimming during the early healing period. One UK aftercare guide advises avoiding swimming for the first 2 weeks, cleaning with saline twice daily, and preventing pressure that could shift the jewellery (UK studio aftercare guidance).
| Piercing position | Initial healing | Full healing | First downsizing |
|---|---|---|---|
| Earlobe | 6 to 8 weeks in Torbay guidance | Varies by person and guidance | After a piercer confirms swelling has settled |
| Cartilage, including helix, conch, tragus, daith and rook | 6 to 8 weeks in Torbay guidance, with more conservative guidance of 3 to 6 months | Sometimes longer than the initial period | Planned after swelling and tissue response are assessed |
For a placement-specific reference, see this guide to ear piercing healing times, then confirm the plan at your appointment. Do not change cartilage jewellery because discomfort has stopped. A piercer should assess whether the post can be shortened and whether the tissue is ready.
Professional Technique and Jewellery for Each Placement
Positioning is part of the piercing procedure itself. The UK National Occupational Standards state that a piercer must know how to position themselves and the client, and how to manually support each ear during the service (UK National Occupational Standards for an ear piercing service).
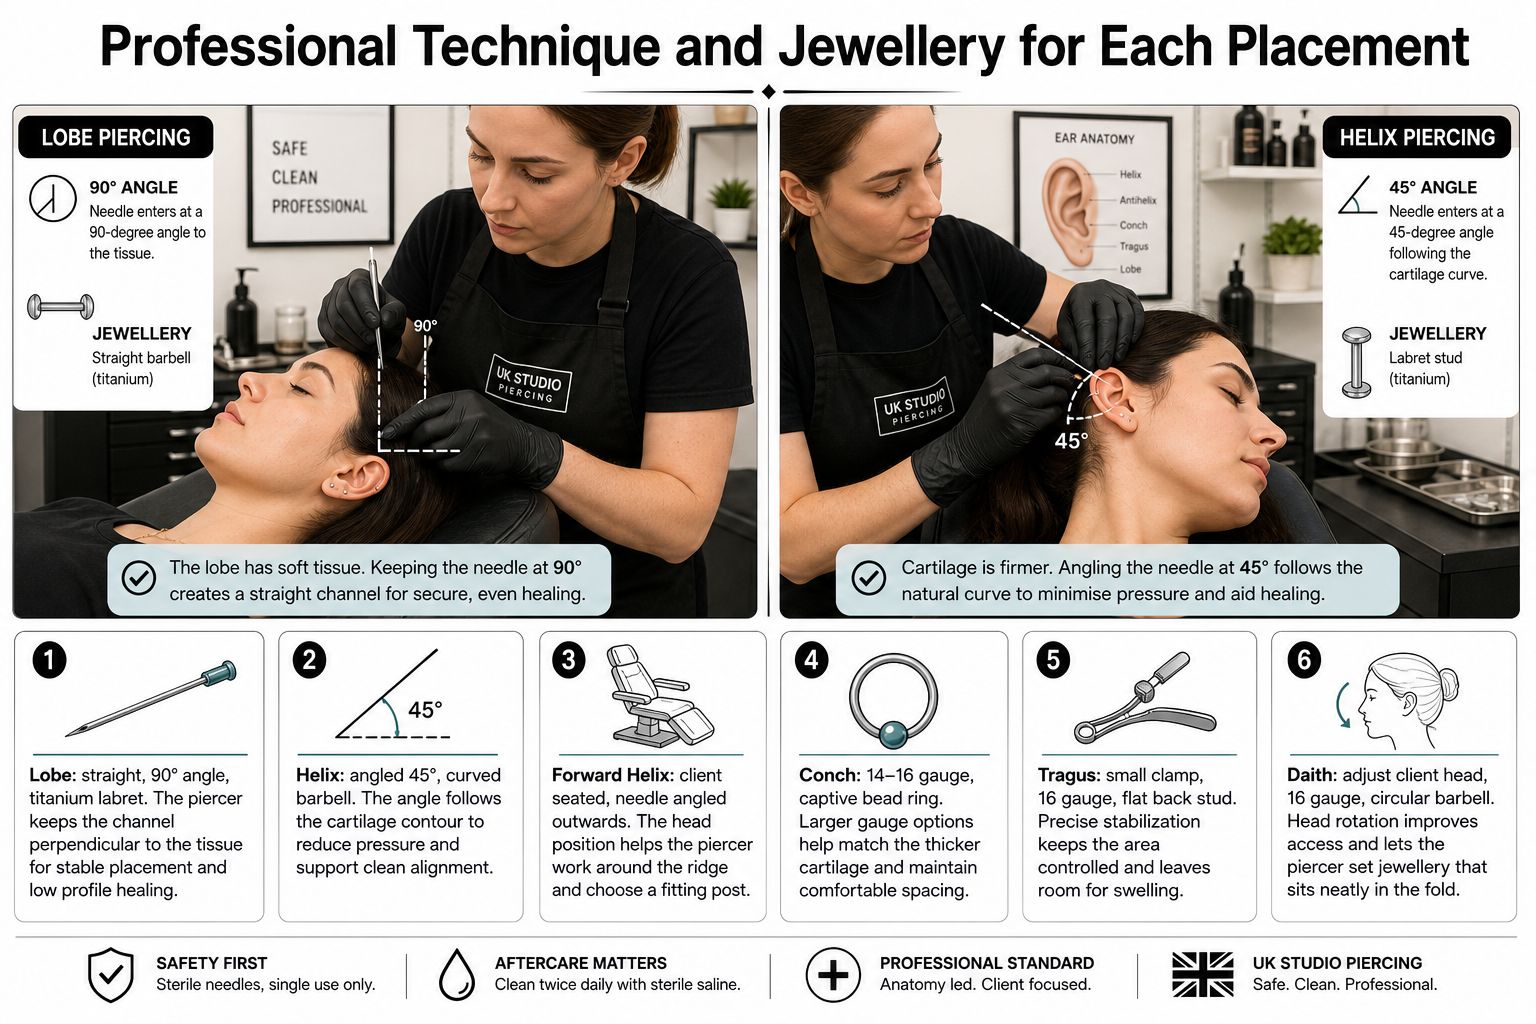
For a lobe, the piercer can usually support the fleshy tissue and pass the needle through at a controlled, appropriate angle. A flat-back labret or suitable ring may work depending on the mark and the client's preference. Helix and forward helix placements need more attention to the curve, available depth and swelling, so initial jewellery must leave safe room without creating unnecessary movement.
Matching jewellery to anatomy
A conch needs careful marking so the channel sits in the bowl without pressing against the antihelix ridge. A flat-back labret is often practical while it heals, while a larger hoop may be considered later if the anatomy and healed channel allow it. Tragus jewellery needs to clear the ear canal and accommodate the flap's thickness. Daith work requires clear access to the inner fold and stable support from behind.
Industrial placement demands the strictest alignment check because one straight bar connects two separate cartilage channels. If the points don't line up naturally, the bar can place pressure on one or both sites and make healing harder. A professional won't force a straight bar into anatomy that can't support its path.
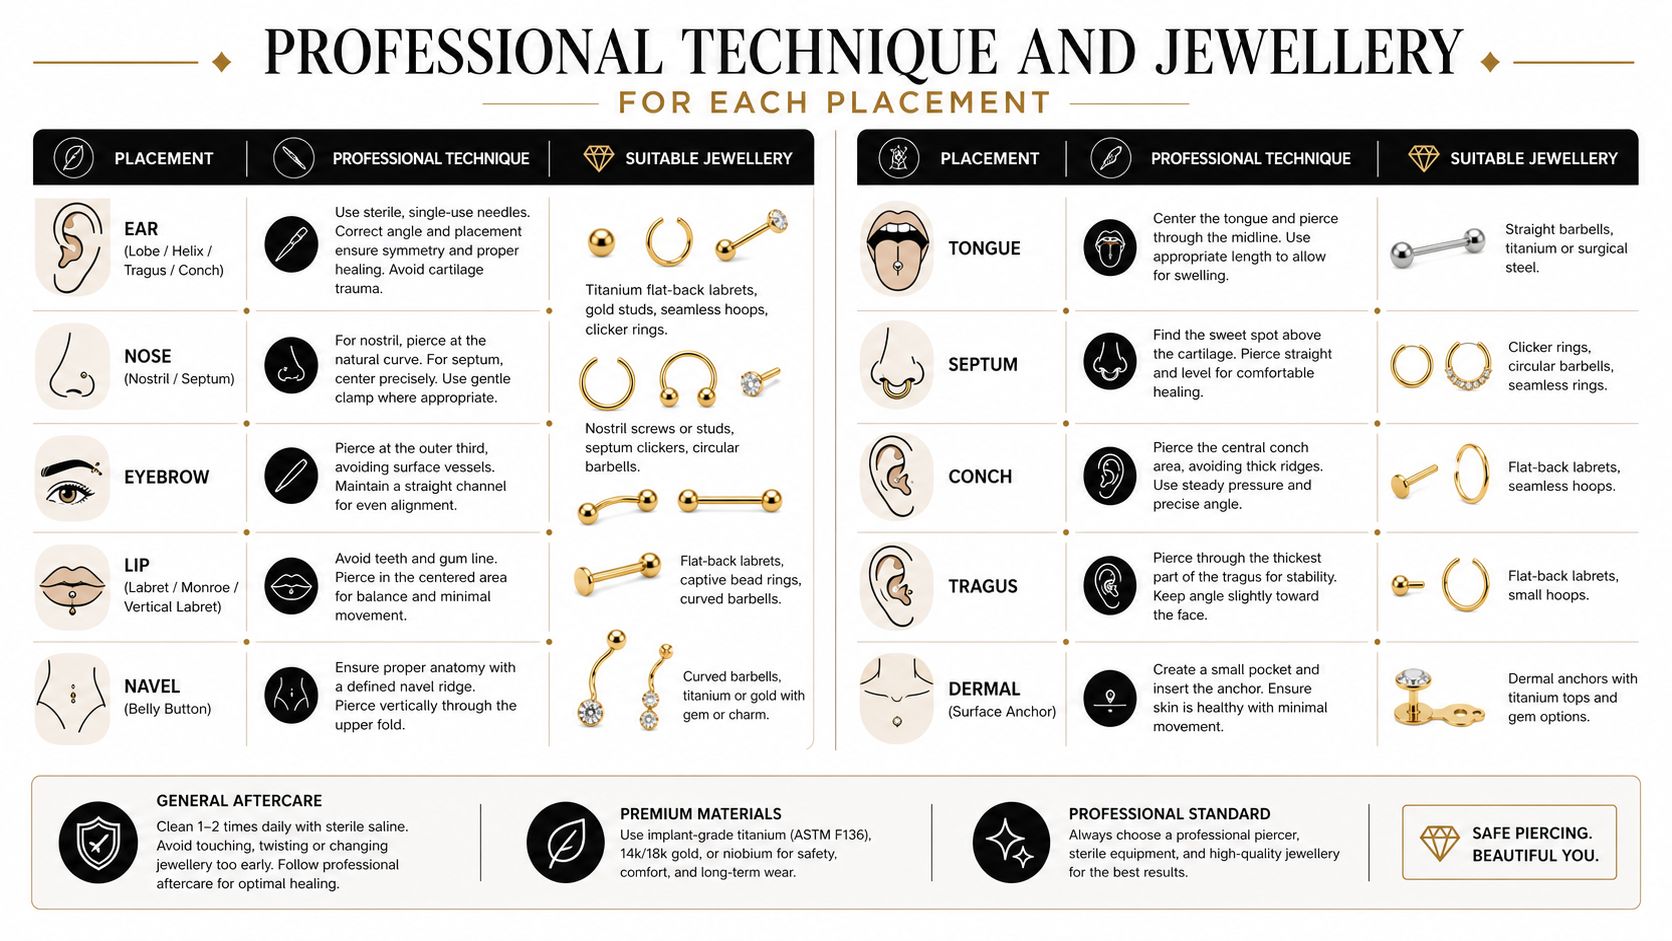
Material and construction matter alongside position. Many professional studios use implant-grade titanium and low-profile threadless or internally threaded jewellery for fresh piercings because these designs can reduce unnecessary friction and make future changes more controlled. Read about titanium piercing jewellery before choosing decorative finishes, and ask the studio what specification its jewellery meets.
Which Ear Piercing Position Suits First Timers
For most first-time clients, the standard lobe remains the sensible starting point. It uses soft tissue, offers broad jewellery choice and generally asks less of your daily routine than a cartilage placement. UK guidance commonly places lobe healing in the 6 to 8 week range, although individual healing and local aftercare advice still matter (Torbay Council aftercare guidance).
That doesn't mean every newcomer must choose a lobe. An experienced client, or an older teenager with a realistic aftercare routine, may choose a helix or conch after an anatomy assessment. The deciding question is whether you can protect the site from pressure, keep hands and hair away, attend follow-up checks and accept that cartilage may stay sensitive for much longer.
Match the placement to the person
- For a nervous adult: A lobe provides a straightforward introduction to the studio process and jewellery care.
- For a teenager: Consider school rules, sports, sleeping habits and whether a parent or guardian can help monitor aftercare.
- For an active client: A less exposed position may be more practical than an upper rim that catches on equipment.
- For a curated-ear plan: Start with a placement that leaves room for later additions rather than filling every attractive space in one visit.
Daith, rook and industrial placements deserve extra caution for a first appointment. Their folds, angles or two-point alignment can make cleaning and pressure management more demanding, and some ears don't have the required anatomy. A reputable piercer should be willing to decline a requested position and suggest an alternative that will sit securely.
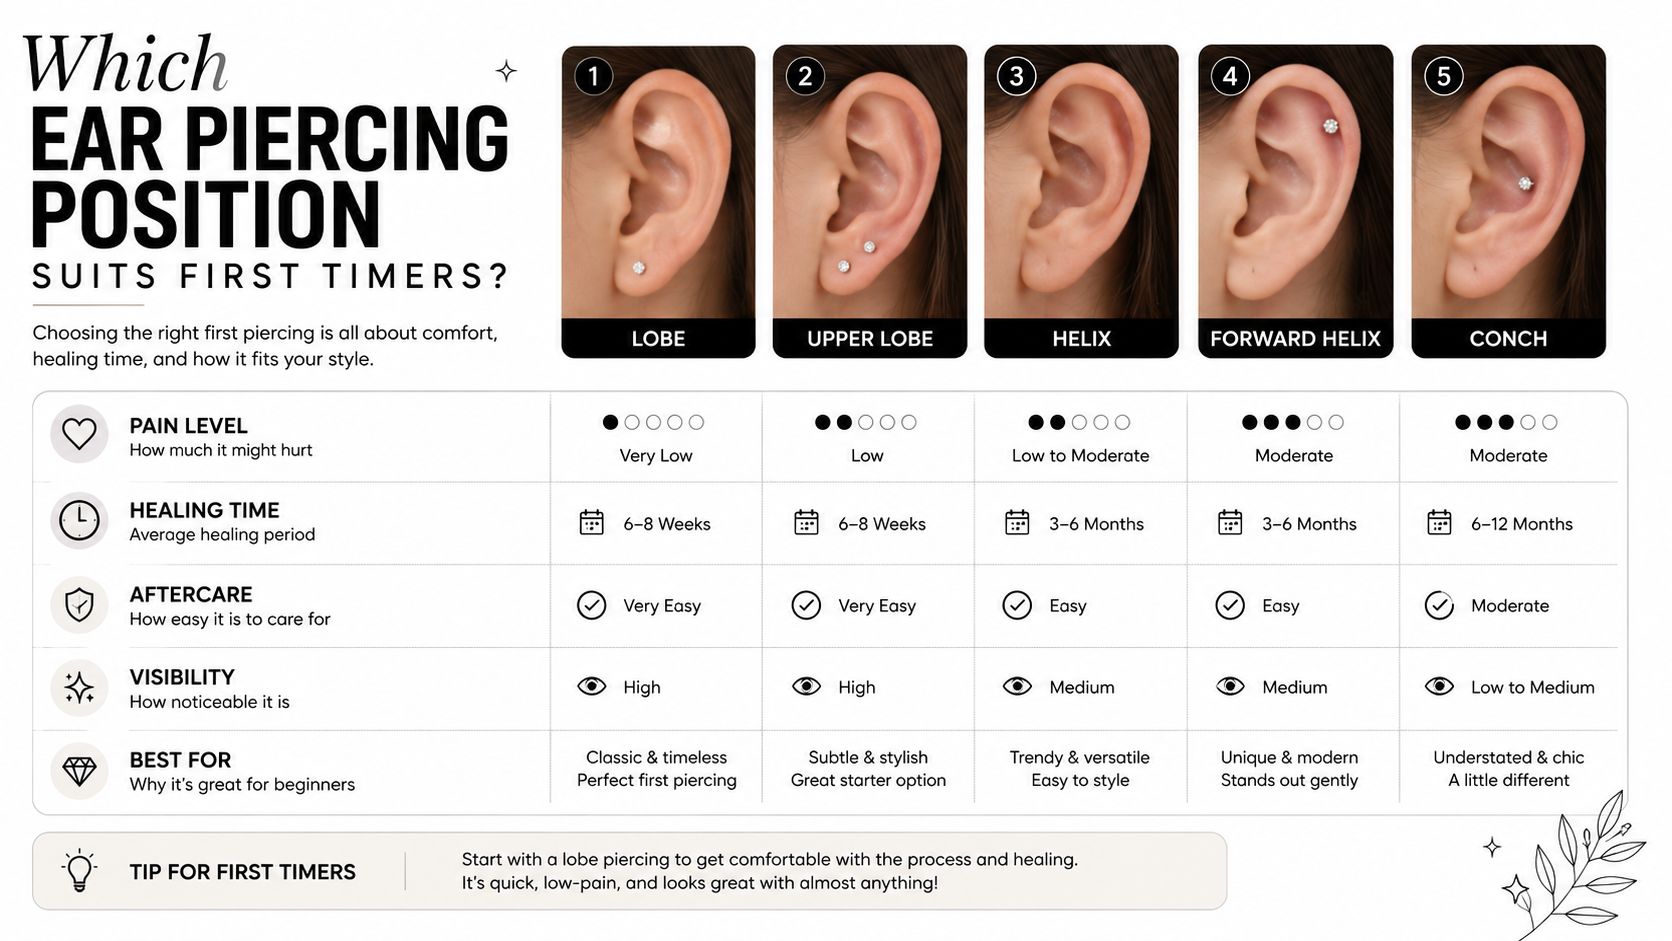
Choosing a conservative first position doesn't close future options. It gives you a chance to learn how your body heals and how your routine affects jewellery, which can make a later cartilage project more deliberate.
Planning Your Piercing Journey with Piercing Near Me
The most useful question isn't “Which placement is fashionable?” It's “Which placement can my anatomy and routine support?” Lobes usually offer the smoother introduction, while helix, conch and daith can deliver a stronger visual effect with a longer aftercare commitment and a higher cartilage risk profile.
Use this short checklist before booking:
- Assess your ear and routine. Look at sleep, headphones, hair, sport, work equipment and any history of difficult scarring.
- Choose your risk comfort. Decide whether you want a soft-tissue starting point or are prepared for the extra patience cartilage requires.
- Book an in-person consultation. Let a qualified piercer mark viable positions, check jewellery clearance and explain warning signs.
The UK National Occupational Standards treat client positioning, piercer positioning and manual ear support as defined parts of the service, so a consultation should feel practical rather than rushed. Ask about single-use sterile needles, implant-grade jewellery, written aftercare and follow-up arrangements. The Piercing Near Me platform helps clients find studios in the UK, including options connected with Croydon and Bournemouth, with consultations, appointments and walk-in availability.
For questions or booking support, call 01202 900050 (Bournemouth) / 020 8686 7730 (Croydon) or message WhatsApp on 07752 913846 (Bournemouth) / 07902 490584 (Croydon). Bring the jewellery style you like, but let the piercer confirm whether the ear piercing position, angle and healing plan are suitable for you.
Visit Piercing Near Me to explore local professional piercing options and arrange a consultation for your chosen ear piercing position. A trained piercer can assess your anatomy, recommend suitable jewellery and give you a realistic aftercare plan before the needle is used.