
You've just left the studio, your new helix, tragus, conch, or daith piercing feels tender, and you're staring at the bottle of saline wondering what happens next. The answer is simpler than most aftercare advice makes it sound: clean it gently twice a day, dry it properly, and stop knocking, pressing, twisting, or soaking it.
Cartilage doesn't need an aggressive cleaning campaign. It needs a calm routine and protection from the everyday things that keep restarting irritation. Mild soreness, slight redness, and a little clear or pale crust can be part of early healing. Your job is to support the process, not interfere with it.
Why Cartilage Piercings Need a Different Cleaning Routine
Cartilage heals slowly but predictably. Unlike a soft lobe, cartilage has limited direct blood flow, so the surrounding tissue has to support the delivery of healing nutrients and cells. That's why a cartilage piercing can take six to twelve months to fully settle, as described in specialist cartilage healing guidance from Kosiner Jewelry.
That long healing window doesn't mean your piercing is failing. A helix may look comfortable on the outside while the channel inside remains fragile. The same applies to tragus, conch, and daith placements. Treating a piercing as healed only because it no longer hurts is one of the easiest ways to trigger a setback.
Cleaning is only half the job
Saline removes softened crust and surface debris, but it can't undo pressure from sleeping on the ear or repeated movement from headphones. A helmet strap, tight hat, glasses arm, hair, or clothing can catch the jewellery and irritate the channel without making the piercing look dirty.
The practical rule: Keep the piercing clean, dry, and boring. Boring piercings usually heal better than constantly handled ones.
A simple routine is enough. UK aftercare guidance commonly recommends cleaning twice daily, morning and evening, with sterile saline, while avoiding rotation and friction. You can find the same approach in this cartilage piercing aftercare guide.
What's normal at the start
During the first few weeks, expect some tenderness, mild redness, slight warmth, itching, and small amounts of clear or pale lymph fluid that dry into crust. These signs should gradually become less noticeable rather than spread or intensify.
The central idea is straightforward: cartilage aftercare is a moisture-and-trauma problem, not just a washing problem. The next sections explain the saline routine, then focus on what you do between cleanings to protect the piercing from pressure, dampness, and accidental knocks.
What to Use and What to Keep Off Your Piercing
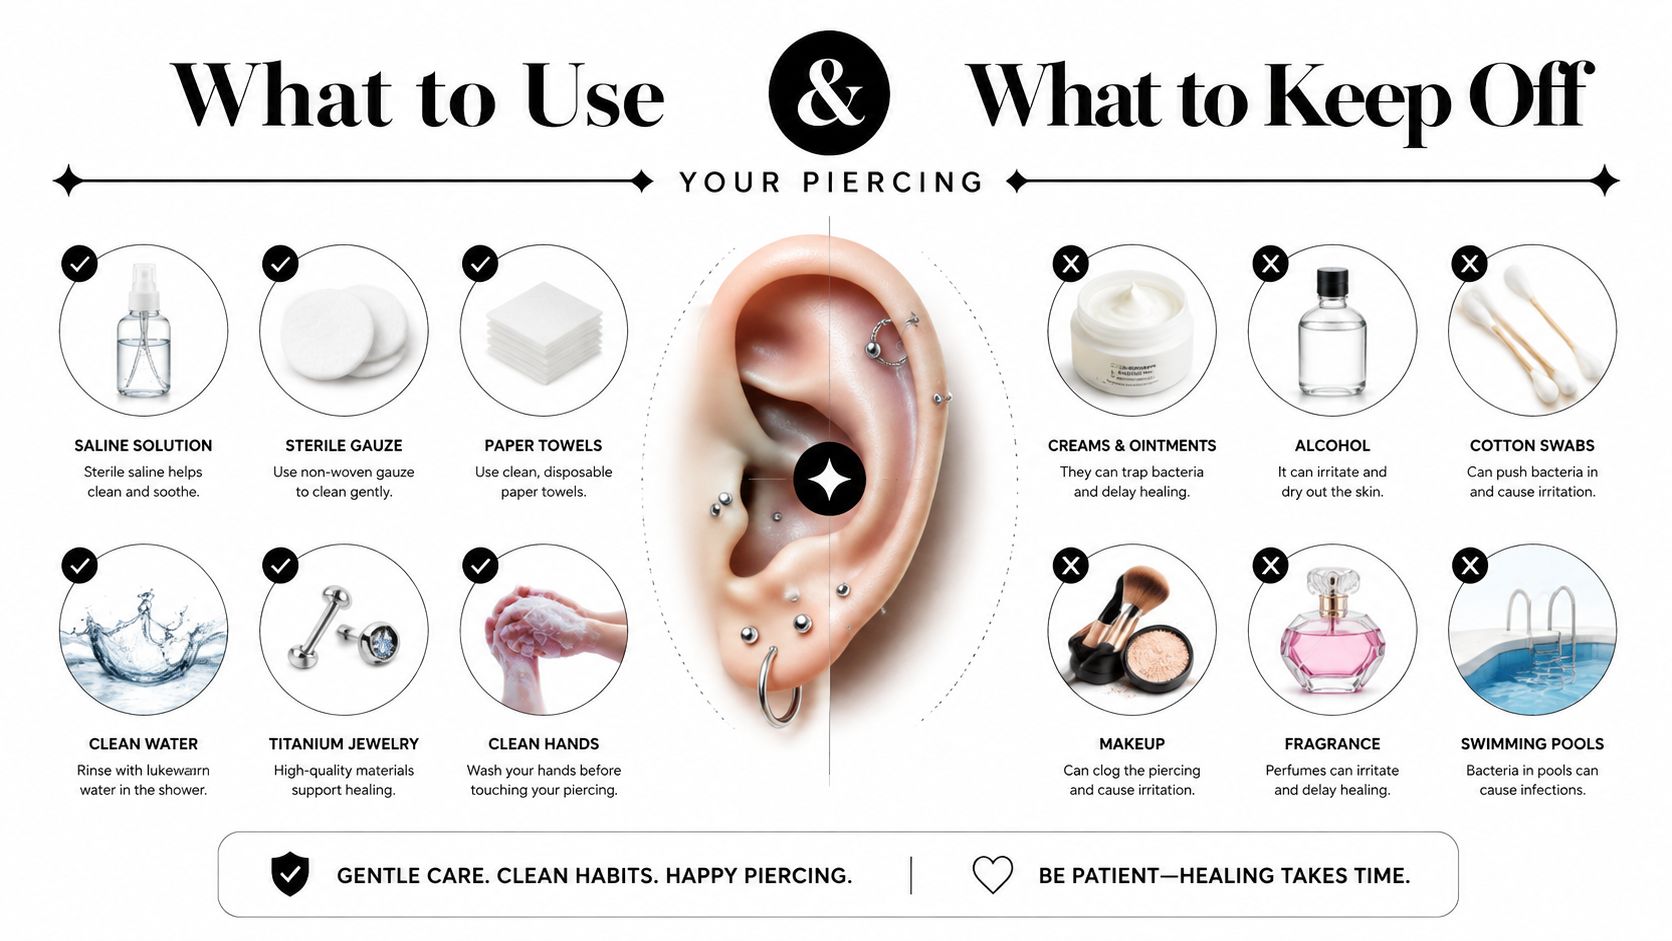
Buy the right supplies before you touch the jewellery. The easiest option is a sterile saline spray labelled 0.9% sodium chloride. It's ready to use, doesn't require measuring, and avoids the contamination problems that can come with repeatedly storing homemade solutions. Guidance on saline spray for piercing care also supports this simple approach.
If you prefer to prepare salt water, use the UK government ratio of 1/4 level teaspoon of preferably sea salt in an egg cup or shot glass of warm water. The government's piercing aftercare warning recommends a salt solution made this way, followed by drying with fresh disposable paper towel or kitchen roll. Use previously boiled water, mix a fresh solution each time, and don't keep a batch beside the sink.
Your basic kit
- Sterile saline: Choose a wound-care saline containing 0.9% sodium chloride.
- Disposable paper towel: Use fresh paper to pat the area dry after cleaning.
- Non-woven gauze: A useful alternative for a gentle compress, provided it doesn't shed fibres.
- Small mug or bowl: Keep one dedicated to salt-water soaks and wash it thoroughly between uses.
What belongs on the shelf
Contact lens solution and eye drops aren't substitutes for piercing saline. They may contain ingredients intended for those products, not a fresh piercing, and can irritate healing cartilage. Alcohol and hydrogen peroxide are also poor choices because harsh antiseptics can damage fragile new tissue and prolong irritation.
Leave antibacterial soaps, tea tree oil, and other essential oils alone. They can strip the skin, leave residue, or sensitise the area. Cartilage recovers slowly from chemical irritation, so stronger doesn't mean cleaner. It usually means more disruption.
Your Twice-Daily Cleaning Routine Without the Fuss
The routine should take less than five minutes morning and night. Don't turn it into a wrestling match with the jewellery. Your hands, saline, a short contact time, and careful drying are enough.
Start with clean hands
Wash your hands with plain soap and water before you go near the ear. Dry them on a fresh paper towel, not on the shared bathroom towel hanging beside the sink.
Apply sterile saline to both the front and back of the piercing. You can spray the area directly and leave the solution in place briefly, or saturate non-woven gauze and hold it gently against the jewellery for one to three minutes, as UK piercing aftercare guidance recommends. The contact time gives dried lymph and crust a chance to soften instead of forcing you to scrape it away.
Let the saline do the work
Hold the compress against the piercing without pressing the jewellery into the ear. Gravity and the saline will loosen material around the front and back. Once the crust is soft, lift away only what comes away easily with the damp gauze.
Don't pick at dry crust. It's often concentrated lymph, and pulling it off can disturb the delicate lining forming inside the piercing channel. If a piece won't move, leave it for the next clean rather than chasing it with a fingernail.
Never rotate or twist the jewellery. Movement drags contaminants through the channel and traumatises tissue that's trying to repair itself.
Pat the front and back dry with a fresh piece of disposable paper towel or clean non-woven gauze. UK guidance specifically favours single-use paper products over shared cloth towels, which can harbour bacteria and snag on jewellery.
Avoid the two common mistakes
First, don't spin the jewellery to “stop it sticking”. That old advice causes unnecessary movement through healing tissue. Second, don't scrub with cotton buds, brushes, or rough cloth. Fibres can wrap around the post, and scrubbing creates friction where you need calm.
After a shower, rinse the piercing with clean water if shampoo or conditioner has run over it. Then dry it properly. Don't compensate for a missed clean by doubling the next one. Return to the normal morning and evening routine.
A Realistic Week of Caring for a New Cartilage Piercing
Jess is a first-time client with a fresh helix piercing. She doesn't live in a studio-clean bubble, and she doesn't need to. She fits the care around ordinary life while keeping the same priorities: saline, drying, and avoiding pressure.
On Monday morning, she holds a saline-soaked gauze compress against the ear while the kettle boils. She pats it dry with paper towel, leaves the jewellery alone, and goes to work. That evening, she repeats the routine after her shower, making sure no shampoo remains around the piercing.
Real life will move the timing
Wednesday brings a gym session. Before using a bench, Jess makes sure the side of her head won't press against the surface and keeps a clean, dry towel between her ear and anything that might rub it. She sprays saline at the car afterwards, then dries the piercing when she gets home.
On Friday, a shampoo appointment means she cleans before leaving and rinses the ear carefully afterwards. Water trapped around the jewellery doesn't get ignored. She uses a fresh paper towel to absorb the moisture rather than rubbing.
Saturday night is busy. Jess doesn't fiddle with the piercing while getting ready, and she avoids headphones that press on the helix. Before bed, she completes a gentle clean and leaves the jewellery untouched.
Sunday is slower. She has a lie-in, so the morning clean happens later. There's no need to panic or perform extra cleaning. If she misses a session, she adds one normal clean when she remembers, rather than scrubbing aggressively or doubling up.
Keep the routine flexible, not casual
The exact clock time doesn't matter. Consistency does. A clean can happen before work, after a shower, beside the kettle, or after the gym, provided you wash your hands, use suitable saline, dry the area, and avoid pressure.
Cleaning should never feel like a battle with the jewellery. If it does, you're probably applying too much force or trying to remove crust before it has softened.
The Habits That Protect Your Piercing Between Cleanings
Most cartilage problems start with moisture, pressure, or movement, not with a failure to scrub hard enough. The 2016 Public Health England investigation into a national Pseudomonas aeruginosa outbreak linked to an aftercare solution used after piercings in England between July and September 2016 found a strong association between illness and the implicated product. The investigation reported an adjusted odds ratio of 4.60, showing why aftercare products must be sterile and used correctly, as detailed in the UK government outbreak guidance.
The lesson isn't to panic about every drop of water. It's to stop treating moisture as harmless and cleaning as the only important task. Dry the piercing after saline, showers, exercise, and accidental splashes.
Remove pressure from the day
Sleeping directly on the piercing is a reliable way to keep it sore. Use a travel pillow with the ear resting in the central opening if you're a side sleeper. Keep pillowcases clean, and don't allow hair to wrap around the jewellery overnight.
Helmets, tight hats, headphones, headphone loops, and snug face masks can press against a helix or upper ear. Phones and glasses can also rub fresh cartilage, especially when their arms or edges sit directly over the placement. Adjust the item, change the fit, or leave it off while the piercing is vulnerable.
Avoid high-moisture environments
Swimming pools, hot tubs, and saunas expose a healing piercing to water, heat, and shared surfaces. UK local-authority aftercare guidance stresses keeping the area dry and avoiding swimming and pressure because trauma and infection can increase the risk of complications such as perichondritis. Upper-ear infections can persist, form abscesses, and scar.
You don't need to disinfect your entire life. You need to reduce avoidable damage. Keep sweat from sitting around the jewellery, change out of damp clothing, protect the ear from gym equipment, and stop touching it while distracted.
Aftercare is damage limitation. Fewer bumps, less trapped moisture, and no fiddling give the tissue room to settle, even if one clean happens later than planned.
Healing or Infection? Reading the Signs and Knowing When to Act
A new piercing can look slightly untidy while it heals. Mild redness, tenderness, itching, slight warmth, and clear or pale lymph fluid are usually managed with the gentle saline routine. The concern is a pattern that worsens, spreads, or becomes hot and painful.
Use this table as a quick guide. If symptoms fit the red-flag column, don't keep experimenting with stronger products.
Cartilage Piercing Healing Signs vs Red Flags
| Sign | Likely Normal Healing | See Your Piercer | See a GP or Urgent Care |
|---|---|---|---|
| Redness | Mild and limited around the opening during early healing | Persistent irritation after repeated knocks or pressure | Redness spreading away from the piercing |
| Fluid | Clear or pale lymph that dries into light crust | Repeated crusting with irritation but no worsening symptoms | Green or yellow discharge |
| Pain | Mild soreness or tenderness that settles | Irritation after sleeping on it or snagging it | Throbbing or worsening pain |
| Temperature | Slight warmth near the piercing | Warmth after friction that improves with rest | A hot, swollen ear |
| Swelling | Modest early swelling | Jewellery feels tight and needs assessment | Rapid or marked swelling, or jewellery sinking into swollen skin |
| General health | No fever or illness | You're unsure whether the irritation is mechanical | Fever, feeling unwell, or rapidly worsening symptoms |
Know who to contact
Your piercer can assess jewellery fit, angle, pressure, and irritation. They can also help you identify whether a bump is being caused by sleeping, headphones, moisture, or a snag. For a useful symptom overview, see this guide to infected piercing symptoms.
A clinician is the right person for suspected infection. Antibiotics may be needed, and cartilage infections can progress quickly. UK public-health guidance tells clients to seek medical help when infection symptoms appear, particularly because upper-ear cartilage infections can cause persistent problems and scarring.
Don't remove the jewellery on your own if you suspect infection unless a clinician tells you to. Closing the channel can interfere with drainage and make assessment harder. Contact your piercer for practical guidance, but use a GP or urgent care service for red-flag symptoms.
Your Cartilage Piercing Aftercare Checklist
Save this beside the bathroom mirror. It's the routine that matters, not a complicated collection of products.
Daily cleaning
- Saline twice daily: Use sterile 0.9% sodium chloride spray, or a correctly prepared salt-water compress.
- Soften, don't scrape: Hold saline against the piercing for one to three minutes, then remove only softened crust.
- Dry completely: Pat the front and back with fresh disposable paper towel or non-woven gauze.
- Leave jewellery still: Don't twist, rotate, push, or pull the post.
Lifestyle protection
- Protect sleep: Don't sleep directly on the piercing. A travel pillow can keep pressure off the ear.
- Manage contact: Take care with helmets, headphones, hats, glasses, gym mats, hair, and clothing.
- Control moisture: Rinse away product residue after showers and dry the area every time.
Leave-alone rules
- Wash before touching: Unwashed hands don't belong near healing cartilage.
- Don't overclean: A missed session calls for one normal clean, not a harsh catch-up session.
- Don't remove jewellery early: Keep the original jewellery in place until your piercer or clinician advises otherwise.
Watch for warning signs
- Act on spreading redness, hot throbbing pain, green or yellow discharge, fever, or worsening swelling.
- Call the studio: For personalised advice, contact 01202 900050 (Bournemouth) / 020 8686 7730 (Croydon) or WhatsApp 07752 913846 (Bournemouth) / 07902 490584 (Croydon).
- Seek medical care: Go to a GP or urgent care service when infection symptoms appear, especially with a hot, swollen ear or feeling unwell.
Cartilage heals slowly but predictably when moisture, trauma, and pressure stay under control.
Piercing Near Me helps you find professional piercing services and practical, personalised aftercare for cartilage placements, including guidance on saline cleaning and healing. Visit Piercing Near Me to explore reputable studios, book your piercing, and get support that continues after you leave the chair.
Trackbacks/Pingbacks