The classic labret is that single, subtle stud you see sitting just below the centre of the bottom lip. It’s an absolute cornerstone of the piercing world—a versatile and timeless choice that has served as the starting point for countless other lip piercing styles.
What Exactly Is a Labret Lip Piercing?

Here’s something that trips a lot of people up: despite the name, a labret piercing doesn’t actually go through the lip tissue itself. Instead, it’s placed in the small dip just beneath the lower lip, passing through the skin and exiting inside the mouth, where the back of the jewellery rests against the lower gum line.
Think of it as the perfect accent piece for your smile. For a fresh piercing, we always use a flat-back labret stud. This type of jewellery is designed specifically to be comfortable and to keep contact with your teeth and gums to a minimum while everything is healing. This classic placement has been a favourite in piercing culture for years, loved for its simple elegance and how easily it can be styled once healed.
For anyone weighing their options, here’s a quick rundown of the key details.
Labret Piercing at a Glance
| Aspect | Details |
|---|---|
| Placement | Just below the centre of the lower lip. |
| Initial Jewellery | Flat-back labret stud (implant-grade titanium recommended). |
| Healing Time | 8-12 weeks on average, but can vary. |
| Pain Level | Low to moderate; typically a quick, sharp pinch. |
| Best For | First-time facial piercings, versatile styling. |
This table should give you a good starting point, but of course, every piercing experience is unique to the individual.
A Modern Resurgence in Popularity
The labret has always been around, but it’s seen a huge comeback recently, particularly here in the UK. This isn’t just a feeling we have in the studio; the numbers really tell the story. Thanks to '90s grunge and alternative styles blowing up on social media, labret piercings are trending hard.
Recent UK piercing industry data from 2023 revealed that labret styles accounted for a significant 12% of all facial piercings carried out in professional studios nationwide. In our own neck of the woods, places like Croydon and Bournemouth have seen even higher demand, with labrets making up as much as 18% of local bookings. This boom is part of a wider trend that’s seen a 25% increase in body piercing services in the South East since 2018, all fuelled by platforms like Instagram and TikTok. You can discover more piercing industry statistics and see how these trends are shaping our community.
The real beauty of a classic labret lies in its perfect balance. It’s bold enough to make a statement yet subtle enough to work with any look you can think of, from casual day-to-day wear to something a bit more dressed up. This is exactly why it’s remained an enduring favourite.
Why It’s a Great Starting Point
For a lot of people, the classic labret is the perfect first step into facial piercings. The placement is fairly straightforward, and with the right aftercare, the healing process is one of the more manageable ones. It’s an ideal way to dip your toes into the world of body modification without committing to something too extreme right away.
Here are a few reasons why it’s such a popular choice:
- Subtle yet Stylish: It’s a piercing that enhances your features rather than overpowering them.
- Highly Customisable: Once it's fully healed, the fun begins. You can swap the top for different gems, shapes, or even switch to a ring.
- Relatively Simple Healing: Being tucked away below the lip, it’s less likely to get caught or irritated compared to some other oral piercings.
Of course, choosing a professional and reputable studio is non-negotiable for a good outcome. At Timebomb Tattoo & Piercing, our expert piercers in Croydon and Bournemouth will make sure your placement is perfectly suited to your anatomy. We only use implant-grade materials, setting you up for the smoothest healing journey possible and turning your idea into a reality with total confidence.
Exploring Labret Placement and Style Variations

The classic labret, sitting smack-bang in the centre below your lip, is a look that never goes out of style. But that’s just the starting line. The world of labret piercings is packed with creative variations, using different placements and combinations to create a look that's all you.
Think of it less as a single piercing and more as a whole family of styles. The technique is the same, but moving the placement just a little—or adding a second piercing—can completely change the vibe from subtle and cool to bold and symmetrical.
Single and Asymmetrical Placements
One of the simplest ways to make a labret your own is to just move it off-centre. It's a small change that makes a big difference, creating a modern, asymmetrical look that can really compliment your features.
A side labret is exactly that—a single stud placed to the left or right of centre. It’s a hugely popular choice for good reason. It adds a bit of edge and personality without feeling too intense, making it a great alternative to the traditional placement.
But what if you want something completely different? Enter the vertical labret. This is a totally unique piercing that goes vertically through the lip tissue itself, not into the mouth. We use a curved barbell, so one bead sits on your lower lip and the other peeks out from just underneath. It’s a striking look that has the massive bonus of never coming into contact with your teeth or gums.
A great piercer doesn’t just poke a hole where you point. It’s a conversation. We look at your anatomy to make sure the piercing will not only look amazing but will also be safe and comfortable for the long haul.
Paired and Symmetrical Styles
If you're after a bolder statement, doubling up on labrets opens up a whole new set of possibilities. Symmetrical and paired styles create a powerful, balanced look that really frames your mouth.
Here are a few of the most popular paired-up styles we see:
- Snake Bites: This is the one everyone knows. It’s two individual labret piercings, one on each side of the lower lip. The symmetry gives it a seriously confident and iconic look.
- Spider Bites: Want something a bit more clustered? Spider bites are two piercings placed very close together on one side of the lower lip. It creates a more focused, edgy look that draws the eye.
- Dolphin Bites: This is another symmetrical style, but with a twist. It features two labrets pierced close together right below the centre of your lip, like a more compact version of snake bites.
Why Your Anatomy Matters
Choosing between, say, snake bites and a vertical labret isn’t just about which photo you like more. It’s about what will genuinely work with your unique features. This is where a proper piercer's experience is non-negotiable.
Our piercers at Timebomb in Croydon and Bournemouth will take a close look at the shape of your lips, the space you have, and even how you talk and smile.
For instance, a vertical labret needs a good amount of full lip tissue to sit securely. For any piercing that goes inside the mouth, we meticulously mark the placement to ensure the flat disc on the back rests comfortably and avoids rubbing against your teeth and gums. We’ll get you to smile, laugh, and relax your face to see how the jewellery moves with you.
It’s this attention to detail that ensures your new piercing is set up for success from day one. It's a true collaboration between your idea and our expertise.
How to Choose the Right Labret Piercing Jewellery
Let’s talk about one of the most important decisions you’ll make for your new lip piercing, and it has nothing to do with how it looks. Choosing the right jewellery from day one is the foundation for a smooth, easy heal.
Think of it this way: your body has to build new skin around this piece of metal. You want to give it the absolute best materials to work with so it can do its job without a fuss. This isn't the time to cut corners.
Prioritise Implant-Grade Materials
When a piercing is fresh, your body is on high alert. That’s why professional piercers are so particular about the jewellery we use for the initial piercing. For any lip piercings labret style, starting with implant-grade jewellery is non-negotiable.
These are biocompatible materials, which is a technical way of saying your body won't see them as a threat and try to fight them off. Your best options are:
- ASTM F-136 Implant-Grade Titanium: This is the gold standard for a reason. It's what surgeons use for implants. It’s completely nickel-free, super lightweight, and has a proven track record for healing beautifully.
- Niobium: A fantastic alternative to titanium, Niobium is just as hypoallergenic and can be anodised to create some incredible, vibrant colours.
- 14k or 18k Solid Gold: If you’re set on a gold look, it must be solid gold (never plated) from a quality body jewellery manufacturer. These specific gold alloys are designed to be safe for long-term wear inside the body.
Here at Timebomb Tattoo & Piercing in Croydon, we've seen first-hand how much this matters. Data from the piercing community shows that 68% of labret clients aged 18-25 now choose implant-grade titanium. This simple choice helps drop infection risks to under 2% when aftercare is done right, a huge improvement on the 5% national average for piercings done by amateurs. You can read more findings on piercing safety statistics and see how professional standards make a real difference.
Understanding Initial Jewellery Styles
For a standard labret, you’ll start with a flat-back labret stud. It’s a simple piece with a decorative top, a post that goes through your lip, and a flat disc on the back that rests comfortably against your gums. We always use a slightly longer post at first to give your lip room to swell, which is a totally normal part of the first few weeks.
I know you might be itching to put a snug-fitting ring in there, but you have to wait until it’s fully healed. Trying to heal a straight piercing with a curved hoop is a recipe for irritation, migration (where the hole starts to shift), and a much longer, more frustrating healing process.
Think of your initial long bar as a temporary placeholder. Its job is to give your piercing the space it needs to heal calmly without pressure. Once the swelling is gone, it’s time for it to be replaced with something better suited for the long term.
The Critical Importance of Downsizing
This brings me to a step that is absolutely vital: downsizing. Once the initial swelling has disappeared—usually around the 4 to 8-week mark—you need to come back to the studio.
Downsizing is exactly what it sounds like: we swap out that initial long bar for a shorter one that fits perfectly. It might seem like a minor detail, but it’s crucial for the long-term health of your piercing, your teeth, and your gums.
Once the swelling is gone, a bar that’s too long can become a real problem. It can:
- Scrape against your teeth and wear away your enamel.
- Rub on your gums, causing them to recede.
- Get caught when you're eating or talking, which can damage both your teeth and the piercing itself.
Getting your labret bar downsized is the best thing you can do to protect your oral health and make your piercing comfortable for everyday life. Your piercer at Timebomb will measure you up for the perfect fit, ensuring you can enjoy your new piercing safely for years to come.
Pain, Healing, and Looking After Your New Labret
So, you’re thinking about getting a labret piercing. It's a fantastic choice, but it’s totally normal to wonder about the practical side of things. Let’s cut through the noise and talk about what you can really expect, from the moment you're in the chair to the day your piercing is fully settled.
First up, the question on everyone's mind: does it hurt? Honestly, it's over before you know it. Most people describe it as a quick, sharp pinch that lasts only for a second. While your lip is certainly a sensitive spot, the procedure itself is so fast that the sensation is very brief. Our piercers at Timebomb Tattoo are pros at making the whole experience as smooth and comfortable as possible.
The Healing Timeline: What to Expect
Once your jewellery is in, your body's healing work begins. The first week is usually the most eventful, with swelling being the main thing you'll notice.
This initial swelling is a completely normal part of the process. It’s exactly why we start you off with a longer labret stud—it gives your lip room to breathe without the jewellery putting any pressure on the fresh piercing. During this stage, it's absolutely vital that you resist the temptation to touch or fiddle with it.
While everyone heals at their own pace, a labret piercing typically takes around 6-8 weeks to fully heal on the outside. This is where choosing a skilled, professional piercer really pays off. Their understanding of anatomy means they can place the piercing perfectly, which makes a huge difference in preventing complications. Poor placement can lead to serious issues like tooth or gum damage—a risk that some reports suggest affects around 7% of DIY or amateur piercings. You can get a better sense of piercing industry safety data here.
This timeline gives you a great visual guide to the key stages of healing and when to change your jewellery.
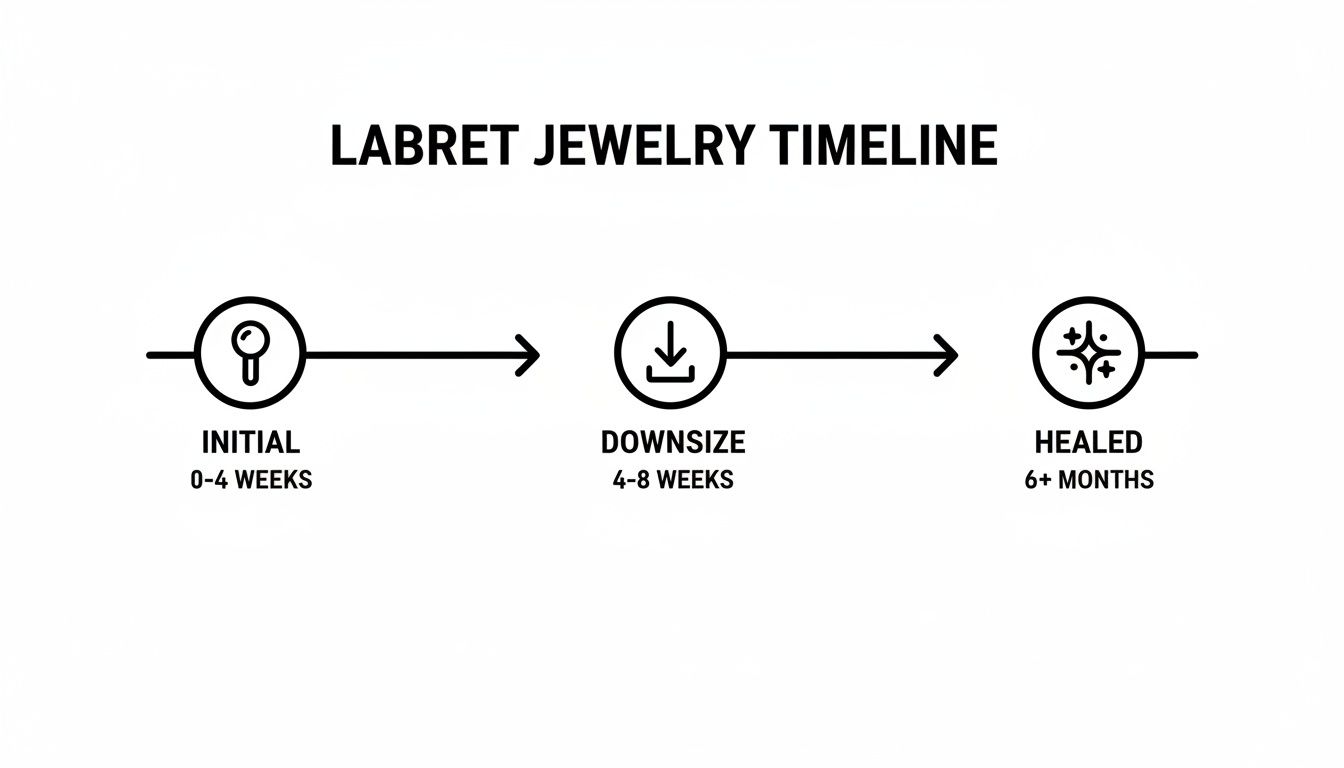
As you can see, coming back to downsize your labret bar once the swelling has gone down is a crucial step for long-term comfort and dental health.
Labret Healing Timeline and Key Milestones
To help you know what's coming, here's a simple breakdown of what to expect during each phase of the healing journey.
| Healing Phase | Duration | What to Expect & Key Actions |
|---|---|---|
| Initial Swelling | Week 1-2 | Expect noticeable swelling, tenderness, and some redness. Action: Clean twice daily, avoid touching, and stick to soft foods. This is the most crucial phase. |
| Downsizing Window | Week 4-8 | Swelling has significantly reduced. The initial long bar may now feel loose. Action: Visit your piercer to have a shorter, fitted labret bar installed. |
| Maturation & Settling | 2 - 6+ Months | The piercing should feel comfortable and look healed, but the internal tissue is still strengthening. Action: Continue cleaning and be gentle with it. |
Following these milestones helps ensure your piercing heals strongly and looks its best for years to come.
Your Essential Aftercare Guide
Good aftercare is non-negotiable. It’s the single most important thing you can do to make sure your labret heals without a hitch. Your best friend for this is a simple sterile saline solution. Steer clear of harsh chemicals like alcohol or peroxide; they're far too aggressive and will only irritate your new piercing, slowing down the healing process.
Think of aftercare as simply keeping the area clean so your body can do its job. You're not trying to disinfect a wound, just creating the perfect, calm environment for healing to happen.
Here’s a straightforward and effective routine to follow:
- Clean Twice a Day: Gently spray the outside of the piercing with a sterile saline solution. There’s no need to rotate or move the jewellery.
- Rinse After Meals: For the inside of your mouth, swish gently with an alcohol-free antimicrobial mouthwash or a saline rinse after you eat to wash away any food particles.
- Hands Off! This is the golden rule. Avoid touching, twisting, or playing with your piercing. It’s the top cause of irritation and can introduce bacteria.
- Be Patient: The outside often looks healed long before the inside is fully settled. Stick with your aftercare routine for the entire healing period your piercer recommends.
If you want to learn more about the best products and methods, check out our in-depth guide on using a saline spray for piercing.
Tips for Eating and Drinking
Eating with a new labret just takes a little getting used to. For the first week or so, it's a good idea to stick to softer foods that don’t require much chewing—smoothies, soups, yoghurt, and mashed potatoes will be your friends.
When you start eating more solid foods again, take small bites and try chewing carefully on the sides of your mouth, away from the jewellery. It's also smart to avoid anything excessively spicy, salty, or acidic for a little while, as these can sometimes sting or irritate a fresh piercing. Staying hydrated with plenty of water is also a great way to support your body's healing process.
Understanding Potential Risks and When to Get Help
Getting a labret piercing from a professional piercer is a very safe procedure, and most heal without a hitch. Still, it’s a new wound, and your body needs time to adjust. Knowing what’s normal during healing—and what isn’t—will give you the confidence to handle any bumps in the road.
For the first week or two, a bit of redness, swelling, and tenderness is completely standard. You’ll also likely see some clear or whitish fluid seeping from the site. This isn't pus; it's lymph fluid, and it's a great sign that your body is doing its job and healing properly.
The absolute worst thing you can do is jump on Google or a forum and try to self-diagnose. Your piercer should always be your first call if you're worried about anything.
Common Issues Versus Serious Concerns
It’s easy to mistake normal healing quirks for something more serious. For example, many people get small, firm "irritation bumps" near their piercing. These are usually just a reaction to the jewellery getting knocked, or perhaps a bit of moisture getting trapped. They look worrying, but they aren't an infection.
On the other hand, swelling that keeps getting worse after the first few days is a definite red flag that needs a professional opinion. This is exactly why following your aftercare instructions to the letter is so crucial. At our Bournemouth studio, for instance, lip piercings labret styles account for 22% of our Friday evening appointments, and our clients choose us because they want a sterile procedure that minimises these exact risks. You can actually learn more about piercing industry trends to see why professional standards are so vital.
The golden rule is simple: when in doubt, get it checked out. A quick visit or call to us at Timebomb Tattoo will either put your mind at ease or give you a clear plan. And please, never take the jewellery out of a piercing you think might be infected—this can trap the infection inside and make things much worse.
Recognising the Signs of an Infection
A true infection is much rarer than simple irritation, but it's important to act fast if you suspect one. The signs are very different from the usual healing process and tend to be more severe.
Keep an eye out for these key warning signs:
- Thick, yellow, or green discharge: Unlike clear lymph fluid, pus is a clear indicator of infection.
- A foul odour coming directly from the piercing.
- Severe and spreading pain, redness, and swelling that feels hot to the touch.
- Feeling generally unwell, especially if you have a fever or chills.
If you notice any of these symptoms, it's time to get it looked at. We’ve put together a detailed guide you can reference on how to spot piercing infection signs.
When to Contact Your Piercer or a Doctor
Knowing who to turn to is just as important as knowing when. For almost all piercing-related worries, your piercer is the expert you need.
- Contact your piercer if: You're seeing irritation bumps, you're concerned about swelling that isn't going down, or you just have a question about your cleaning routine. We can take a look and suggest a different cleaning method or perhaps a change in jewellery.
- Contact a medical professional if: You’re seeing clear signs of an infection, like pus, a fever, or redness that is spreading across your skin. While we can spot the signs, only a doctor can diagnose an infection and prescribe treatment if needed.
Here at Timebomb Tattoo in Croydon and Bournemouth, our job doesn't end when you walk out the door. We're here to offer support and guidance throughout your entire healing journey.
Booking Your Labret Piercing at Timebomb Tattoo
So, you've done your homework and you're feeling ready for a labret piercing. That’s fantastic. The next step—and honestly, the most crucial one—is picking the right people to bring your idea to life.
When you book with us at Timebomb Tattoo & Piercing, you're not just getting a piercing; you're getting peace of mind. We prioritise your health above all else, which is why every single procedure is done by an experienced piercer using a brand-new, single-use, sterile needle. That’s our non-negotiable standard. If you want to dive deeper into why this is so important, our guide on the piercing gun vs needle method explains exactly why a needle is the only professional choice for precision and hygiene.
Our job doesn't end once the jewellery is in. We'll have a proper chat beforehand to make sure the placement is perfect for your anatomy, and we’ll send you away with clear, detailed aftercare advice to see you through the entire healing process.
Take the Next Step Today
Getting your slot booked at our Croydon or Bournemouth studio is easy. We're here to guide you, from the first questions you have to the day you come back to swap in some new jewellery.
Here's all the info you need to get in touch.
Timebomb Tattoo & Piercing, Croydon
- Address: 233 Lower Addiscombe Road, Croydon, CR0 6RD
- Phone: 020 8676 1333
- Hours: Open 7 days a week, 11 AM - 7 PM
Timebomb Tattoo & Piercing, Bournemouth
- Address: 137 Commercial Road, Bournemouth, BH2 5SF
- Phone: 01202 559 551
- Hours: Open 7 days a week, 10 AM - 6 PM
Feel free to give us a call to chat through your ideas or just pop in to see us. Our team is always happy to help you feel prepared and excited about your new piercing.
Choosing a verified professional studio is an investment in a smooth, complication-free experience. It’s where self-expression and your long-term well-being meet, and that expert approach makes all the difference.
This level of professional guidance is why so many parents trust us when arranging piercings for their teens. They appreciate the focus on safety and the fact that lip piercings labret styles are easily reversible. With expert placement and personalised aftercare, removal rates are incredibly low—around 9% after the first year. It just goes to show how professional support leads to confident choices, a point you can read in more detail about the piercing industry.
Your Labret Piercing Questions Answered
It's completely normal to have a few more questions rattling around, even after covering the basics of a lip piercings labret. In fact, we encourage it! Here are the answers to some of the most common things we get asked by clients in the studio every day.
Can I Get a Ring Straight Away?
I know how tempting it is to go for a hoop right from the start, but for a standard labret, that’s a definite no. Trying to heal a straight channel with a curved ring is a recipe for disaster—it causes irritation, can make the piercing shift (migrate), and will make your healing journey much, much longer.
You absolutely have to start with a flat-back labret stud. Once your piercing is fully healed, which can take several months, you can have fun experimenting with rings. Patience is key here.
Will a Labret Piercing Damage My Teeth?
This is a really important concern. Any piercing that sits inside your mouth, like the classic labret, does come with a risk of causing gum recession or tooth enamel damage over time. The good news is that this risk can be dramatically lowered with two simple steps:
- Proper Placement: A skilled, experienced piercer knows exactly how to angle the piercing to minimise contact with your teeth and gums from day one.
- Downsizing: This is non-negotiable. After the initial swelling has settled, we'll swap your longer starter bar for a snug, perfectly fitted one. This single step prevents the vast majority of potential oral health issues.
If you’re still worried, a vertical labret is a fantastic alternative. The jewellery for that piercing never even touches the inside of your mouth.
How Much Do Lip Piercings Labret Styles Swell?
Expect some swelling! The lip is packed with blood vessels, so it's normal for it to get quite puffy, especially during the first week. This is exactly why we use a longer bar for your initial jewellery—it gives your lip the space it needs to swell comfortably without being squeezed. The puffiness will gradually go down over a couple of weeks.
Don't panic when your lip looks a bit plump at first! It’s just your body’s way of kicking off the healing process. Be gentle, a careful cold compress can feel nice, and just let your body do its thing.
Can I Hide My Labret Piercing for Work or School?
Once your labret is completely healed, you can usually pop in a discreet retainer. These are often made of clear or flesh-toned Bioplast and make the piercing far less obvious. The important thing to remember is that you can't use a retainer in a new or healing piercing. You have to commit to wearing the initial metal jewellery for the entire healing period.
Ready to book your piercing with a team that puts your safety and style first? Contact Piercing Near Me today to schedule your appointment at our Croydon or Bournemouth studios. Visit us at https://piercingnearme.co.uk to get started.