Thinking about your first, or next, ear piercing? Many begin by asking which placement looks best, but that's not the most useful first question. The better question is whether a placement suits your ear anatomy, your sleeping habits, your job, your headphones, and your patience for healing.
That's where a lot of online guides fall short. They show pretty jewellery, list a few names, and skip the part that matters once you leave the studio. Ear curation can look effortless, but a well-planned ear usually comes from smart placement, appropriate jewellery, and aftercare that matches the tissue being pierced.
Ear piercings are also far from niche. Older England survey data found that 10% of adults had ever had a body piercing, and among the 1,934 piercings recorded, 13% were at the ear, making ear placements a major part of piercing practice in England according to the adult body piercing survey published on PubMed Central. That matches what we see in studio life. “Ear piercing” isn't one thing. It includes lobes, high lobes, helix work, conch placements, tragus piercings, and more.
This guide gets straight to the placements clients ask for most. You'll find practical advice on pain, healing, jewellery, what catches, what swells, and what tends to heal smoothly when done properly. For anatomy terms, UK-facing guidance commonly distinguishes placements such as lobe, stacked lobe, high-lobe, anti-tragus, tragus, daith, helix, forward helix, conch, and industrial, as outlined in WebMD's ear piercing placement guide.
The advice here is grounded in what works on real clients at Timebomb Tattoo & Piercing, with direct booking support through Piercing Near Me for our Croydon and Bournemouth studios.
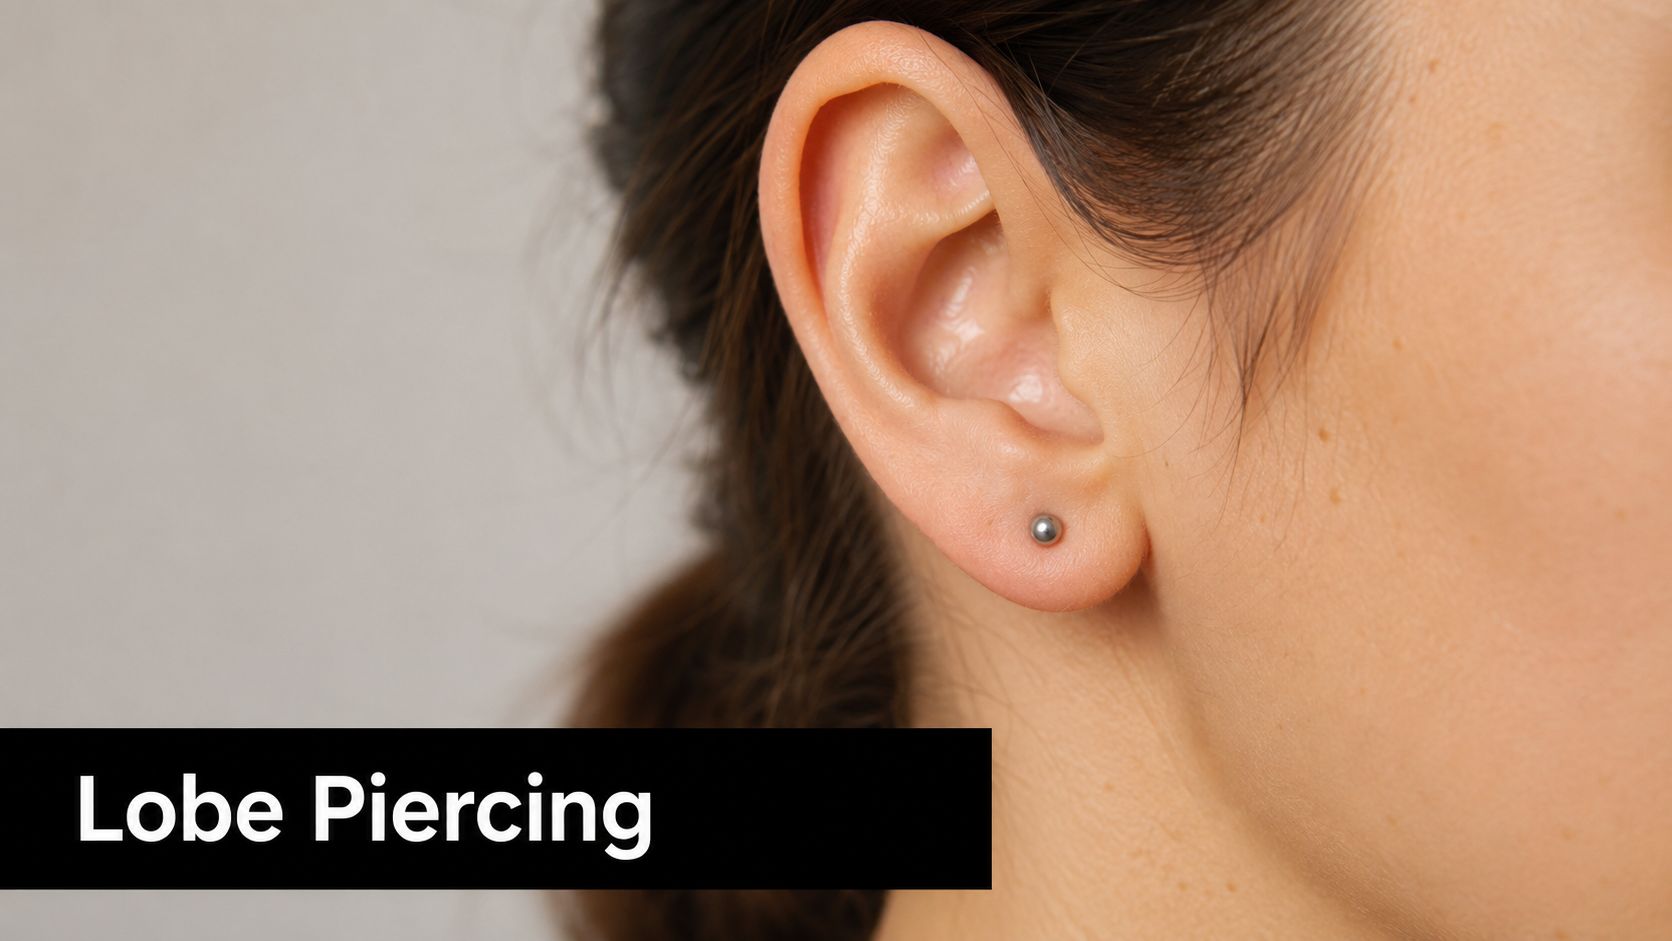
1. Lobe Piercing
The lobe is a common starting point, and for good reason. It sits in the soft lower part of the ear, so it's usually simpler to place, simpler to jewellery-fit, and easier to live with than cartilage.
For first-timers, this is the most forgiving option in the piercings ear types range. It works with a single classic stud, a double lobe arrangement, or the start of a stacked ear that you build over time.
What works best in practice
A well-placed lobe piercing should sit naturally with your existing ear shape and jewellery goals. If someone wants a second and third lobe later, I'd rather place the first with future spacing in mind than squeeze everything together and limit options.
Studs are usually the best starting jewellery. A small implant-grade titanium labret or stud stays stable, catches less than a hoop, and gives the tissue a quieter healing environment.
- Best starter jewellery: Implant-grade titanium studs or flat-back labrets are the most reliable choice for fresh lobes.
- Best styling path: Start simple, then add a second lobe once the first has settled if you want a curated look.
- What usually causes trouble: Sleeping on fresh piercings, swapping jewellery too early, and touching them absent-mindedly.
Practical rule: Lobes are easy compared with cartilage, but they still heal better when they're left alone.
Pain, healing and common mistakes
Pain is usually low and brief. Most clients describe it as a quick pinch followed by warmth or slight throbbing.
Healing is often more straightforward than cartilage, but easy doesn't mean instant. If you're comparing timelines, our guide to ear piercing healing times gives a useful overview of what to expect. In day-to-day studio advice, the main points stay the same: clean with sterile saline, keep hands off, and don't rush jewellery changes.
A common real-world example is the client who gets both lobes done, then sleeps on one side every night. One side settles. The other stays irritated. That doesn't usually mean the piercing was done badly. It usually means the healing ear never got a break from pressure.
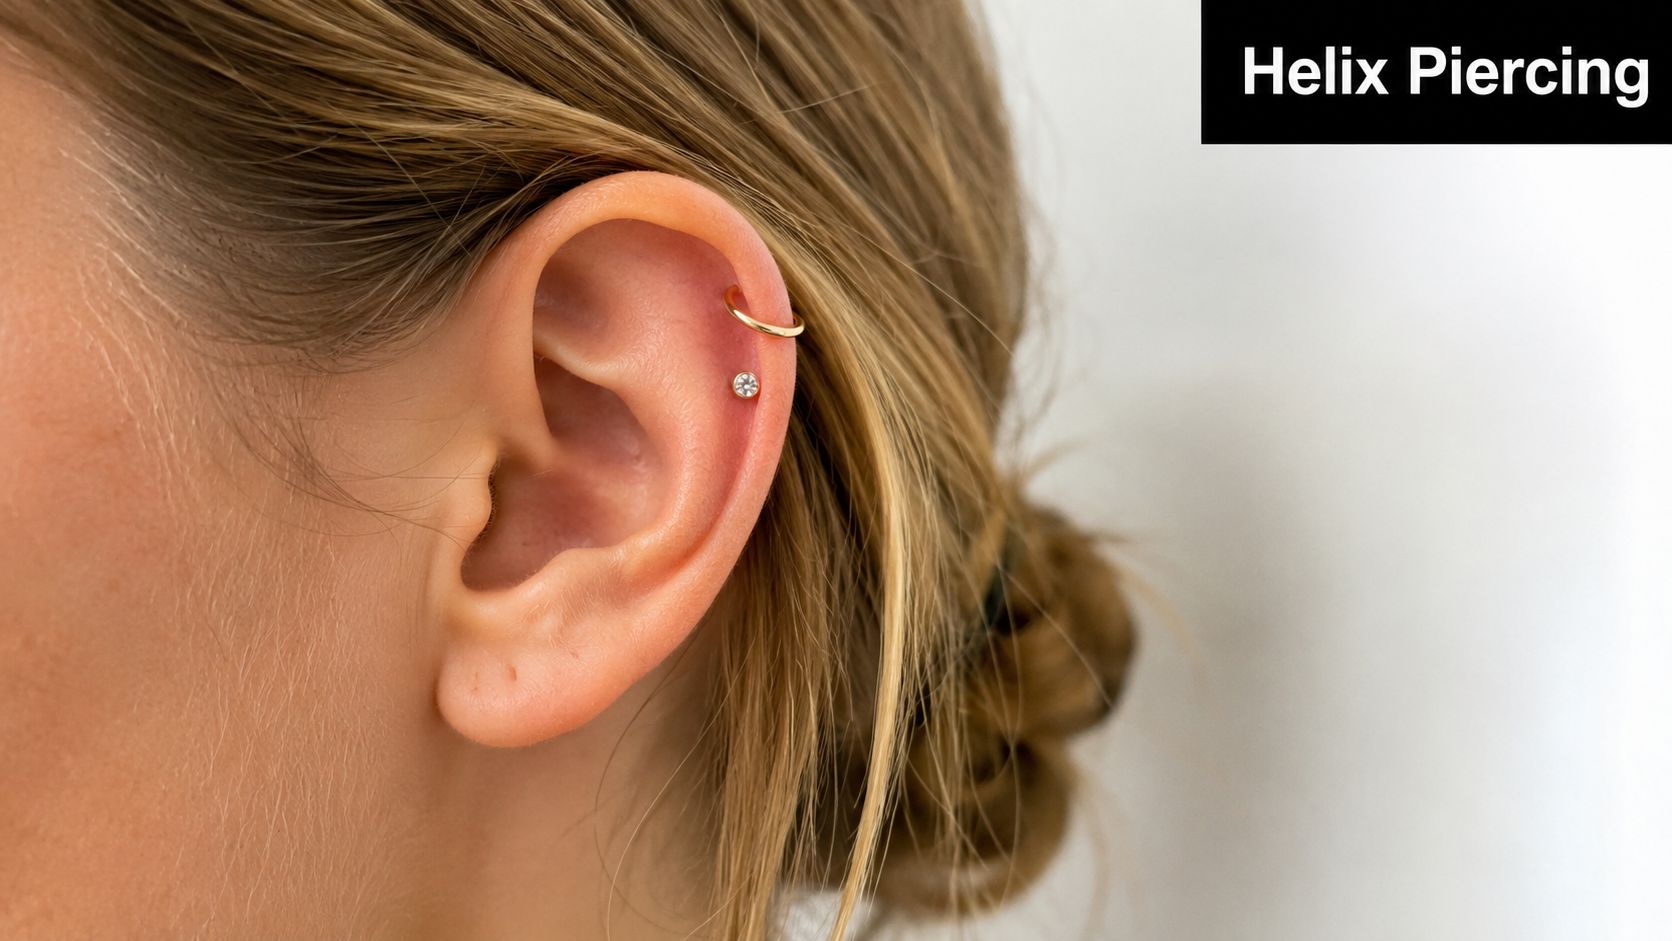
2. Helix Piercing
The helix sits along the outer upper cartilage, and it's one of the most requested cartilage placements for a reason. It's visible, versatile, and easy to build on later with a second helix, a forward helix, or a conch.
A helix can look delicate or bold depending on the jewellery. A tiny titanium stud keeps it subtle. A hoop later on gives it more movement and presence.
Why helix piercings need more patience
Helix piercings look simple, but cartilage can be stubborn. It swells, it remembers pressure, and it doesn't like being knocked by hairbrushes, hoodies, phone screens, or headphones.
This is also where technique matters. Cartilage should be pierced cleanly with a sterile single-use needle, not forced through with blunt pressure. If you're weighing methods before booking, it helps to understand the difference in piercing gun vs needle procedures.
A helix often feels fine in the studio and then becomes awkward during week two, when swelling, hair snagging, and sleep pressure start to show up.
Jewellery, pain and daily life
For fresh helix work, I'd choose implant-grade titanium and keep the design compact. Clients often love the idea of a ring from day one, but rings move more, rotate more, and can prolong irritation in the early stage. A well-sized stud or flat-back usually gives better healing odds.
Pain is generally moderate. It's sharper than a lobe and the soreness tends to linger longer. The trade-off is aesthetic payoff. A single helix can stand alone, while a double helix or helix constellation creates one of the cleanest curated-ear looks available.
A common example is someone who wants a helix but wears over-ear headphones for work. It can still be a good choice, but only if they're willing to adjust that routine while it settles. If not, I'd usually suggest starting with a lobe or upper lobe first.
3. Conch Piercing
The conch sits in the bowl-like centre of the ear, and when it's placed well, it becomes the anchor point of the whole ear. It draws the eye inward rather than outward, which gives it a different feel from a helix.
Clients usually choose either an inner conch for a centred stud look or an outer conch when they want to work toward a ring later. Both can be beautiful, but the jewellery plan should be decided before the needle ever comes out.
Stud first, ring later
A fresh conch usually behaves best with a stud or flat-back labret. Large rings look great once healed, but starting with one can make pressure, movement, and snagging harder to manage.
This is one of those placements where ear shape matters a lot. Some conches are roomy and ideal for statement ends. Others need a smaller, more conservative start. Good placement isn't about following a trend photo. It's about reading the anatomy in front of you.
- Best for: Clients who want a focal-point piercing without filling the outer rim first.
- Less ideal for: Anyone who relies on in-ear headphones every day and can't pause that habit.
- Strong jewellery choice: Titanium flat-backs with low-profile ends tend to heal more smoothly than decorative pieces with lots of edges.
Pain, swelling and real trade-offs
Conch pain is usually moderate to moderately high because the tissue is thicker than a lobe. The actual piercing is quick, but the ear can feel full, warm, or tender afterwards.
One common issue is pressure from earbuds. Even careful clients forget how often they use them until the fresh piercing reminds them. If someone tells me they commute, work, and exercise with earbuds every day, I'll flag that as a real healing obstacle, not a minor inconvenience.
What works well is patience and conservative jewellery. What doesn't work is choosing a large decorative piece on day one because it looked great in a photo. The conch rewards restraint at the start.
4. Tragus Piercing
The tragus is the small flap of cartilage at the entrance to the ear canal. It's a small area, but it changes the whole look of an ear because it adds detail in the front-facing view.
This placement suits minimal jewellery especially well. A tiny bead, polished disc, or subtle gem can make a tragus look deliberate without overwhelming the ear.
Where precision matters most
Tragus work needs careful angle, careful depth, and jewellery that sits comfortably against a very compact piece of tissue. Not every tragus is large enough for every style, and forcing a look onto unsuitable anatomy usually creates healing issues.
This is also a practical placement. Anything that presses into the ear canal area, or constantly brushes the front of the tragus, can keep it sore. Earbuds are the obvious example, but phone pressure and habitual touching do the same thing.
The best tragus piercings look effortless because they're conservative in size, clean in angle, and not overloaded with jewellery.
Pain and healing reality
A tragus often sounds intimidating because of the location, but the experience varies a lot from person to person. Many clients find the piercing itself manageable and the healing phase more annoying than painful.
You should expect some tenderness when chewing, talking a lot, or pressing the area accidentally. Most problems come from friction rather than from cleaning itself. I'd always rather a client clean gently and consistently than over-clean and irritate the skin.
A good real-world pairing is a tragus with a single helix or a conch. It gives balance without crowding the ear. If the client wants a front-of-ear detail but doesn't have the anatomy for a forward helix, tragus can be the stronger option.
5. Anti-Tragus Piercing
The anti-tragus sits opposite the tragus, just above the lobe area, and it's one of the more anatomy-dependent choices among popular piercings ear types. Some ears have a pronounced ridge there. Others barely have enough tissue to support a stable piercing.
That's why this one should always begin with an honest anatomy check. If the structure isn't suitable, the right answer is no. A forced anti-tragus rarely becomes a happy piercing.
A niche placement with strong visual payoff
When it works, it looks brilliant. It adds detail low on the ear without defaulting to another lobe piercing, and it pairs well with a tragus for a balanced front-of-ear design.
Jewellery should stay small and low-profile to begin with. Bulky ends, oversized rings, or decorative pieces with projecting edges tend to make an already demanding piercing harder to heal.
- Good candidate: Someone with a defined anti-tragus ridge and realistic healing expectations.
- Good pairing: Anti-tragus with double lobes or tragus for structure and symmetry.
- Poor approach: Choosing it just because it's unusual, without considering anatomy or daily pressure points.
Pain and movement issues
This usually feels more intense than a standard lobe. It's cartilage, it's compact, and it sits in an area that can react to jaw movement, headphones, and sleeping pressure.
Clients are often surprised by how much nearby movement matters. Talking, chewing, resting your face on your hand, or wearing snug headphones can all irritate it. The placement can absolutely heal well, but it tends to do best on clients who are patient and don't need a “low-maintenance” piercing.
If you want something distinctive and you're willing to baby it, anti-tragus can be a smart choice. If you want easy healing, it usually isn't the first one I'd suggest.
6. Forward Helix Piercing
The forward helix sits on the upper front cartilage where the ear curves toward the face. It catches the light from the front, which is why it photographs so well and looks especially refined with tiny matching studs.
This is often the placement people choose when they want detail without adding bulk. A double or triple forward helix can look elegant, but only if there's enough room to place each piercing cleanly.
Small space, big impact
Forward helix piercings need very accurate spacing. If they're too tight, they look cramped and can become awkward to clean. If they're too spread out, the stack loses that intentional curated look.
Fresh jewellery should stay light and secure. Titanium flat-backs are the safest starting point for most clients because they reduce excess movement and sit neatly in a compact area.
A strong real-life example is the client who wants a “pretty from the front” piercing for work or social settings but doesn't want a larger statement placement. That's exactly where forward helix shines.
Pain, styling and what tends to go wrong
Pain is usually in the moderate range. The piercing itself is quick, but the area can be tender when brushing hair back, pulling tops over your head, or sleeping carelessly.
What goes wrong most often is accidental snagging. Hair, towels, scarves, and glasses can all interfere if the jewellery is too prominent or the client forgets it's there. This is why simple jewellery wins in the early stage.
It also helps to be realistic about anatomy. Some ears comfortably suit a triple forward helix. Some suit one beautifully and shouldn't be pushed further. Good piercers don't force a stack just because it's fashionable.
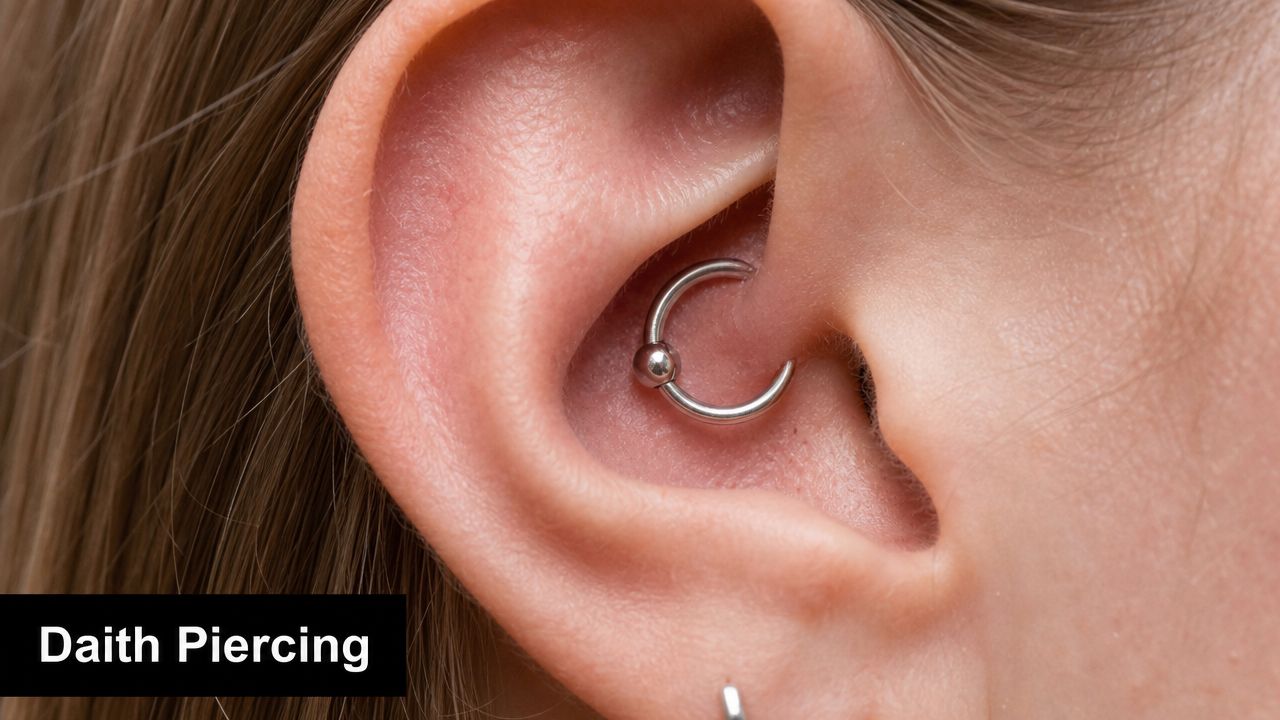
7. Daith Piercing
The daith passes through the inner cartilage fold above the ear canal, and it's one of the most distinctive placements on the ear. It has a tucked-in, sculptural look that stands out without being immediately obvious from every angle.
Many clients arrive asking about daith because they've heard anecdotal migraine claims. I keep that conversation honest. People do ask about it for that reason, but it should still be chosen as a piercing first, not as a medical plan.
Anatomy and jewellery make or break this piercing
A daith needs the right fold to support a clean pass and suitable jewellery. This is not the place for guesswork. If the ridge is too shallow or the angle is off, healing can be unnecessarily difficult.
Hinged clickers and captive-style rings are common choices once suitable, but the key is correct sizing and smooth surfaces. Decorative pieces can work later. Fresh daith piercings usually do better when the jewellery shape respects the fold and doesn't create excess pressure.
Choose a daith because you like how a daith looks. Any other hoped-for benefit should stay secondary.
Pain, swelling and patience
Daith pain is often described as a deep pressure rather than a surface pinch. The area can swell noticeably early on, and cleaning takes a bit more care because the piercing sits inside a fold.
This isn't a piercing to rush, pick at, or constantly photograph by moving the ear around. It rewards clients who can leave it alone and follow a boring routine. Saline, clean hands, no twisting, no unnecessary fiddling.
A good daith can sit beautifully with a helix or conch, especially if you want texture across the ear. A bad daith plan is choosing ornate jewellery immediately and then wondering why the area stays irritated.
8. Rook Piercing
The rook sits in the inner upper ridge of cartilage above the daith. It's one of the placements that experienced piercing clients often love because it adds depth to the ear instead of just decorating the outer edge.
It's also one of the placements that not every ear can support well. If the ridge is too flat or too tight, the result may be more trouble than it's worth.
Not a beginner's cartilage choice
Rook piercings can heal beautifully, but they're not the easiest place to start if you've never healed cartilage before. The tissue is firm, the placement is tucked away, and swelling can be more noticeable than people expect.
Curved barbells are the standard starting point in many cases because they suit the natural shape of the area. What doesn't work well is forcing jewellery that fights the anatomy.
- Good for: Clients who already understand cartilage healing and want a more layered look.
- Less good for: Anyone wanting a “quick heal” or planning to sleep on that side regularly.
- Best studio approach: Conservative placement, room for swelling, and jewellery with a polished finish.
Pain and everyday management
A rook can feel sharp and intense during the procedure because of the tissue thickness. Afterwards, it's often more manageable than people fear, provided they don't keep knocking it.
One real trade-off is cleaning access. Because the rook is tucked in, clients sometimes either ignore it or over-handle it trying to reach it. Neither helps. Gentle saline and restraint work better than constant interference.
Rook pairs well with helix and conch placements because it gives inner-ear detail. If someone wants an advanced-looking curation without an industrial bar, rook is often the smarter route.
9. Upper Lobe (Second/Third Lobe) Piercing
Upper lobe piercings sit above the first lobe and are one of the easiest ways to make an ear look more styled without jumping straight into cartilage. They still feel familiar, but they add dimension and allow better jewellery layering.
For many clients, a second or third lobe is the most practical next step after a first piercing. It gives you more room to play with spacing, metal colour, and stone size without taking on the healing demands of a helix or conch.
The value of good spacing
Planning matters more than people think. If upper lobe piercings are too close together, jewellery competes for space and the ear can look cramped. If they're well spaced, even simple studs look intentional.
A useful point from the retail side is that ear piercings account for the largest share of body piercing jewellery demand at 46%, with nose next at 27%, according to the body piercing jewellery market overview at Business Research Insights. That makes sense in studio practice. The ear supports the widest mix of studs, hoops, clickers, and flat-backs, and upper lobe placements are a big part of that flexibility.
Jewellery, pain and styling choices
Pain is usually low to mild, though an upper lobe can feel slightly firmer than the first lobe depending on where the flesh starts to thin toward cartilage. For starter jewellery, close-fitting titanium studs or flat-backs tend to behave best.
If you're choosing starter pieces, our guide to the best earrings for newly pierced ears can help you narrow down practical options. In the studio, I usually advise clients to think in layers: a slightly larger first lobe, a neat second, and perhaps a smaller accent higher up. That progression tends to age well and stay wearable.
A common real-world setup is a first lobe with a polished ball, a second lobe with a small gem, and a plain upper lobe accent. It's simple, but it looks considered.
10. Ear Stretching and Gauging
Stretching isn't a separate piercing placement, but it belongs in any serious discussion of piercings ear types because it changes what a healed lobe can become. Done properly, stretching is gradual, controlled, and based on tissue condition, not impatience.
Done badly, it creates tearing, thinning, blowouts, and scar tissue that can be hard to reverse. This is one area where rushing always shows.
Stretching rewards patience
A healthy stretch starts with a fully healed, settled piercing. From there, size changes should feel gradual and manageable. Pain, force, and resistance are warnings, not milestones.
The best jewellery for early stretching is smooth, correctly sized, and made from quality materials. Cheap tapers, mystery metal, and oversized jumps cause most of the problems people later blame on stretching itself.
If a stretch feels like a battle, stop. Healthy tissue doesn't need to be forced.
What works and what doesn't
What works is waiting until the ear is ready, lubricating appropriately, and treating the lobe like living tissue rather than elastic. What doesn't work is copying someone else's pace, skipping sizes, or wearing heavy jewellery in a freshly stretched ear.
A realistic example is the client who had standard lobes for years and wants a more statement look without adding multiple cartilage piercings. Stretching can be an excellent route because it keeps the focus on the lobe and offers a very different jewellery style, from understated tunnels to bold plugs.
It's also worth being honest about permanence. Some stretched lobes shrink significantly if jewellery is removed. Others don't return to their previous size or shape. Anyone considering stretching should treat it as a commitment, not a temporary style experiment.
Comparison of 10 Ear Piercing Types
| Piercing | Implementation complexity 🔄 | Resource requirements & aftercare 💡 | Expected outcomes ⭐ | Key advantages 📊 | Ideal use cases ⚡ |
|---|---|---|---|---|---|
| Lobe Piercing | Low, simple needle technique, minimal skill required | Basic implant-grade studs (titanium/steel); saline cleaning twice daily; minimal follow-up | Quick healing (4–6 weeks); very low pain; reliable healing | Fastest healing, lowest infection risk, highly versatile | First-time piercings, children/teens, everyday wear |
| Helix Piercing | Moderate, cartilage piercing along outer ridge; precise placement needed | Implant-grade jewellery; daily saline soaks; avoid sleeping on side; longer monitoring | Healing 6–9 months; moderate pain; visible, aesthetic result | High visibility, stacks well, suits statement jewellery | Statement wearers, layered ear designs, 16+ |
| Conch Piercing | Moderate–High, deeper cartilage area, requires precision | Experienced piercer; larger gauge options (16–14g); strict aftercare; avoid earbuds | Healing 8–12 months; moderate–high pain; bold central focal point | Large surface for decorative jewellery; strong visual impact | Bold statement pieces, focal ear compositions |
| Tragus Piercing | High, small area near ear canal, technical accuracy needed | Skilled piercer; small gauge studs; careful cleaning; no earbuds/headphones during healing | Healing 6–8 months; moderate–high pain; distinctive subtle look | Unique placement that complements helix/conch | Experienced enthusiasts, those wanting discreet but distinct piercings |
| Anti-Tragus Piercing | High, anatomically variable, needs expert placement | Experienced piercer; small–medium gauge; strict cleaning; mindful of jaw movement | Healing 6–8 months; high pain; can be sensitive to movement | Symmetry with tragus, less common and distinctive | Symmetrical ear designs, experienced clients |
| Forward Helix Piercing | Moderate–High, close to tragus, front-facing cartilage work | Implant-grade jewellery; daily saline; avoid jaw/cheek pressure | Healing 6–9 months; moderate–high pain; highly visible from front | Front-facing drama, stacks well for striking designs | Front-facing statement piercings, layered helix work |
| Daith Piercing | High, thick fold, complex angle and depth control required | Very experienced piercer; expect swelling; diligent saline care; avoid submersion | Healing 6–12 months; moderate–high pain; unique textured placement (migraine claims anecdotal) | Curved jewellery displays attractively; distinctive look | Experienced enthusiasts seeking unusual placements |
| Rook Piercing | Very high, deep inner-ear ridge, technically challenging | Expert piercer only; extended aftercare; avoid water and pressure | Healing 6–12+ months; high pain; subtle, sophisticated depth in ear | Distinctive, elegant with curved jewellery; complements daith | Advanced piercing collectors, those seeking subtle complexity |
| Upper Lobe (2nd/3rd) | Low, soft tissue similar to first lobe, straightforward | Standard studs; saline cleaning; ensure adequate spacing between piercings | Healing 4–6 weeks; very low pain; clean stacked aesthetic | Fast healing, low risk, easy to style and hide | Stacking designs, adding to existing lobe piercings |
| Ear Stretching & Gauging | Moderate, gradual process requiring correct technique and patience | Tapers/gauges, lubricants, fully healed starting piercing, professional guidance | Ongoing timeline (months–years); minimal if gradual; often permanent at large sizes | Enables bold statement jewellery and unique aesthetics | Long-term commitment seekers, alternative fashion enthusiasts |
Ready for Your New Piercing? What to Do Next
Choosing the right placement is only half the job. The part that matters just as much is choosing a studio that takes hygiene, anatomy, jewellery quality, and aftercare seriously. A well-placed piercing in the wrong jewellery, or with poor aftercare advice, can turn an exciting appointment into months of avoidable irritation.
For most first-time clients, the easiest route is still the standard lobe. It's usually the most straightforward to heal, the least disruptive to daily life, and the simplest place to learn good piercing habits. If you already know you want cartilage, helix and upper lobe combinations are often the most wearable starting point because they create a curated look without immediately jumping into the trickiest anatomy.
Pain matters, but it shouldn't be the only deciding factor. A placement that hurts briefly and then fits your lifestyle can be a better choice than a “lower pain” option that clashes with how you sleep, work, exercise, or wear headphones. That's why honest consultation matters. Good piercers don't just ask what looks nice. They ask how you live.
Parents often ask what the best option is for teenagers. In practical terms, it's usually a lobe piercing, provided the child is old enough to understand aftercare and leave the jewellery alone. For any client under 16, a parent or legal guardian must be present. The piercing itself takes moments. The aftercare responsibility lasts much longer, so maturity matters more than bravery.
Preparation is simple but important. Eat before your appointment, stay hydrated, come in with clean ears, and avoid alcohol beforehand. If you wear glasses, helmets, earbuds, or headphones regularly, mention that during your consultation because it can affect placement advice. If you already know you're a side sleeper, say so. That one habit changes what tends to heal well.
At Piercing Near Me, clients are connected with the teams at Timebomb Tattoo & Piercing in Croydon and Bournemouth for consultations, walk-ins, and appointments. The focus is practical and safety-led: single-use sterile needles, implant-grade jewellery, careful placement, and aftercare that's explained clearly rather than rushed. That matters whether you're getting a single lobe or planning a full curated ear over several appointments.
If you're still deciding, keep it simple. Pick the placement you most want, make sure your anatomy supports it, and start with jewellery that helps healing rather than showing off too early. You can always upgrade later. The clients happiest with their piercings are usually the ones who treated the first few months seriously.
FAQs for First-Timers & Parents
What's the best first piercing?
The standard lobe is usually the easiest first choice and the most forgiving to heal.
How much will it hurt?
Pain is subjective. Lobes are usually mild. Cartilage tends to feel sharper and stay sore for longer.
What age is appropriate?
It's best when a child is ready to understand aftercare and not interfere with the jewellery. For clients under 16, a parent or legal guardian must be present.
What should I do before I come in?
Eat properly, drink water, arrive with clean ears, and be ready to talk through anatomy, jewellery, and aftercare.
Book Your Appointment in Croydon or Bournemouth
Ready to bring your ear curation ideas to life? The teams at Timebomb Tattoo & Piercing in Croydon and Bournemouth can help with placement advice, jewellery selection, and safe piercing appointments.
Call us on: 01202 9000 50
WhatsApp us on: 07752913846
We look forward to seeing you at our Croydon or Bournemouth studio!
If you're comparing studios, placements, or jewellery options, Piercing Near Me is a practical place to start. You can explore ear piercing guidance, check booking options, and connect with Timebomb Tattoo & Piercing in Croydon or Bournemouth for a consultation.