
You've saved a photo of a perfect ear stack, chosen the jewellery, and now you're pointing to a spot on the outer rim thinking, “There.” In the studio, that's usually where the useful conversation starts. Helix piercing placement isn't about copying a position from a photograph. The piercer has to match the jewellery and the look you want to the shape of your cartilage, your sleeping habits, glasses, headphones, hair, and any future piercings.
A helix sits through the upper outer cartilage ridge, not the softer lobe tissue. UK clinical guidance warns that cartilage piercings can develop perichondritis, an infection affecting the tissue around the cartilage of the outer ear, so hygiene, precise technique, suitable jewellery, and sensible aftercare all matter from the beginning (UK Health Security Agency guidance on perichondritis linked to ear piercings).
Why Helix Piercing Placement Matters More Than You Think
A client once arrived with a very clear reference photo and a very specific finger point on the rim. The photograph showed a neat upper helix stud, but her own ear curved more tightly towards the front, and the proposed dot would have sat directly beneath the arm of her glasses. She also slept on that side and wore over-ear headphones for work. The attractive position in the photograph would have been a poor position for her daily life.

The helix is a curved working surface
The outer rim isn't a flat strip. It changes in thickness, angle, curvature, and available space as it travels around the ear. A dot that looks balanced from the front may sit too close to the edge from the side. A placement that appears delicate with a small flat end may leave too little room for swelling or put pressure on the jewellery when the ear is compressed.
A professional piercer therefore looks beyond the visible dot. The piercing channel needs enough stable cartilage around it, and the jewellery must sit at an angle that works with the ear rather than forcing the ear to accommodate it. UK clinical sources associate cartilage piercings with higher complication rates than lobe piercings, and describe serious complications that can include abscess formation, cartilage loss, and surgical treatment (NHS guidance on infected piercings).
Practical rule: The most flattering dot is only useful if the ear can support it comfortably while it heals.
Lifestyle often decides between two otherwise attractive options. Glasses arms can rub a forward or high position. Headphone cushions can press across a standard upper helix. Long hair can catch on a decorative end, while a helmet or tight hat can repeatedly compress the rim. Side sleeping creates another problem, because pressure and movement can keep a cartilage piercing irritated.
Good placement supports your future plan
A single helix may be the first part of a larger ear curation. If you might add a flat, conch, or another helix later, the first dot shouldn't consume the space needed for those pieces. A piercer also has to consider whether you want a subtle stud, a larger decorative end, or a hoop after healing.
This is why one person's ideal helix position may be completely wrong for someone else. The best result balances anatomy, jewellery angle, daily pressure, snagging risk, and future styling, rather than treating aesthetics as the only measure of success.
Understanding Your Ear Anatomy and Helix Zones
If your glasses arm sits across the upper rim, a fashionable helix mark can become a daily pressure point. Placement starts with the ear in front of you, then accounts for how you sleep, wear headphones, manage your hair, and plan future jewellery.
The helix is the raised outer rim of the ear. It curves around the outside and provides the area usually meant by a traditional helix piercing. Its thickness, curl, and available surface change from ear to ear, so the same marked position will not suit every client.
Inside the rim is the flatter scapha. Closer to the centre, the antihelix forms another raised fold. Towards the front, the rim turns and meets structures around the upper ear, including the crus of the helix. You do not need to memorise those terms. They explain why a piercer may move your requested dot by a small amount to find stable tissue and a workable jewellery angle.
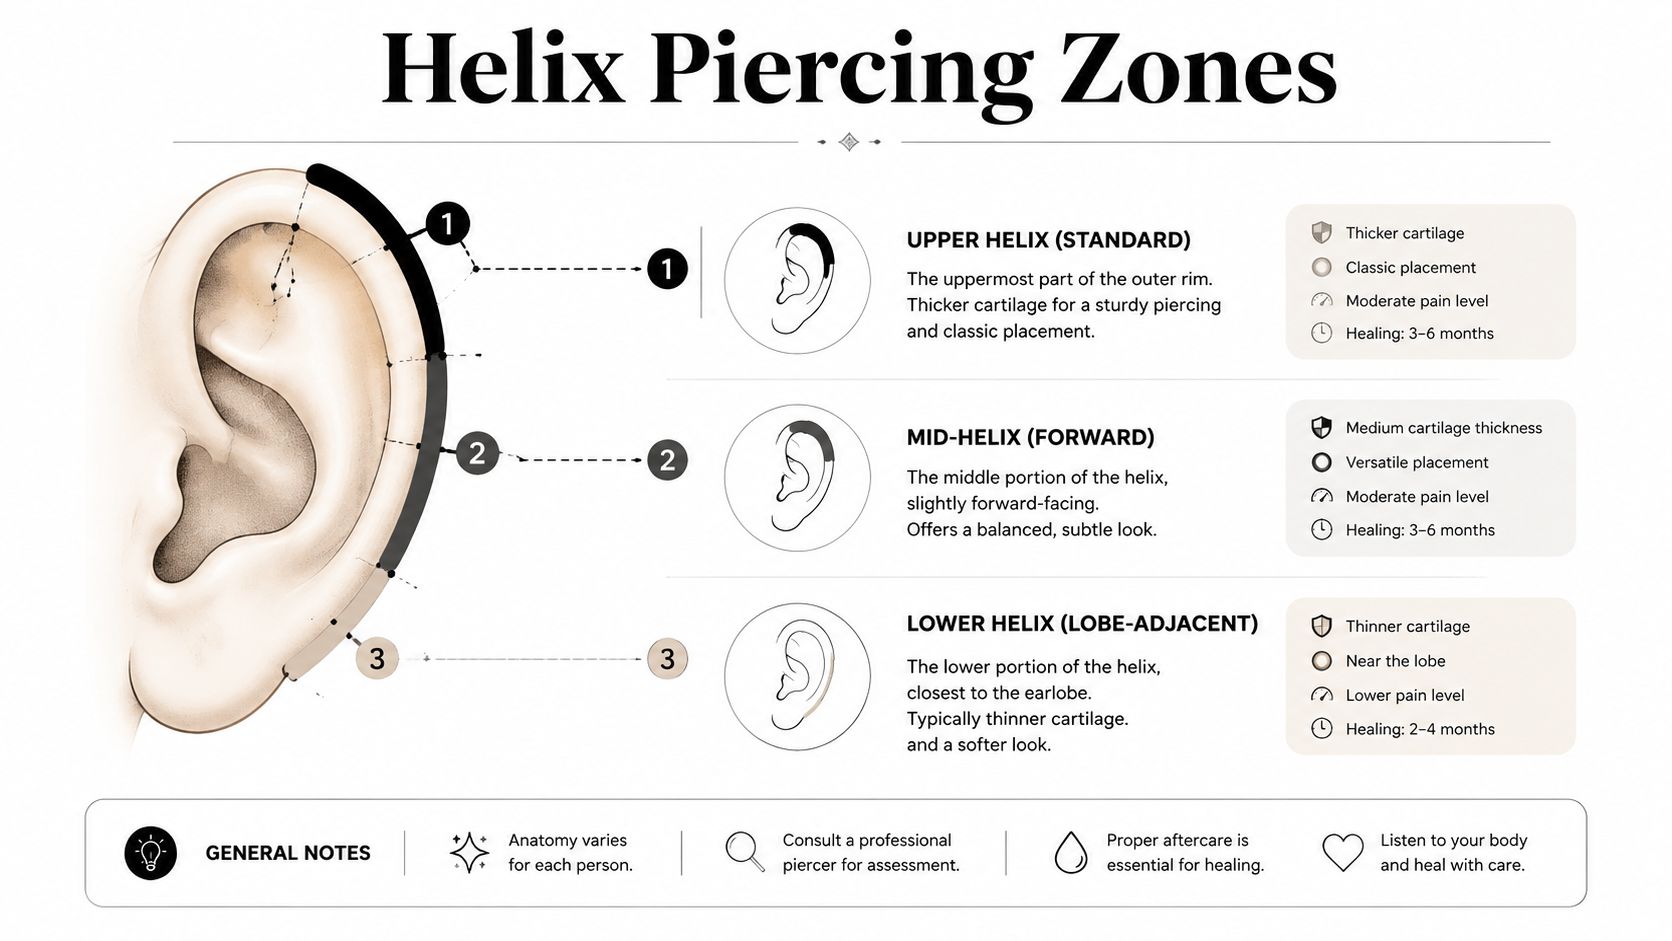
Three useful placement zones
Upper helix, standard: This familiar outer-rim position sits near the upper curve. It works as a standalone stud or the first point in a row. Check the rim's thickness and the space around it, especially if you use over-ear headphones, hats, or glasses.
Mid-helix, forward: This sits closer to the front of the ear, near the temple and the route taken by glasses arms. It can look neat and balanced, but the cartilage and folds vary considerably. A tighter curve may leave less room for swelling, cleaning, or a larger decorative end.
Lower helix, lobe-adjacent: Further down the rim, this position creates a softer connection towards the lobe. Pillows, hair, mask loops, and clothing can all reach it, so side sleepers should discuss the pressure before choosing it.
Why cartilage changes the decision
Cartilage has a different blood supply from the soft tissue of the lobe. It usually heals more slowly and stays vulnerable to irritation for longer. UK guidance identifies cartilage-related problems including granulomas and perichondritis, so a helix needs different expectations from a lobe piercing. Upper-ear cartilage also falls within local piercing rules. The Redbridge code states that this piercing is not permitted for people under 16, while clients aged 16 to 18 need a parent or legal guardian present with written consent (Redbridge body piercing code of practice).
Check your ear from the front, side, and slightly behind. Note whether the rim is prominent or tightly curled, whether the scapha is broad or shallow, and whether the forward edge turns sharply towards the temple. These observations cannot replace an in-person assessment, but they help you ask focused questions using this practical ear piercing guide.
Comparing Helix Placement Options for Different Lifestyles
The most useful comparison isn't “Which position looks trendiest?” It's “Which position creates the fewest problems in the routine you already have?” A standard upper helix may be ideal for someone who avoids over-ear headphones, while a forward position may be workable for someone who wears small glasses frames and keeps hair away from the ear.
| Placement | Best For | Watch Out For | Healing Considerations |
|---|---|---|---|
| Standard upper helix | A classic outer-rim stud, a future row, or a simple first cartilage piercing | Over-ear headphone cushions, helmet edges, hair snagging | Choose a stable section of rim with room for swelling and avoid direct pressure |
| Forward helix | A more front-facing detail and curated combinations near the upper ear | Glasses arms, temple pressure, hair and mask contact | A tighter forward fold can make cleaning and jewellery clearance more demanding |
| High helix | A striking position high on the rim, often used as a focal point | Hats, helmets, hairbrushes, and upper headphone contact | The exposed position can be easy to bump, so jewellery should remain secure and low profile |
| Low helix | A softer transition towards the lobe and room for an upper-rim composition | Pillow pressure, hair, clothing, and mask loops | Side sleepers may need to change how they rest their head while the cartilage settles |
Glasses and forward placements
Glasses arms sit close to the forward side of the ear and temple. If they pass directly over a fresh piercing, every removal and replacement can create friction. A forward helix isn't automatically unsuitable for glasses wearers, but the piercer should watch the exact path of the frame rather than relying on a general rule.
Bring the glasses you use most often to the consultation. The fit can change when you switch from everyday frames to sunglasses, so mention both if you alternate between them.
Headphones, helmets, and hair
Over-ear headphones are often more disruptive than people expect because the cushion can rest across the outer ear for long periods. A high or standard helix may be inside that pressure zone, while a forward position may conflict with the headband or frame connection. Helmets create a similar issue, with the added difficulty of repeated removal and compression.
Hair can be equally persistent. Long strands wrap around decorative ends and can pull the jewellery when you tuck hair behind your ear. A small, smooth end is usually easier to live with during healing than a large projecting design.
Sleeping and future curation
If you sleep on the side you want pierced, placement should be discussed openly. A lower helix may sit exactly where your head presses into the pillow, while a higher position may be spared by the way your ear rests. A future conch or flat also changes the available visual space, so ask the piercer to map the ear as a complete composition rather than treating the helix as an isolated dot.
How Professional Piercers Mark and Choose the Perfect Spot
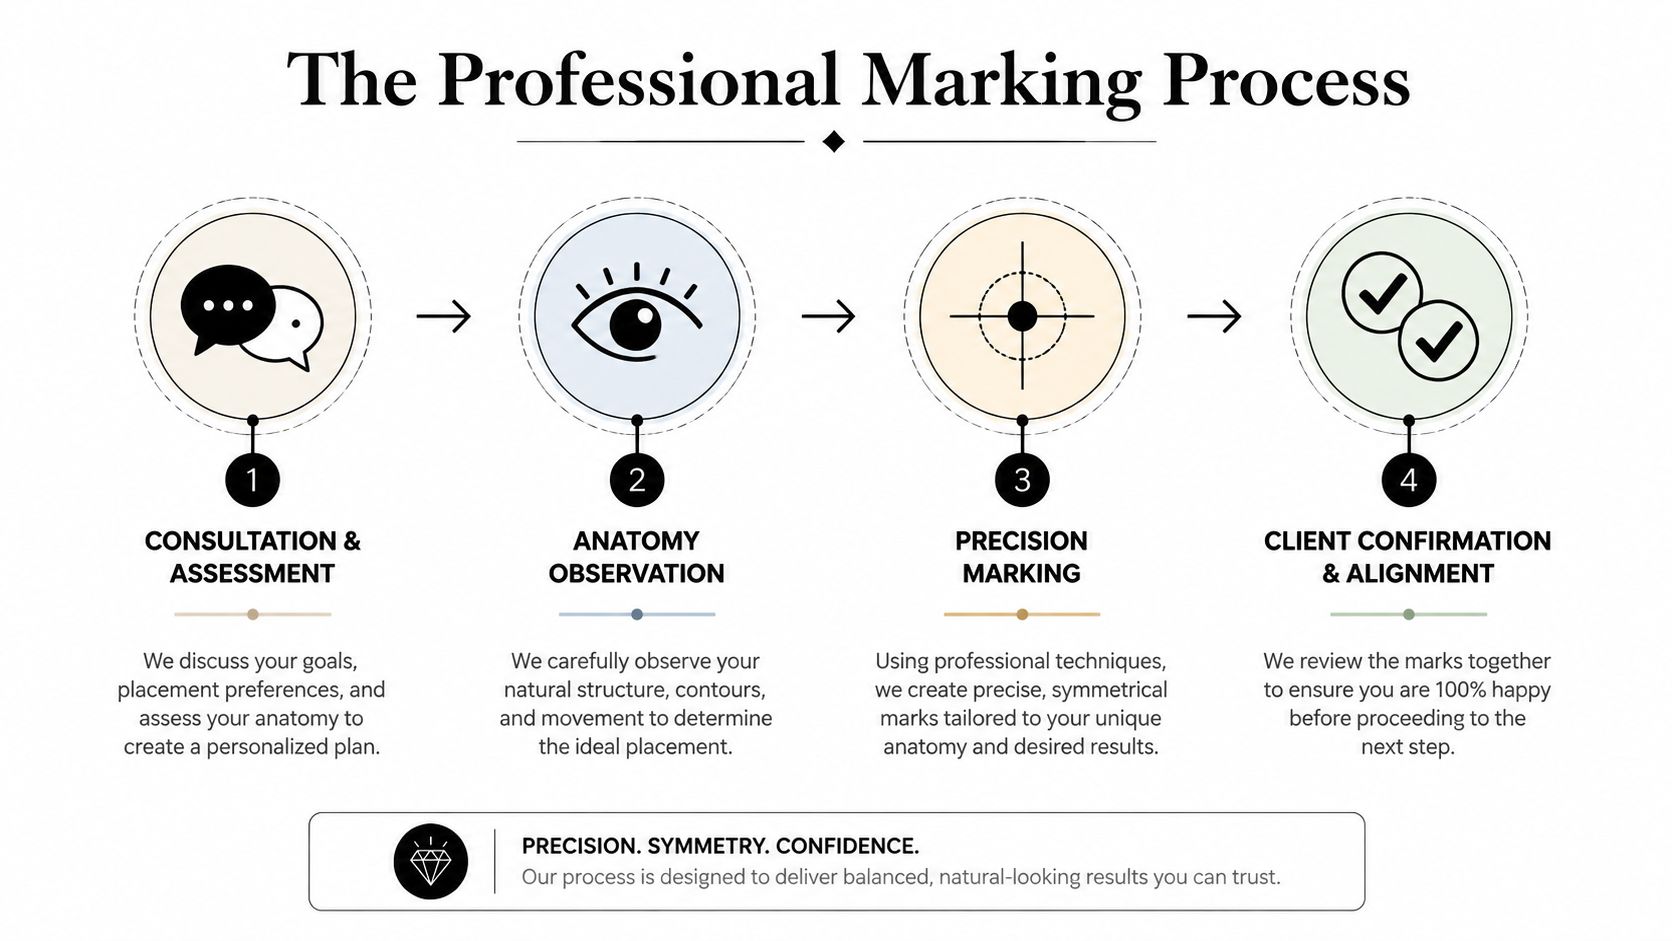
A good marking process is a conversation, not a quick pen mark followed by the needle. The piercer first examines the ear at rest, then considers how the rim changes when the client smiles, moves their jaw, puts on glasses, or turns their head. Symmetry matters, but exact mirror-image placement isn't always possible or desirable because ears naturally differ.
The consultation comes before the dot
Expect practical questions:
- Sleeping side: Explain whether you regularly sleep on the intended side or change position during the night.
- Daily equipment: Mention glasses, sunglasses, over-ear headphones, helmets, hats, masks, and any work equipment that touches the ear.
- Hair routine: Describe whether you wear long hair loose, tie it back, or use products that may reach the piercing.
- Future jewellery: Say whether you're considering a hoop, a decorative end, a double helix, a flat, or a conch later.
The piercer then assesses the cartilage section for stability, thickness, curvature, and edge clearance. Piercing too close to the edge can leave less supportive tissue and may increase pressure, migration, or trauma. The exact angle also matters. Jewellery that looks straight from one view may sit under tension when viewed from the side.
Jewellery changes the marking
A flat-back labret, hoop, or decorative end doesn't occupy space in the same way. For a fresh piercing, a piercer needs to allow for swelling and select jewellery that remains stable without pressing into the ear. A hoop can require a different channel position and angle from a flat-back, particularly if the ear curves tightly.
Most clients should judge the mark with the initial jewellery in mind, not only the healed look. Ask to see the dot from the front, side, and rear. Move your hair, put on your glasses, and check whether the placement still feels practical. Reputable studios that offer professional piercer consultations should be willing to discuss a mark, adjust it, or explain why a requested location isn't suitable.
A small change in position can protect the piercing from a daily source of pressure that a photograph will never show.
Don't feel rushed into approving a mark. Once the needle has passed through cartilage, the decision can't be corrected by moving the jewellery a little higher or lower. Collaborative marking gives you a chance to make an informed choice before the procedure begins.
Preparing for Your Helix Piercing Appointment
Preparation starts with choosing the right studio, not with deciding which jewellery colour you like. Look for a practitioner who uses sterile, single-use equipment where possible, examines anatomy in person, and explains aftercare clearly. UK infection-control advice for piercing businesses emphasises single-use sterile products where possible, and UK clinical reporting describes cartilage piercing as a medically sensitive category with a significant complication rate (clinical study of complications linked to ear cartilage piercing).
Before you arrive
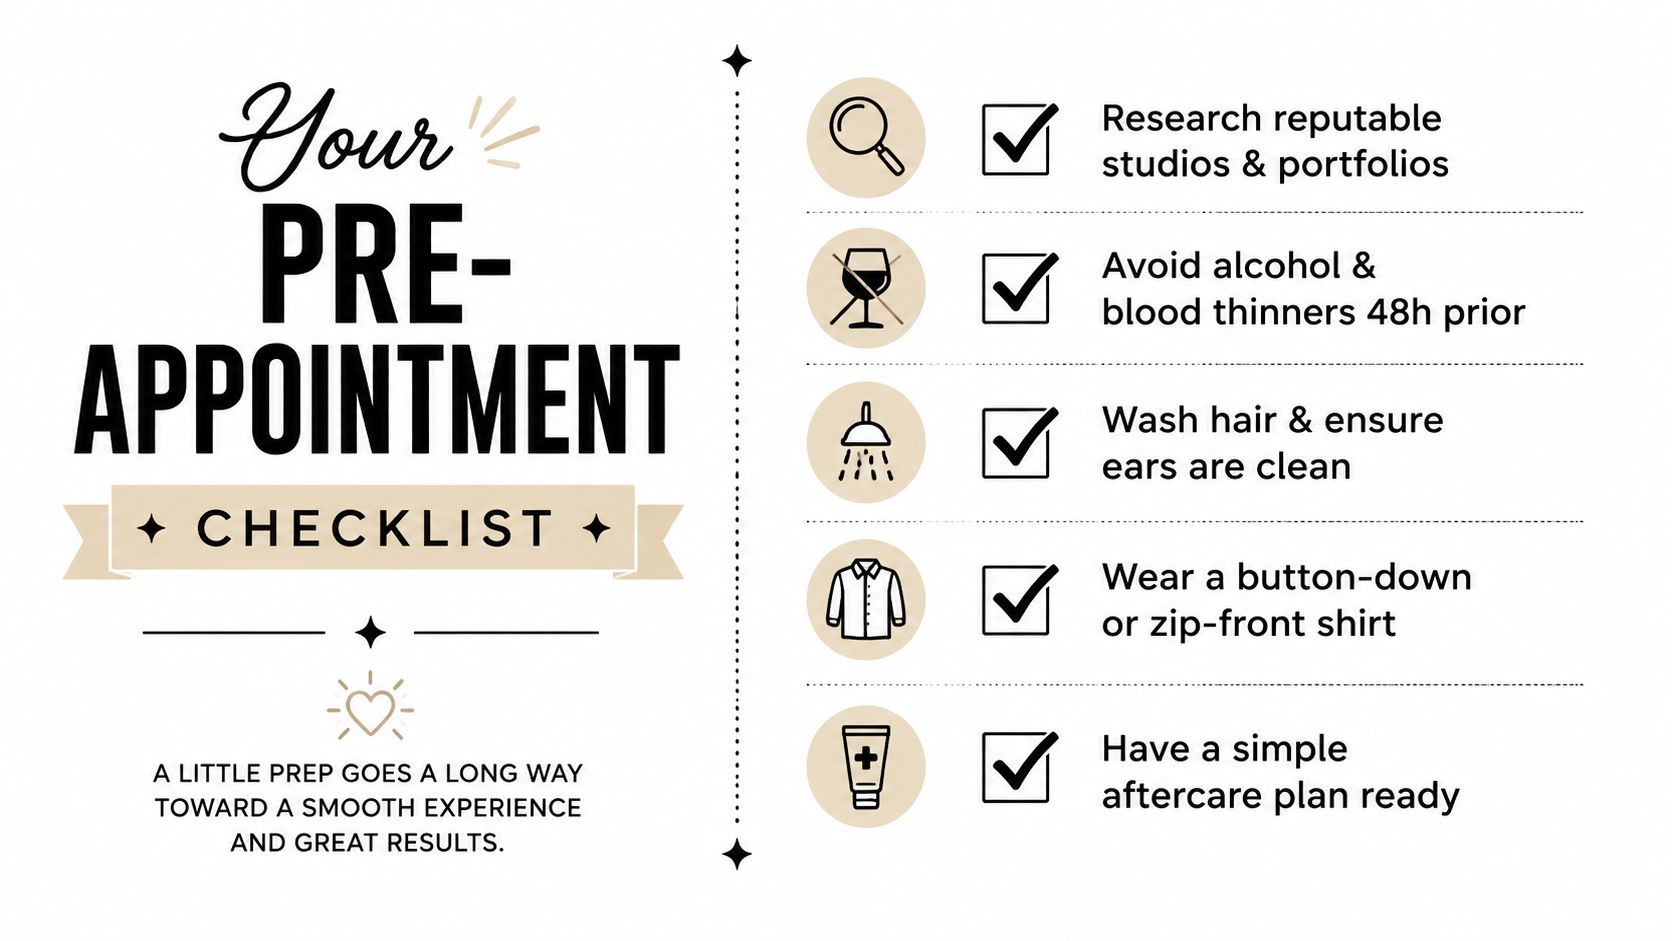
Use this short checklist:
- Research portfolios: Look for healed work and placements on ears with anatomy similar to yours, not only freshly pierced photographs.
- Plan your jewellery: Ask about implant-grade options and whether a flat-back labret is suitable for your anatomy and chosen position.
- Protect your appointment: Avoid alcohol and blood-thinning medicines unless a qualified healthcare professional has told you to take them. Don't stop prescribed medication without medical advice.
- Wash your hair: Clean hair and ears make it easier for the piercer to work without avoidable product or debris around the site.
- Choose practical clothing: A button-down or zip-front top reduces the chance of catching the jewellery while changing.
The supplied preparation visual includes an alcohol and blood-thinner avoidance window of 48 hours, but medication decisions need individual medical advice. If you're unsure about a medicine, ask your GP or pharmacist rather than making a change based on general piercing advice.
Identification and communication
Ask the studio about its age policy before booking. One UK local authority code states that upper ear cartilage piercing isn't permitted under 16, and requires parental or legal guardian presence with written consent for ages 16 to 18 (Redbridge age and consent requirements for body piercing). Policies can vary, so bring the identification and consent documents the studio requests.
For consultations and appointment confirmation with partner studios in Croydon or Bournemouth, call 01202 900050 (Bournemouth) / 020 8686 7730 (Croydon) or message WhatsApp on 07752 913846 (Bournemouth) / 07902 490584 (Croydon). Tell the team which side you sleep on, what glasses or headphones you use, and whether you have future ear curation plans. Those details can change the recommended mark.
Aftercare Routines for Your Helix Placement
Aftercare should respond to what irritates the piercing. A forward helix near the hairline can collect styling products or catch while you arrange your hair. A high helix is more exposed to hats, helmets, and hairbrushes, while a lower helix often receives pressure from pillows, collars, or clothing. Your glasses, headphones, and usual sleeping position also matter, because daily contact can keep cartilage inflamed.
Follow your piercer's cleaning instructions, keep handling to a minimum, and leave the jewellery alone. Do not rotate or play with it. Keep hair products, sprays, dye, cosmetics, and headphone surfaces away from the site as far as your placement allows. UK guidance identifies cartilage infection as a concern, so worsening symptoms need professional assessment rather than improvised home treatment.
Build your routine around the position
If you sleep on the pierced side, change to the opposite side while the area settles. A travel pillow can leave the ear in the central opening instead of pressing it into the cushion. This can help with a lower helix, although repeated pressure can irritate any cartilage piercing.
Manage hair according to the jewellery's position. Tie it back carefully for brushing, keep combs away from the post, and rinse the area if product reaches it. Over-ear headphones may press directly on a high or mid helix, so pause them during the sensitive stage or use equipment that clears the ear. Earbuds can still be unsuitable if putting them in or removing them causes you to touch the piercing. Plan around swimming, gym sessions, and helmets too, since sweat, impact, and repeated contact can disrupt healing.
Know when the studio should see it
Cartilage healing is often described as taking three to twelve months, and many guidance pages refer to six to twelve months. The timeframe depends on your anatomy, jewellery, pressure, and how often the piercing is knocked. Early comfort does not prove that the channel has finished healing.
A piercer may suggest downsizing at around six weeks, after the initial swelling has reduced. This needs an in-person assessment. A post changed too early can create pressure, while excess length left in place allows more movement and snagging.
Contact the studio about a persistent irritation bump, granuloma, increasing swelling, heat, spreading redness, discharge, or worsening pain. Perichondritis can progress to an abscess and damage cartilage, so suspected infection needs prompt medical attention. Avoid tea tree oil, harsh antiseptics, and forced jewellery removal. Follow this helix piercing aftercare guidance alongside your piercer's instructions.
Piercing Near Me helps clients compare and book professional piercing services connected with studios in Croydon and Bournemouth. Consultations cover anatomy, jewellery, placement, and aftercare. Visit Piercing Near Me to discuss a helix position that suits your glasses, headphones, sleeping habits, and future ear curation plans before booking.
Trackbacks/Pingbacks