You save a helix stack on your phone, book in, and assume the hard part is choosing the look. Then you sit in the studio and find out your ear fold is too shallow for that exact placement, the ring you wanted is wrong for fresh cartilage, and your daily headphones will affect what heals well. That gap between online inspiration and real-life anatomy is where good piercing advice matters.
Ear cartilage piercings are popular, but they need more planning than many first-time clients expect. In a reputable UK studio, the goal is not to copy a photo exactly. The goal is to place a piercing that suits your ear, your jewellery options, and your routine so it has a fair chance of healing cleanly.
That is the part social media usually skips.
A healed cartilage piercing can look effortless. The appointment that gets you there is usually very deliberate. We check anatomy before agreeing a placement, explain where a design may need adjusting, and choose jewellery that supports healing rather than just the look on day one. If you are booking in Croydon or Bournemouth, that practical approach is what separates a good idea from a piercing that stays sore, snags constantly, or sits at an awkward angle.
The safest start is clear advice before the needle ever comes out. That means understanding what your ear can support, what material and style of jewellery make sense for fresh cartilage, and what healing will ask of you over the next several months.
From Inspiration to Your First Cartilage Piercing
You pick a saved helix or conch photo, walk into the studio, and expect a quick yes or no. A good piercer gives you a more useful answer than that. We look at how the piercing will sit on your ear, whether the jewellery works for a fresh wound, and how your day-to-day habits will affect healing.
Online photos are helpful for style direction. They do not show ear thickness, fold definition, pressure from glasses, or the angle needed for a piercing to heal without constant irritation. That is why two people can ask for the same look and leave with different plans.
Cartilage piercings stay popular because they can be subtle, bold, or built into a full ear project over time. The part social media often misses is that fresh cartilage needs practical choices first. The jewellery that looks best in a healed piercing is not always the jewellery that gives it the best start.
Good cartilage piercing work balances the look you want with the anatomy you actually have.
That balance matters from the first appointment. A helix may snag on hair and bedding. A conch can clash with over-ear headphones. A tragus can be awkward if you rely on earbuds every day. None of that means you cannot have the piercing. It means the plan should fit your routine as well as your ear.
In our Croydon and Bournemouth studios, the safest starting point is a proper consultation before any marking or piercing happens. We check the shape and depth of the tissue, explain where a reference photo needs adapting, and recommend jewellery that supports healing instead of fighting it. Clients usually feel more confident once they understand why a placement is being adjusted, because the goal is not to copy a picture exactly. It is to give you a piercing that looks right, sits well, and has a realistic chance of healing cleanly.
Mapping Your Ear Anatomy and Piercing Types
A good cartilage plan starts with the ear in front of us, not the photo on your phone. In a proper UK studio, we check whether the tissue is pronounced enough, whether the angle can sit cleanly, and whether the placement will spend the next few months fighting your glasses, headphones, helmet, or sleep.
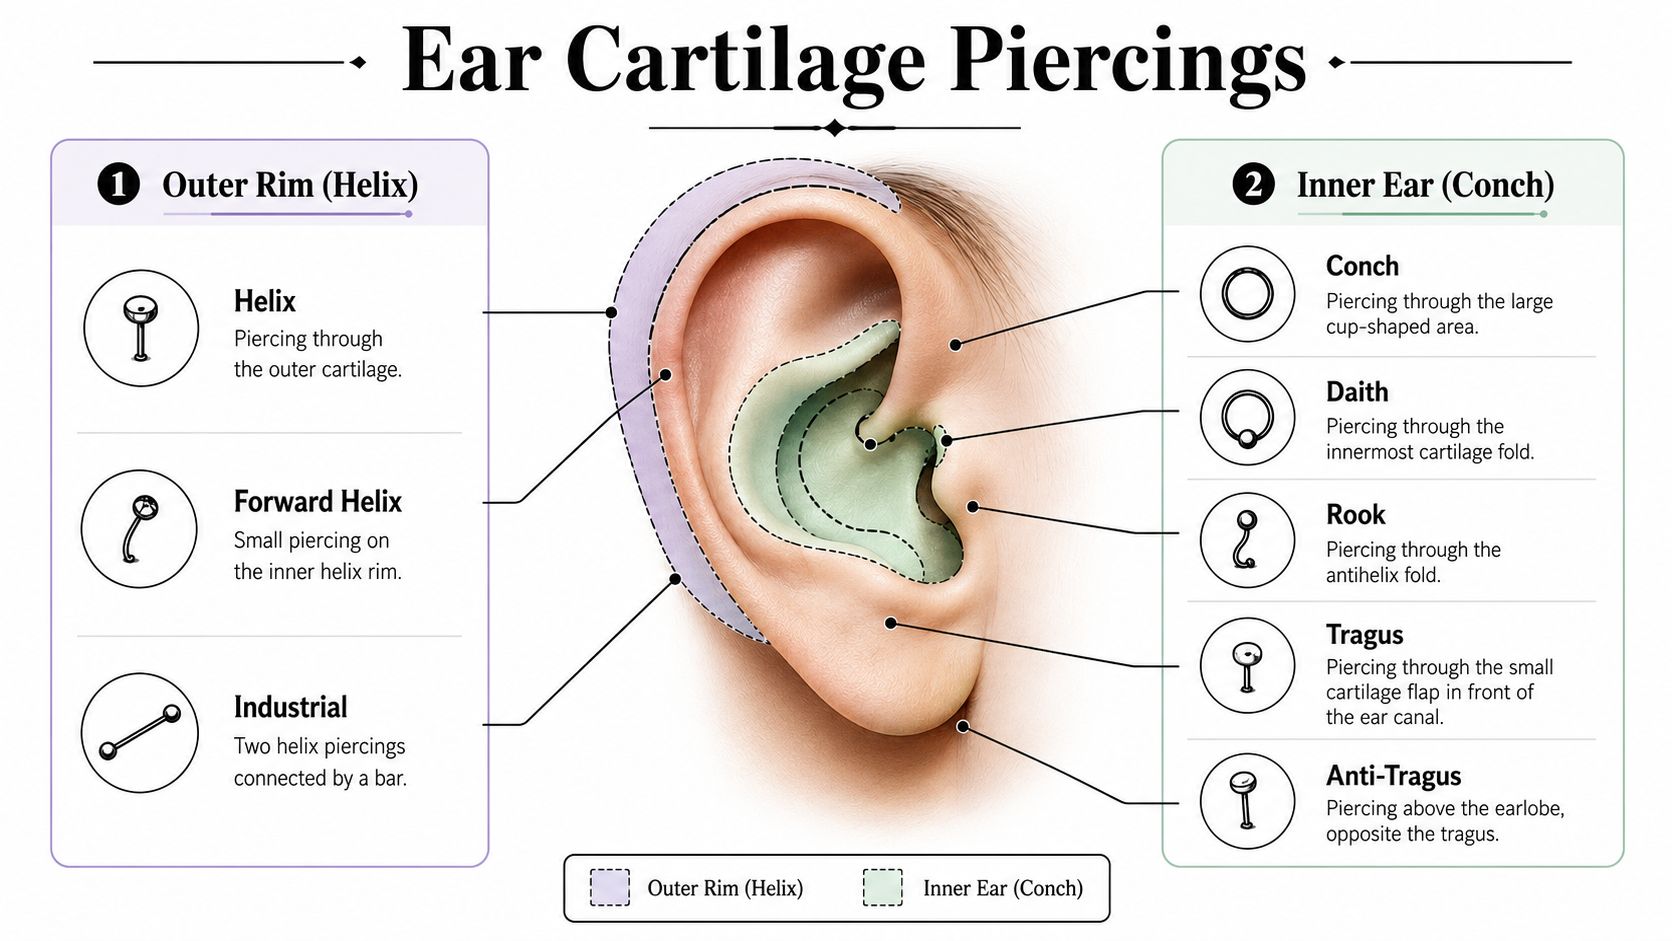
The main cartilage zones
The outer rim covers the helix and forward helix. These are common starter choices because they are visible and easy to build around later. They are also exposed, so they get knocked more often by hairbrushes, hats, phone use, and sleeping on that side.
The inner ear includes the conch, tragus, rook, daith, and anti-tragus. These placements can look tidy and well balanced, but they depend more heavily on fold shape and depth. If the ridge is too shallow or the angle is poor, the piercing may sit under pressure from day one.
The industrial sits in its own category because it links two points with one bar. It only works if both placements line up with your anatomy. If they do not, forcing it usually leads to irritation, poor angles, and a difficult heal.
Ear cartilage piercing comparison guide
| Piercing Type | Location | Pain Level (1-10) | Average Healing Time |
|---|---|---|---|
| Helix | Outer upper rim of the ear | 5 | 6 to 12 months |
| Forward Helix | Front section of the upper rim near the head | 6 | 6 to 12 months |
| Conch | Large inner cup of the ear | 6 | 6 to 12 months |
| Tragus | Small flap in front of the ear canal | 6 | 6 to 12 months |
| Rook | Inner antihelix fold above the daith area | 7 | 6 to 12 months |
| Daith | Innermost fold above the ear canal | 7 | 6 to 12 months |
| Anti-tragus | Small cartilage area above the lobe opposite the tragus | 7 | 9 to 12 months |
| Industrial | Two connected piercings across the upper ear | 8 | 9 to 18 months |
Pain scores help set expectations, but they are only a rough guide. What matters more in practice is tissue density, placement tension, and whether the piercing can sit at a stable angle without being bumped every day.
How placement choice changes daily life
A piercing can suit your ear and still be a poor fit for your routine. That is a real part of consultation work, and it is where online inspiration often falls short.
- Helix: Often a strong first cartilage piercing, but side sleepers and anyone wearing over-ear headsets a lot should expect more irritation risk.
- Conch: Gives a clean, central look and can heal well with the right jewellery, though large headphones often press directly onto it.
- Tragus: Small and neat, but awkward if you depend on earbuds, stethoscopes, or in-ear hearing protection.
- Rook and daith: Distinctive placements with good character, though plenty of ears do not have a defined enough fold to place them safely.
- Industrial: High visual impact, low margin for error. It needs suitable anatomy and careful jewellery selection from the start.
A reputable piercer adjusts the plan to the ear and the life you lead. If you visit us in Croydon or Bournemouth with a saved reference photo, the conversation usually shifts from “Can I have this exactly?” to “What version of this will heal well on your ear?” That is the point where inspiration turns into a safe design.
If you want a closer look at suitable starter options, material standards, and why studio piercers often recommend simpler pieces first, our guide to implant-grade titanium piercing jewellery explains what supports healing and what usually causes problems.
Choosing Your Jewellery Implant-Grade Materials
Jewellery choice isn't the decorative part of the appointment. At the start, it's part of the medical logic of healing. Material, gauge, post length, and shape all affect how the piercing behaves over the next several months.
Why initial jewellery needs to be boring in the best way
Fresh cartilage usually does best with simple, stable jewellery. That typically means a well-fitted flat-back stud or another piece selected for swelling room and minimal movement. Fancy shapes, very thin posts, and jewellery chosen mainly for looks can create problems fast.
For technical sizing, cartilage jewellery is commonly selected in 20G (0.8 mm), 18G (1.0 mm), or 16G (1.2 mm), with 18G described as the most common size for cartilage and higher lobes. The same guidance notes that cartilage is typically pierced at 18G or 16G, and that sizing matters because a post that's too thin can create a “cheese-cutter” effect and migration, while a post that's too short can become embedded if swelling occurs (cartilage jewellery sizing guide).
That's why a reputable piercer may recommend jewellery that looks slightly longer than you expected on day one. It isn't sloppy fitting. It's space for normal swelling.
Material matters more than marketing terms
Clients often ask for “surgical steel” because they've heard the phrase before. In practice, what matters is whether the material is suitable for prolonged contact with healing tissue and whether the studio can clearly tell you what it is.
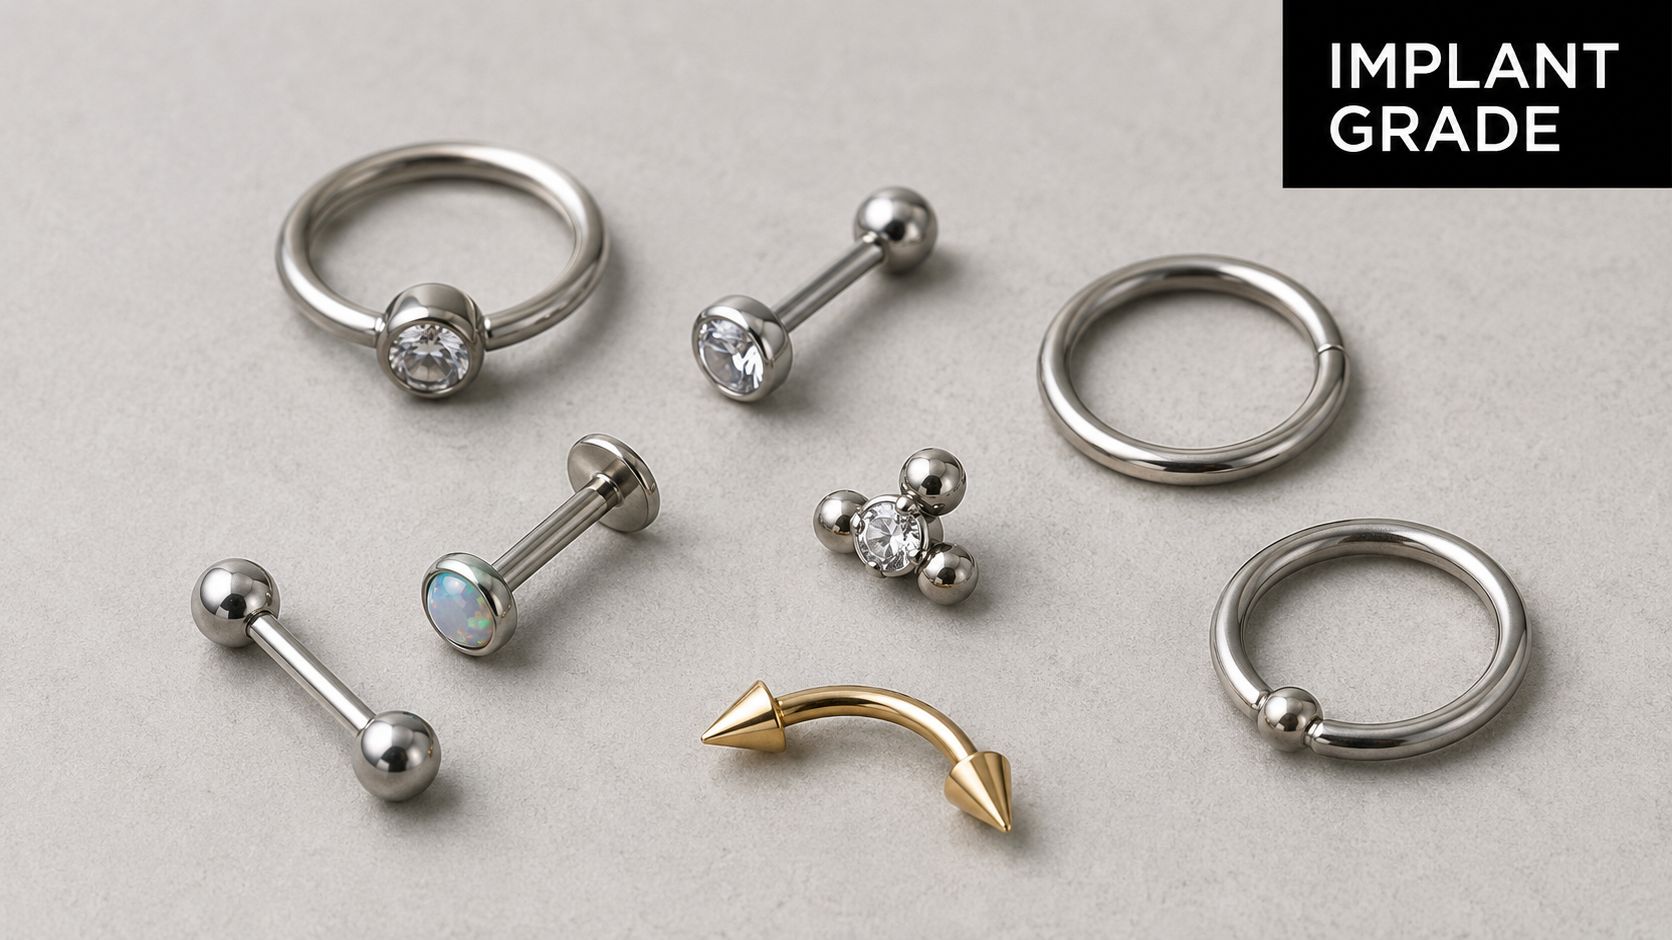
For fresh ear cartilage piercings, implant-grade titanium is a strong standard because it's biocompatible, lightweight, and appropriate for healing piercings. Cheap plated jewellery and mystery alloys are where people get into trouble. Even when the placement is correct, poor jewellery can keep a piercing irritated for much longer than necessary.
If you want a clearer breakdown of metal options before booking, this guide to titanium piercing jewellery is a useful starting point.
- Choose stability over sparkle: A plain titanium post often heals better than ornate jewellery with awkward edges.
- Allow room for swelling: Initial posts need enough length to avoid pressure during the early stage.
- Match jewellery to anatomy: Thicker cartilage areas often need more thought about both gauge and wearable length.
Your Piercing Appointment What to Expect
You arrive with a saved photo of the look you want, then realise your ear, your routine, and your healing capacity all affect what is safe to do that day. That is normal. A good appointment turns that uncertainty into a clear plan.
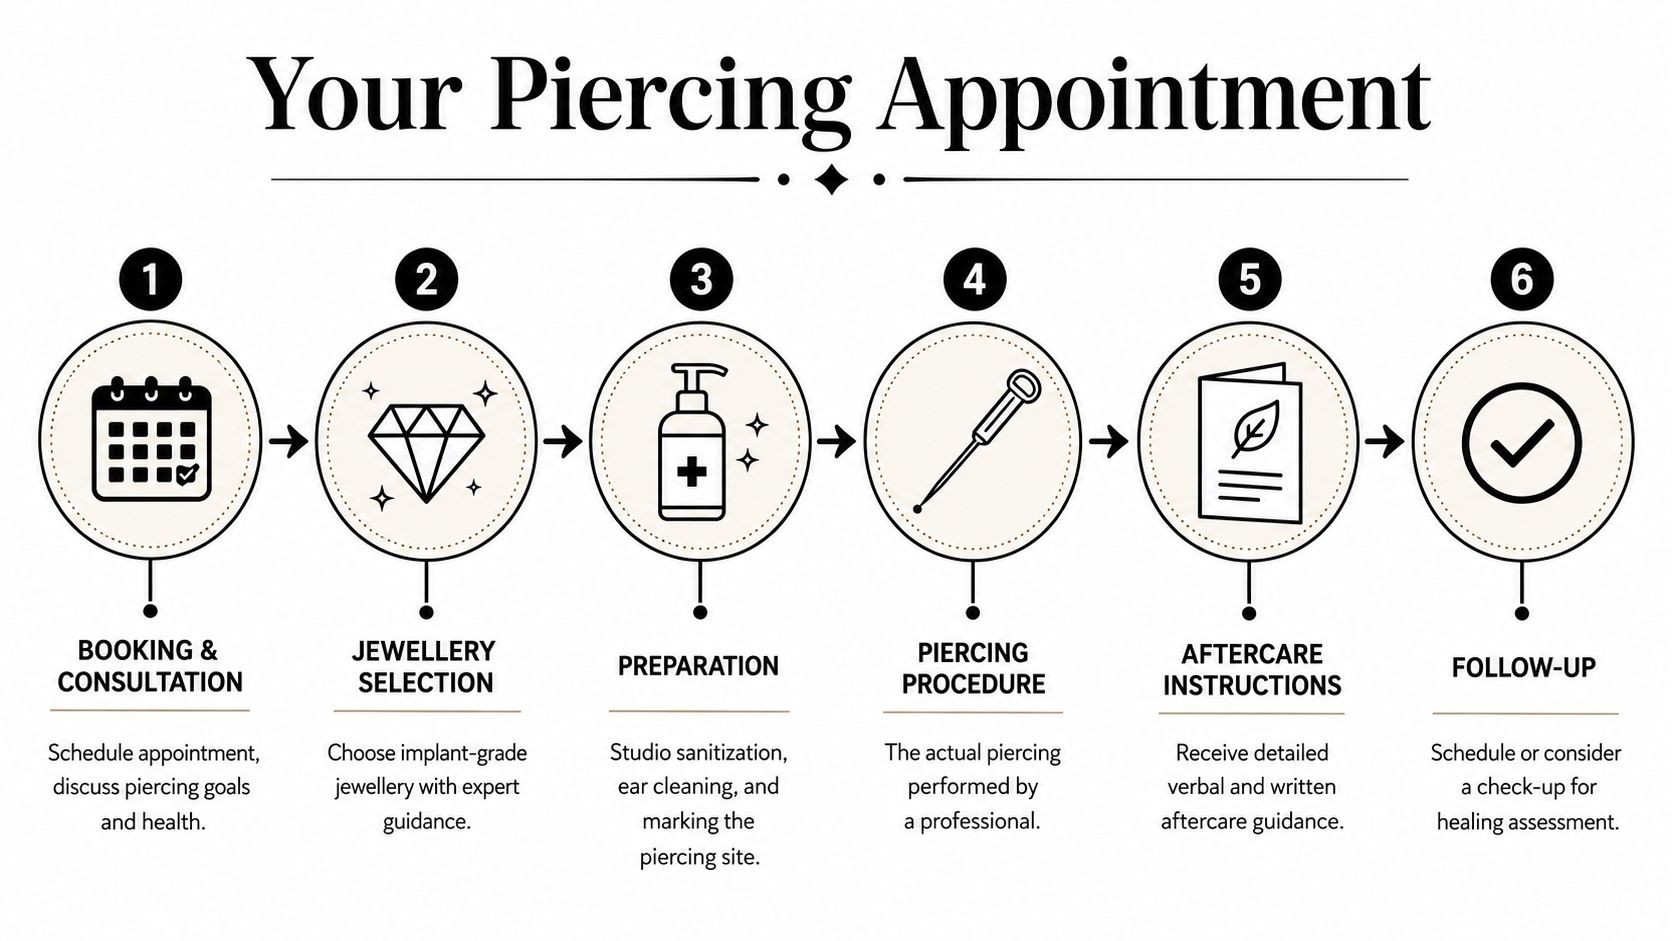
The appointment from start to finish
The first part is a consultation, not a race to get the needle out. You show your reference images, and your piercer asks practical questions about glasses, headphones, sports, uniforms, hair, and how you sleep. In our studios in Croydon and Bournemouth, that part matters because online inspiration often skips over the details that decide whether a cartilage piercing heals calmly or gets knocked every day.
Your ear is then assessed in person. We check the fold, the thickness of the tissue, how the jewellery will sit at rest, and whether the angle will work for your anatomy. Sometimes the answer is yes. Sometimes the original idea needs adjusting. Occasionally the safest answer is to wait or choose a different placement.
That is not a sales tactic. It is how good piercers avoid preventable problems.
Next comes jewellery selection. The piece that heals best is not always the piece that photographs best on day one, and clients are usually relieved once we explain why. Initial jewellery needs to sit securely, allow for swelling, and suit the placement rather than fight it.
Then the area is cleaned, the placement is marked, and you get time to check it properly in the mirror.
The part people worry about most
People often worry that the piercing will end up crooked, especially with helix work or paired placements. The reason we spend time on marking is simple. Cartilage placement is rarely about one magic dot. There is usually a safe area that still needs careful choice of angle, spacing, and how the jewellery faces from the front and side.
Say something if the mark does not look right to you. Any reputable piercer would rather adjust the pen mark than pierce a position you already feel unsure about.
What good studio practice looks like
A reputable studio uses a single-use sterile needle, prepares a clean sterile setup, and talks you through each step before it happens. The piercing itself is brief. The appointment takes longer because preparation, positioning, and jewellery fit matter more than speed.
Before you leave, you should have clear aftercare instructions and a chance to ask ordinary questions without feeling awkward. Common ones include:
- Sleeping: How do you avoid pressure if you favour that side?
- Work or gym: What is likely to irritate it in the first few weeks?
- Jewellery fit: When should the post be checked for a downsize?
- Early healing: What is expected swelling, and what needs a review?
If you want to read the care routine before you book, our guide on how to clean a new piercing explains the basics clearly.
If you want this kind of careful consultation at our Croydon or Bournemouth studios, call 01202 9000 50 or send a WhatsApp message to 07752913846 and we can talk through the placement you have in mind.
The Healing Journey Aftercare and Timelines
A lot of clients come in with a saved photo and a date in mind. The piercing part is quick. Living with it well for the next several months is what decides whether it settles beautifully or keeps flaring up.
What the timeline really means
Cartilage usually heals more slowly than people expect. It can look calm on the surface before the deeper channel is stable, so early confidence is one of the main reasons a piercing gets set back.
That is the gap between online inspiration and real healing. A fresh helix in a photo can look neat after a few weeks. In day-to-day life, it still needs protecting from pressure, knocks, and jewellery changes for much longer.
You should expect healing to be measured in months, not weeks. Good days and irritated days can both happen during a normal healing period, especially if it gets slept on, caught in hair, pressed by headphones, or bumped while getting dressed.
What good aftercare looks like in real life
Keep the routine simple and consistent. Overcleaning causes its own problems, and so does touching it every time you check the mirror. If you want the full cleaning routine set out step by step, our guide on how to clean a new piercing safely covers it clearly.
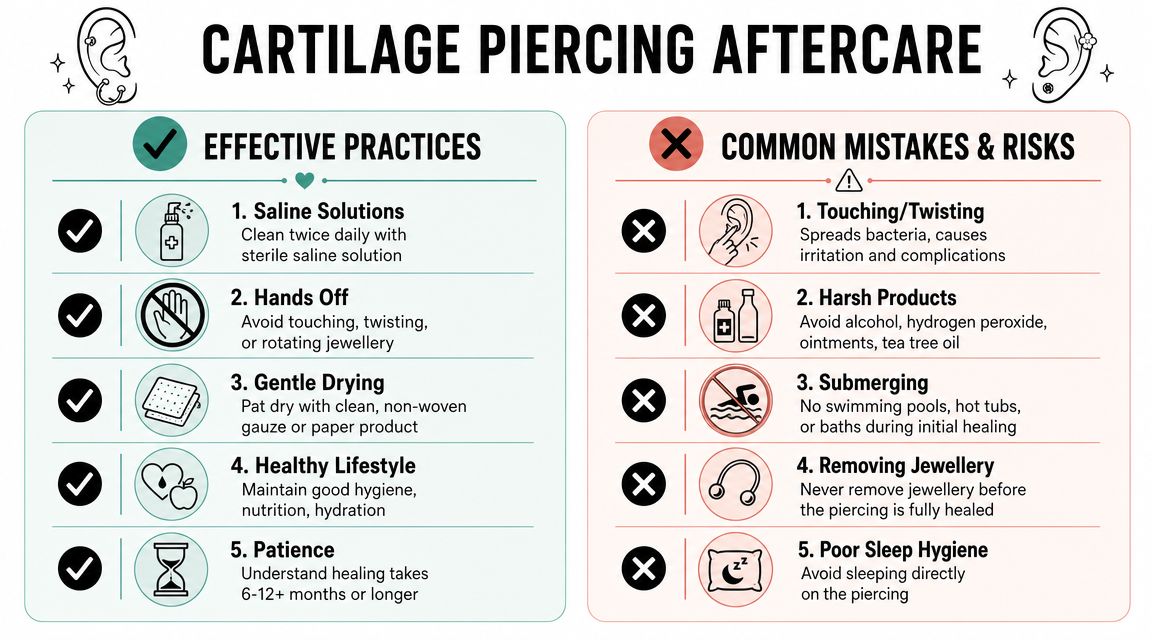
Do:
- Use sterile saline once or twice a day. That is enough for most fresh cartilage piercings.
- Rinse away shampoo and hair product well. Residue often causes the “mystery irritation” people blame on healing.
- Keep pressure off the area. A travel pillow or a change of sleeping side helps more than people think.
- Dry it gently after cleaning or showering. Damp skin and trapped moisture can keep the area sore.
- Come back for a downsize when advised. An overlong post is helpful at first, then becomes more likely to catch and move once swelling drops.
Do not:
- Do not twist or spin the jewellery. That only reopens a healing channel.
- Do not use tea tree oil, surgical spirit, peroxide, ointments, or homemade salt mixes. They tend to irritate cartilage rather than calm it.
- Do not change jewellery early because it “looks fine”. Looking settled and being healed are not the same thing.
- Do not remove the jewellery to give it air. That can trigger swelling and make reinsertion difficult or impossible.
- Do not ignore repeated swelling, throbbing, or discharge that is getting worse. Those signs need a review.
A well-healing cartilage piercing is usually boring. That is what you want.
What is normal, and what deserves a check
Mild swelling, tenderness, warmth, and a small amount of clear or pale crusting can all be normal early on. Cartilage can also become grumpy again after a snag or a bad night's sleep. That does not always mean infection.
Pain that increases instead of easing, redness that spreads, hot swelling, thick yellow or green discharge, or the jewellery starting to sink into the tissue should not be brushed off. Get it checked promptly. In a reputable UK studio, we would rather see you early and confirm it is minor than have you wait until the problem is harder to sort out.
The risk is notable because cartilage has poorer blood supply than the earlobe, so irritation and infection can be slower to settle and can leave more lasting damage if they are not dealt with properly.
A realistic healing mindset
Cartilage rewards patience. The clients who heal best are usually the ones who leave it alone, protect it from pressure, come back for the right jewellery adjustment, and do not treat every small crust or off day as a crisis.
If something changes and you are unsure, ask your piercer. Good aftercare is not about doing more. It is about doing the right things, at the right time, and avoiding the habits that keep a piercing irritated.
Finding and Booking a Safe Piercer
You can usually spot the difference between a studio that is set up for safe cartilage work and one that is chasing quick bookings within a few minutes of looking. Online photos may show a pretty ear stack. A good studio shows the practical side as well. Clear jewellery information, proper healing guidance, and evidence that the piercer checks anatomy before agreeing to a placement.
That matters in cartilage. Problems often start with choices made before the needle ever touches the ear.
What to check before you book
Ask direct questions. A reputable studio should answer them clearly and without getting defensive.
Start with the piercing method. Fresh cartilage should be done with a single-use sterile needle. Ask what jewellery they use for initial piercings, and expect a straight answer about implant-grade materials. Ask whether they check your ear anatomy in person before confirming placement. If a studio promises every trend to every client from a photo alone, be cautious. In real practice, some placements do not suit some ears, and a decent piercer will say so.
Then look past the polished portfolio shots. Good work is consistent. Angles should make sense for the ear, jewellery should fit the tissue properly, and healed results should look settled rather than tight, swollen, or irritated. If every image is taken immediately after the piercing and there are no healed examples, that tells you something too.
A practical screening list
- Needle use: Fresh cartilage piercings should be done with single-use sterile needles.
- Sterilisation standards: The studio should be able to explain how instruments and jewellery are sterilised.
- Jewellery quality: Implant-grade options should be available for initial jewellery.
- Consultation quality: Your piercer should ask about anatomy, lifestyle, sleeping habits, and whether the placement is realistic for healing.
- Aftercare support: Written aftercare and a clear route for check-ups should be part of the service.
Cartilage infections can become serious more quickly than many first-time clients expect, so hygiene, technique, and proper jewellery are not small details. They are the foundation of a piercing that has a fair chance to heal well.
If you are comparing studios, our guide to professional ear piercing near me shows the sort of information a proper booking route should give you before you commit, including consultation standards, jewellery options, and studio hygiene details. Our site, Piercing Near Me, is there to help you check those basics for our Croydon and Bournemouth studios before you book.
For direct enquiries, call 01202 9000 50 or message WhatsApp 07752913846.
Your Next Steps to a Safe and Stylish Piercing
A good cartilage piercing starts long before the needle. It starts with choosing a placement that suits your ear, your routine, and the jewellery that can heal safely. It continues with a studio that takes sterile technique seriously and a piercer who's comfortable saying “that trend isn't right for your anatomy, but this option is”.
The aspect often underestimated is the months after the appointment. Ear cartilage piercings reward patience. If you protect them from pressure, avoid changing jewellery too early, and follow sensible aftercare, you give yourself the best chance of getting the look you wanted without turning healing into a constant battle.
If you're ready to talk through options in Croydon or Bournemouth, book a consultation and ask the practical questions first. A proper appointment should leave you feeling informed, not rushed.
You can reach us on 01202 9000 50 or on WhatsApp at 07752913846.
If you're looking for clear information and a straightforward route to booking, Piercing Near Me helps you explore professional piercing options, compare services, and take the next step towards a safe, well-planned cartilage piercing in Croydon or Bournemouth.