Often called a 'curated ear', the art of full ear piercing is all about transforming your entire ear into a personalised statement. It’s a thoughtful process of choosing and placing multiple piercings to create one cohesive look that’s completely unique to you.
What Are Full Ear Piercings and Why Are They So Popular?
Think of your ear as a blank canvas and the piercings as your medium. A full ear project, or what we call a 'curated ear', goes way beyond a simple lobe stud. It's about designing a complete piece of living art by carefully arranging different piercings—from the classic helix to the intricate daith and conch—with jewellery that perfectly suits your anatomy and your personal style.
This isn't about getting as many piercings as you can fit. It's about creating harmony and telling a story through your choices. Each piercing is a deliberate decision, contributing to an overall design that can be delicate and minimalist, bold and edgy, or anything in between. It’s a powerful form of self-expression that balances individuality with a real sense of aesthetic design.
The Rise of the Curated Ear
While multiple ear piercings have been popular for decades, the ‘curated’ approach has really taken off in recent years. You can see the groundwork for this trend going back a while. A 2006 study in England found that 46.2% of women aged 16-24 already had at least one body piercing beyond the standard earlobe, showing an early interest in placements like the helix and tragus. You can read the full study's findings on the rise of piercing trends here.
More recently, the visual appeal of a fully styled ear has exploded on social media. For instance, Pinterest reported a massive 150% spike in searches for "curated ear" back in 2021, a clear sign of just how many people are now actively planning their own unique ear projects.
A curated ear is a journey, not a destination. It’s a collection of piercings gathered over time, each with its own story, that come together to reflect your personal evolution and style.
Planning Your Full Ear Piercing Vision
The very first step is what we call 'ear mapping'—essentially, creating a blueprint for your future piercings based on your ear’s unique shape and your style goals. This is where getting professional advice is absolutely essential. A skilled piercer acts almost like an interior designer for your ear; they'll help you choose placements that not only look incredible but will also heal well together.
For a deeper dive into the specifics of each placement, you can explore our complete ear piercings guide.
To give you a better idea of what’s possible, here’s a quick look at some of the most popular piercings that form the foundation of a beautifully curated ear.
Quick Guide to Popular Ear Piercing Placements
This table breaks down the essentials for some common placements, helping you understand what to expect in terms of pain and healing as you start to map out your vision.
| Piercing Name | Location on Ear | Pain Level (1-10) | Average Healing Time |
|---|---|---|---|
| Lobe | The fleshy bottom part of the ear | 2-3 | 6-8 Weeks |
| Helix | The outer cartilage rim at the top of the ear | 5-6 | 6-12 Months |
| Conch | The inner 'cup' part of the ear cartilage | 6-7 | 6-12 Months |
| Daith | The innermost cartilage fold, just above the ear canal | 6-8 | 9-12 Months |
| Tragus | The small flap of cartilage covering the ear canal | 5-6 | 6-12 Months |
| Rook | The upper cartilage fold inside the ear's rim | 7-8 | 9-18 Months |
Remember, cartilage piercings take significantly longer to heal than lobes, so patience is key! Planning the sequence of your piercings with a professional is vital for a smooth healing process.
Ultimately, achieving your dream look safely and beautifully is the most important part of the entire journey. That's why you should always start at a trusted, professional studio like Timebomb Tattoo & Piercing. Our expert piercers in Croydon and Bournemouth can guide you every step of the way, from the initial idea to a fully healed, stunning result.
Mapping Out Your Perfect Curated Ear
So, you’re ready to start designing your dream ear project? This is where the real fun begins. Think of this as the creative blueprint for your full ear curation, moving from a vague idea to a solid plan that works with your unique anatomy. It’s what separates a random jumble of piercings from a truly stunning, cohesive look.
This is the stage where we map everything out to make sure every new piercing has a purpose. Are you aiming for a delicate, minimalist vibe with tiny, sparkling studs? Or do you want to make a bold statement with standout hoops and ornate, decorative pieces? A good plan ensures your ear tells a story.
The Core Placements: Your Building Blocks
To create a gorgeous full ear design, you first need to know your canvas and your tools. Let's walk through the most popular piercing placements. These are the fundamental building blocks for any curated ear, and each offers a totally different look.
- The Lobe: The classic starting point, and for good reason. Its soft, fleshy tissue is incredibly versatile, perfect for anything from a single stud to stacked arrangements (often called upper lobes) or even small hoops. Your lobes are the foundation for the entire project.
- The Helix: Found along the upper cartilage rim of your ear, the helix is your go-to for adding height and framing the ear. It’s the perfect spot for delicate hoops that hug the cartilage or a 'constellation' of several tiny studs climbing up the edge.
- The Conch: Nestled right in the inner ‘cup’ of your ear, the conch is a natural centrepiece. You can go with a subtle stud (inner conch) or a dramatic large hoop that sweeps around the ear's outer edge (orbital conch). It’s a real head-turner.
- The Daith: Tucked away in that innermost fold of cartilage, the daith has become famous for housing a beautiful, snug-fitting ring. This placement adds an element of intrigue, drawing the eye inward to a stunning central detail.
- The Rook: Pierced through the upper ridge of cartilage inside the ear, the rook is a more subtle but seriously striking option. It's the ideal home for a small, curved barbell that adds a flash of sparkle to an often-overlooked spot.
- The Tragus: That small flap of cartilage that partially covers your ear canal is prime real estate for a single, eye-catching stud. A tragus piercing acts as a beautiful anchor point at the front of your design, balancing out placements on the upper ear.
Finding Harmony Between Your Anatomy and Your Style
Once you know the placements, the next step is to start combining them into a look that feels like you. The goal is to create harmony, not just clutter.
Your ear’s unique shape is your most important guide here. A skilled piercer won’t just put a piercing where you point; they’ll help you choose spots that truly flatter the natural curves and folds of your anatomy. Never hesitate to book a consultation for this—at our studios, you can get expert advice by calling 01202 9000 50 or dropping us a message on WhatsApp at 07752913846.
It's all about balance. A large, ornate daith ring can be beautifully offset by a few tiny, delicate helix studs. An industrial bar, which is a single long bar connecting two points on the upper cartilage, can be softened with a simple stack of lobe piercings below it.
This quick map breaks down the journey: starting with your vision, choosing your placements, and always putting safety first.
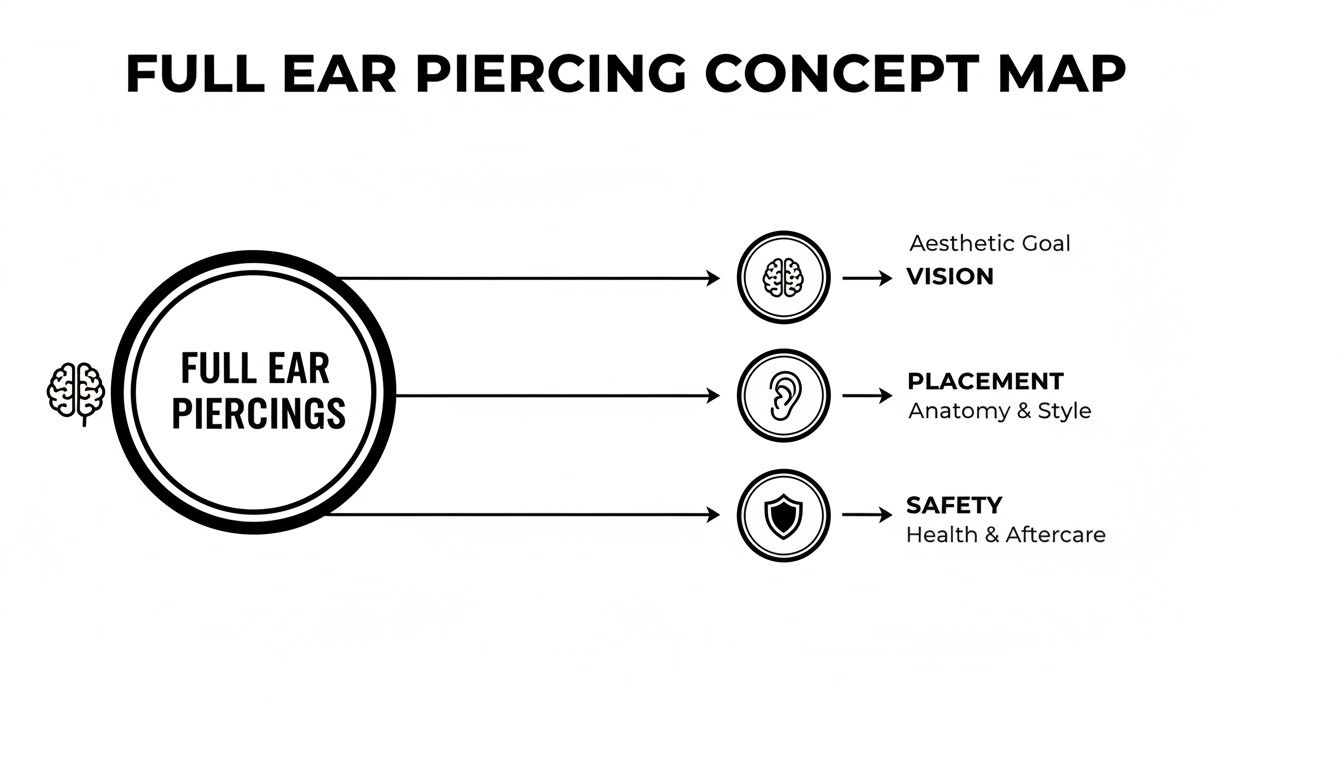
It shows how a great ear curation starts with a creative idea before moving on to the practical steps of placement and proper care.
Bringing Your Vision to Life
Figuring out your vision is about more than just screen-shotting piercings you like on Instagram. It’s about understanding how those pieces will work together on your ear. By all means, gather inspiration, but always remember that what looks amazing on one person’s ear might not be the best fit for yours.
A curated ear isn't about copying; it's about interpretation. Use your inspiration as a starting point, then work with a professional to adapt those ideas to your unique anatomy for a look that is truly your own.
A great way to pull it all together is by choosing a theme. Do you love celestial jewellery with tiny moons and stars? Or maybe a botanical theme with delicate leaves and floral studs? Having a theme helps guide your jewellery choices, ensuring every single piece contributes to a cohesive, intentional style. This is what takes your ear from simply being pierced to being perfectly curated.
Your Piercing Journey: From Planning to Perfect Healing
So, you’ve been saving inspiration pictures for that incredible, jewellery-filled ear, and you’re ready to make it happen. That’s fantastic. But the absolute key to achieving that look is understanding that it's a marathon, not a sprint. The biggest mistake we see people make is trying to get too much done, too fast. This is a journey that demands patience, a smart plan, and respect for your body's healing process.
Think of it like this: your body has a certain amount of energy it can dedicate to healing. Every new piercing you get is a small wound that needs some of that energy. If you get too many at once, you’re essentially overloading the system. This is especially true for cartilage piercings. The result? A whole lot of swelling, more pain than necessary, and a much higher risk of infection and complications for every single piercing.
The Art of Sequencing Your Piercings
The secret to a beautifully healed, curated ear isn't getting four or five holes punched in one go. It's about smart sequencing. When you come in, we’ll work with you to map out a realistic timeline. We usually recommend a maximum of two or three piercings in a single session, and—this is important—all on the same ear.
Why one ear at a time? It’s purely practical: it leaves you with a "safe side" to sleep on. Rolling onto a fresh piercing at night is one of the main reasons people end up with irritation bumps, migration (where the jewellery starts to shift), or piercings that just refuse to heal. By focusing on one ear, you can let it heal in peace while you sleep soundly on the other.
Planning your piercings in stages isn't a setback; it's the professional strategy. By giving your body the time it needs, you ensure each piercing heals beautifully, creating a stronger foundation for your final design.
Once that first set of piercings is well on its way, we can start on the other ear or add more to the first. It might feel slow, but this methodical approach is your best bet for a smooth, stress-free result. To chat about your own piercing map, give our Croydon or Bournemouth studio a call on 01202 9000 50.
Why Lobes and Cartilage Heal So Differently
It's also crucial to know that not all parts of your ear heal the same way. Your ear is made of two very different kinds of tissue, and they play by their own rules.
- Soft Tissue (Lobes): Your lobes are fleshy and have fantastic blood flow. This constant supply of oxygen and nutrients is what allows them to heal relatively quickly. Most lobe piercings feel settled and comfortable within 6-8 weeks.
- Cartilage (Helix, Conch, Rook, etc.): The upper part of your ear is cartilage, which has a very poor blood supply. Because of this, healing is a much slower, more delicate process. You’re looking at 6-12 months, or even longer, for some of these placements to fully heal.
This difference is everything. A lobe piercing might be ready for its first jewellery change in a couple of months, but a cartilage piercing demands a year or more of patience. Trying to rush a cartilage piercing is asking for trouble.
Healed vs. Fully Mature: The Waiting Game
This is probably the most important concept to grasp, and it's where many people get tripped up. There’s a huge difference between a piercing that feels healed and one that is truly, fully mature.
After a few months, your piercing might stop feeling sore, and the redness and swelling will have gone. It’s so tempting to think, "Great, it's done!" and immediately switch to a new piece of jewellery or get lazy with your aftercare. The problem is, the fistula—the little tube of scar tissue inside that forms the piercing channel—is still incredibly fragile.
A piercing is only fully mature when that internal channel has become strong and stable. This can take double or even triple the initial 'healed' feeling time, especially for cartilage.
Changing jewellery too early or giving up on cleaning can easily tear this delicate new tissue, causing inflammation and setting your healing back months. Patience is your best friend here. If you have any worries or questions during the process, just send us a message on WhatsApp at 07752913846. Real healing is a waiting game, and the prize for winning is a perfect piercing for life.
Choosing Your Piercing Jewellery: Materials and Styles

The jewellery is where the magic really happens. It’s what transforms a series of individual piercings into a thoughtfully curated ear, a style that’s uniquely yours. But before we get lost in the fun of styling, we need to talk about the single most important factor: the material of your initial jewellery.
Think of it this way: a fresh piercing is a small, delicate wound. The jewellery you put inside isn't just an accessory; it’s a medical implant that will be living in your body for months. Getting the material right is the foundation for a healthy, stress-free healing journey.
This is exactly why professional studios like ours are so particular about what we use for initial piercings. We only work with materials that are proven to be safe and compatible with the human body.
The Only Material We Trust for New Piercings
When you get a new piercing, there’s one clear winner for your first piece of jewellery: implant-grade titanium. I’m not talking about the generic "titanium" you might see sold in high-street shops. We use specific, highly polished, and certified material (like ASTM F-136) designed for long-term wear inside the body.
The reason is simple: it’s biocompatible. In plain English, this means your body’s immune system is extremely unlikely to have a bad reaction to it. It’s a neutral material that allows your body to focus all its energy on healing the piercing, rather than fighting off an allergy or irritation.
Choosing implant-grade titanium is the single most important decision you can make for the health of your new piercing. It dramatically reduces the risk of irritation, allergic reactions, and healing complications, setting you up for success from day one.
You’ll often hear about surgical steel, but the problem is that many people have (or can develop) a sensitivity to the nickel it contains. For something as involved as a full ear project, starting every single piercing with implant-grade titanium is, without a doubt, the safest and smartest way forward.
Exploring Jewellery Styles After Healing
Once your piercing is fully healed—and I mean properly healed and stable, not just feeling a bit better—you can dive into the exciting world of decorative jewellery. This is the point where you swap out that basic starter stud and your curated ear really starts to take shape.
You'll come across a few key styles:
- Flat-Back Labret Studs: These are the unsung heroes of cartilage piercings. The flat disc on the back sits flush against your ear, which is a game-changer for comfort, especially when sleeping. No more snagging on hair or pillows.
- Seamless Rings and Clickers: An absolute classic for daith, septum, and healed helix piercings. Clickers feature a handy hinge for easy opening and closing, while seamless rings give you that perfect, unbroken circle of metal.
- Barbells: Available in straight or curved styles, these are essential for specific placements. A curved barbell is perfect for a rook, while a long, straight barbell is the signature piece for an industrial piercing.
- Huggies and Hoops: When your lobes and helix piercings are well and truly settled, nothing beats a classic hoop or a snug-fitting huggie. If you want to know more about the different types, you can learn more about huggie earrings in our detailed article.
Creating a Cohesive Theme
Now for the creative part: pulling it all together. To make your collection of piercings look intentional, it helps to build around a theme. You could go for a modern, eclectic vibe by mixing metals, like pairing yellow gold with white gold or titanium.
Or you could create a story around a specific motif. A celestial theme with tiny star and moon studs is always popular, as is a botanical look using delicate leaf climbers and floral ends. The possibilities are truly endless.
If you’re feeling a bit stuck for ideas, we're here to help. Give us a call on 01202 9000 50 for a chat, or send your inspiration pictures to our WhatsApp on 07752913846 to get a consultation started.
Keeping Your New Piercings Safe and Sound
When it comes to a full ear project, two things truly matter: choosing a fantastic studio and nailing your aftercare. Think of it as a partnership. Your piercer gets things started on the right foot, and then it’s over to you to see it through. Get these two elements right, and you're well on your way to a perfectly healed curated ear.
This is where you build your confidence. We’ll walk you through exactly what to look for in a studio and how to care for your piercings at home, cutting through all the noise and bad advice online.
What Makes a Great Piercing Studio?
Not all studios operate at the same standard, and when you’re planning something as involved as a curated ear, you can't afford to compromise. A professional studio will make its commitment to your health and safety obvious from the moment you walk in. At Timebomb Tattoo & Piercing, this isn't just a policy; it's the core of how we work.
Here’s your non-negotiable checklist for a safe, professional piercing environment:
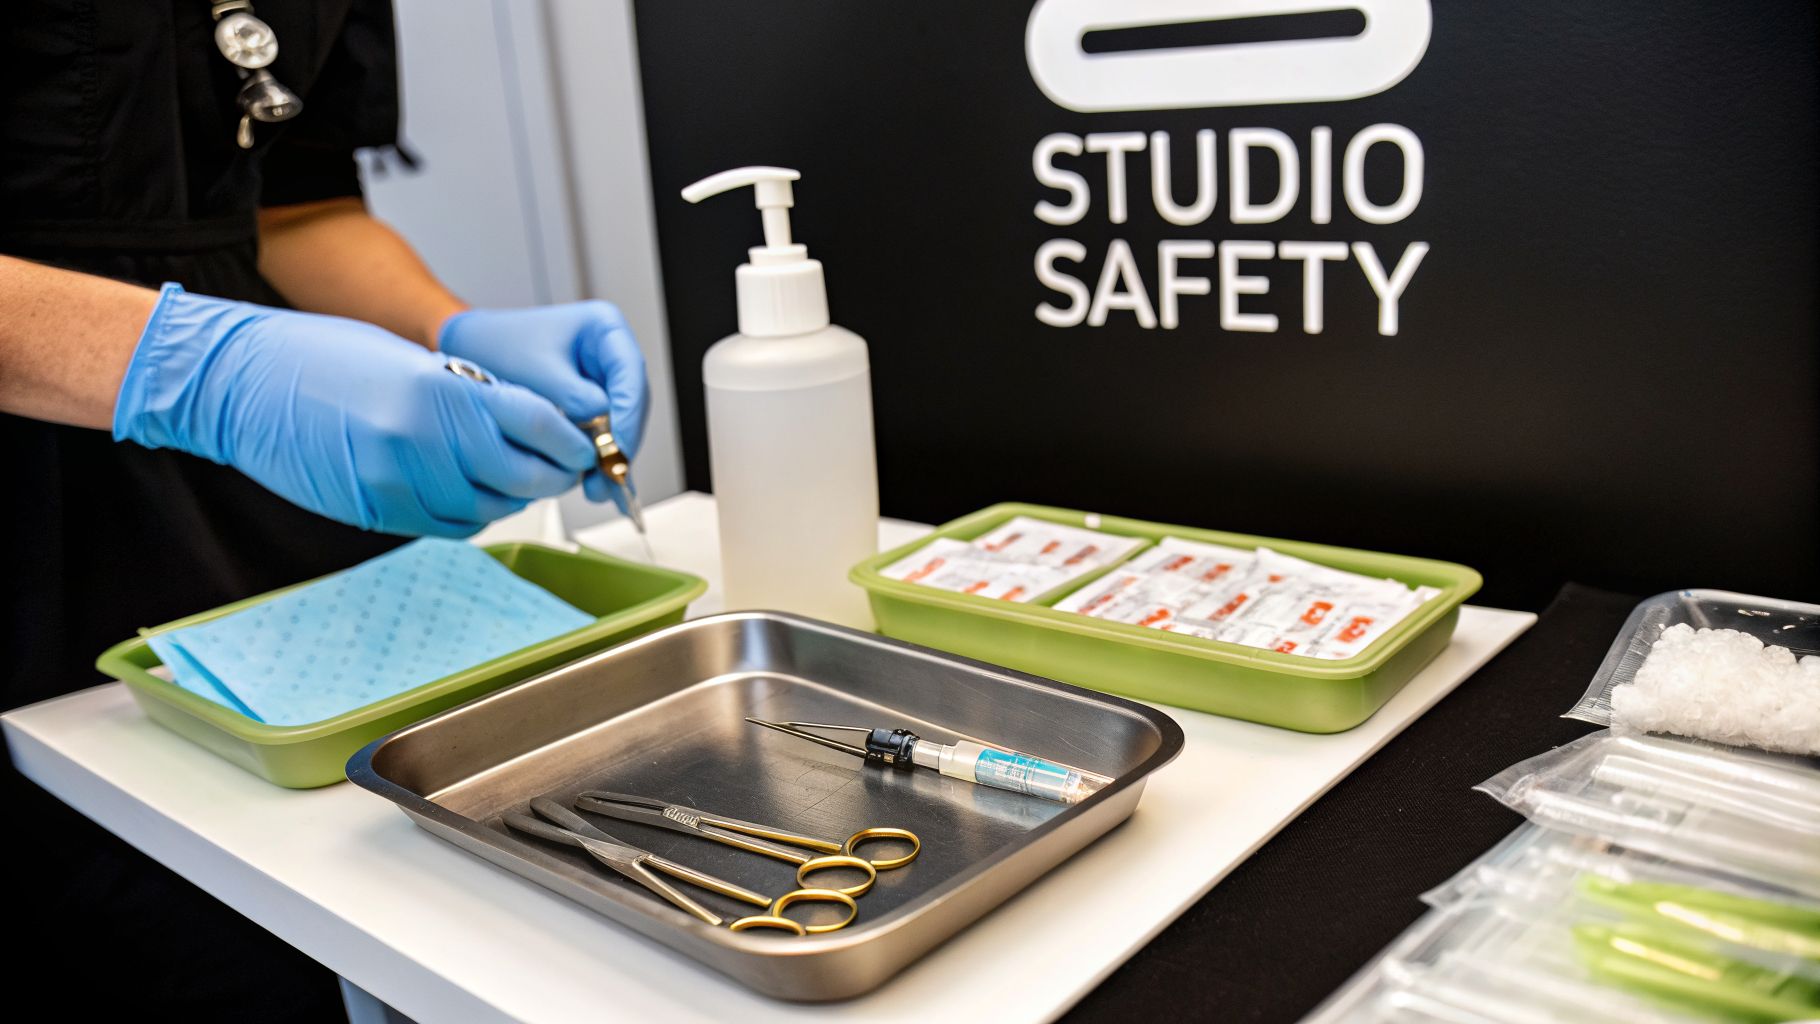
- Sterile, Single-Use Needles. Period. This is the gold standard. Your piercer must open a new, individually packaged, sterile needle right in front of you for every single piercing. No exceptions.
- Absolutely No Piercing Guns for Cartilage. Guns use blunt force to shove jewellery through tissue, which can shatter cartilage. This leads to nasty complications, bumps that won't go away, and painfully long healing times. We've written a whole guide on the piercing gun vs needle debate if you want the full story.
- A Proper Consultation. A great piercer is a partner in your project. They should take the time to look at your ear's unique anatomy, discuss your goals, and map out a realistic plan before even thinking about picking up a needle.
- Spotless and Organised. The studio should be visibly clean. All surfaces should be disinfected between clients, and your piercer must wear fresh gloves for your procedure.
If a studio ever makes you feel rushed, ignores your questions, or just gives you a bad vibe, trust your gut and walk away. A true professional wants you to feel completely comfortable and informed. If you have any questions about our procedures, just give us a call on 01202 9000 50.
Your Simplified Aftercare Routine
The internet is full of complicated and often conflicting advice on piercing aftercare. The truth? Healing is simple. It all comes down to keeping the piercing clean and leaving it alone.
The most effective aftercare strategy is minimalist. Your body is designed to heal itself; your job is simply to provide a clean, undisturbed environment for it to do its work.
We live by the LITHA method, which stands for 'Leave It The Hell Alone'. When you combine that mantra with a simple cleaning routine, you have the perfect recipe for healing any piercing, especially delicate cartilage.
Here’s all you need to do:
- Wash Your Hands. Before you go anywhere near your new piercing, always give your hands a good wash with soap and water.
- Use a Sterile Saline Spray. Twice a day, spray a sterile saline solution (you can get pre-made piercing aftercare sprays) directly onto the front and back of your piercing.
- Gently Pat Dry. Take a clean piece of non-woven gauze or kitchen roll and carefully pat the area dry. Don’t use cotton buds or towels—their fibres can get snagged on the jewellery and cause major irritation.
That’s it. No twisting the jewellery. No homemade salt soaks. The aim is to interfere with the healing tissue as little as humanly possible.
What NOT to Do (Under Any Circumstances)
Just as important as what you do is what you don't do. Avoiding these common mistakes will save you from months of frustration and potential problems.
- Don't Twist or Turn Your Jewellery. This is ancient, terrible advice. All it does is tear the delicate new skin forming inside the piercing, inviting in bacteria and causing those dreaded irritation bumps.
- Don't Sleep on Your New Piercing. Constant pressure is the number one enemy of a healing cartilage piercing. Grab a travel pillow and sleep with your ear in the hole—it's a game-changer.
- Don't Use Harsh Chemicals. Never use alcohol, hydrogen peroxide, or antibacterial soaps on your piercing. They’re far too aggressive and kill off the healthy new cells your body is working so hard to create.
- Don't Change the Jewellery Too Soon. Be patient! Wait for your piercer to give you the all-clear before swapping out the initial jewellery for something new.
If you hit a snag or just have a question during healing, don't guess. Send a picture or your query over to our WhatsApp at 07752913846, and we'll give you professional advice you can trust.
Book Your Piercing at Timebomb Tattoo and Piercing
Feeling that spark of inspiration? Ready to turn those ideas into a beautifully curated ear? The next step is always the most exciting, and we’re here to make sure it’s a great one. Booking in at our Croydon or Bournemouth studios is simple, and it’s the start of a collaboration with professionals who are as passionate about your project as you are.
The moment you walk through our doors, you’ll find our studios are clean, professional, and genuinely welcoming. We’re serious about safety and your comfort above all else. This isn't just a transaction; it's the beginning of a process to create something unique that you'll love for years to come.
What to Expect at Your Consultation
Your journey with us at Timebomb starts with a simple chat. During your consultation, our piercers will sit down with you to talk through your goals and, just as importantly, take a close look at your unique ear anatomy. This is where we map everything out, ensuring the final look is not only stunning but perfectly suited to you.
Getting the conversation started is easy.
- Give us a call: Our main line is 01202 9000 50.
- Send us a message: You can also reach out via WhatsApp on 07752913846.
Think of the consultation as the blueprint session. It's where your ideas and our expertise come together to plan every detail, so you leave feeling confident, informed, and excited for what’s next.
We believe in total transparency with our pricing and use only the highest quality, implant-grade jewellery for all initial piercings—no exceptions. Whether this is your very first piercing or you’re a seasoned collector, our mission is to make you feel right at home. Let’s create your perfect ear together.
Got Questions? We’ve Got Answers
Even after planning your dream ear, a few questions are bound to pop up. It’s completely normal. We’ve put together some quick, straightforward answers to the queries we hear most often in our studios, so you can walk in feeling 100% confident.
How Much Will My Curated Ear Actually Cost?
This is probably the number one question we get asked! The honest answer is: it varies. A curated ear isn't a one-off purchase; it's a collection you build over time, and the total cost depends entirely on your choices.
Each piercing has its own price, usually somewhere between £30-£60 depending on the placement. Then there’s the jewellery, which is where you can really express your style, and that will influence the final figure. Think of it as commissioning a piece of art—we’ll be completely transparent about the cost of each element during your consultation, so there are no surprises.
Can I Get a Few Cartilage Piercings at Once?
I know it’s exciting and you want to get your project going, but we really need to work with your body, not against it. We strongly recommend getting no more than 2-3 piercings in a single sitting, and ideally, keeping them all on one ear for now.
Your body has a limited amount of energy for healing. Pushing it too far with too many new piercings at once can mean everything swells more, hurts for longer, and develops those dreaded irritation bumps. It’s a marathon, not a sprint!
Which Ear Piercing Hurts the Most?
Ah, the pain question! Pain is incredibly personal, so what one person finds intense, another might barely notice. That said, as a general rule, piercings through thicker bits of cartilage tend to be a bit more memorable. Placements like the rook or daith are often reported as being more nippy than, say, a lobe or even a fine helix.
But here’s the thing: the actual piercing is over in a flash. Seriously, it's a second of sharpness. Our piercers are masters at what they do, making the whole process smooth and swift, so you're thinking about your cool new jewellery before you've even had a chance to worry.
How on Earth Do I Sleep with a New Piercing?
This is a big one, and getting it right is crucial. You absolutely cannot sleep directly on a healing piercing. Constant pressure is the fastest way to make it angry, crooked, or just flat-out refuse to heal.
The solution is surprisingly simple: a travel pillow. Pop it on your bed, lie down, and tuck your ear into the hole. It’s a game-changer! This lets you sleep on your side without any pressure on your new piercing. It’s also another great reason to focus on healing one ear at a time.
Ready to get started, or just want to chat through some ideas? The team at Timebomb Tattoo and Piercing is here to help. You can book a consultation at our Croydon or Bournemouth studios by giving us a call on 01202 9000 50 or dropping a message to our WhatsApp at 07752913846. Let's bring your vision to life.
For more info or to find your nearest studio, check out our Piercing Near Me page.