
You're standing in the studio mirror, or maybe in your bathroom at home, wondering if a navel piercing will suit your body or just fight it for months. That's the right question to ask first. The best navel piercing tips start with anatomy, because a piercing that fits your navel shape will heal better than jewellery chosen for a trend.
The reason I push clients to think this way is simple. A UK population survey found that 10% of adults in England had ever had a body piercing somewhere other than the earlobe, based on 1,049 pierced adults out of 10,503 respondents, and the navel was the single most common site in that dataset, accounting for 33% of all piercings recorded (PMC study on body piercing prevalence in England). That popularity doesn't mean every navel is a candidate for a standard placement. It means more people are learning, sometimes the hard way, that anatomy decides the outcome.
Before You Book a Navel Piercing
The first thing I ask a new client is whether their navel has enough structure for a traditional placement. If there's a clear top ridge and bottom ridge, and enough skin for the bar to sit without pinching, that's a good sign. If the navel is shallow, folds inward oddly, or collapses when you sit, a floating navel may be the safer route because the jewellery fit matters more than the jewellery style.
Check your navel in a mirror, standing up
Stand relaxed, then look straight on in a mirror. You want to see whether there's a defined shelf of skin above the navel where a curved barbell can sit without being pressed flat by the abdomen. If the top skin disappears when you bend, twist, or sit, that's useful information, because a piercing that gets trapped by movement is far more likely to get irritated.
Practical rule: anatomy comes first, fashion comes second.
A traditional navel piercing works best when the jewellery can sit in a surface-safe placement. That means the bar isn't forced to lie against skin that keeps folding over it. When the placement is wrong, clients usually notice pressure, snagging, or a bar that sits at an odd angle. Those are not things to “tough out”, they're signs the original plan needs rethinking.
If you're unsure, a consultation is the smartest next step. A good piercer will look at your navel standing, maybe ask you to sit, and talk through whether a standard barbell or a floating style is the cleaner choice. That conversation is worth having before any needle comes out, because the aftercare you'll need later depends on what's pierced now.
Your Pre-Piercing Checklist
The week before the appointment is where comfort is won or lost. Eat properly, drink water, and don't turn up hungry, shaky, or dehydrated. If you're prone to fainting with needles or blood, say so upfront, because a piercer can pace the appointment and help you stay steady.
Get the practical details right
Wear something that won't sit on the piercing site. Low or loose waistbands are easier to manage on the day than stiff jeans, bodycon waistbands, or anything with a belt that lands directly across the navel. If you've got sport, travel, or a long shift after the appointment, plan around it rather than hoping the piercing will somehow ignore friction.
A few studio checks matter just as much as your own prep:
- Needles: ask whether the studio uses single-use sterile needles.
- Jewellery: ask for implant-grade material, not costume pieces.
- Clean surfaces: look for visible cleanliness, fresh packaging, and organised tools.
- Clear aftercare: you should leave with written or verbal instructions that make sense.
Avoid anything that tends to thin the blood, including alcohol right before the appointment, and be sensible with painkillers unless your clinician has told you otherwise. The point isn't to be dramatic, it's to reduce avoidable bleeding and swelling. If you're already coming in with sore skin, a tight waistband, or a poor night's sleep, you're stacking the deck against yourself before the needle even starts.
A clean appointment also means a calm one. The less you have to manage on the day, the more attention you can give to placement, jewellery length, and the aftercare briefing.
Choosing Jewellery That Heals Well
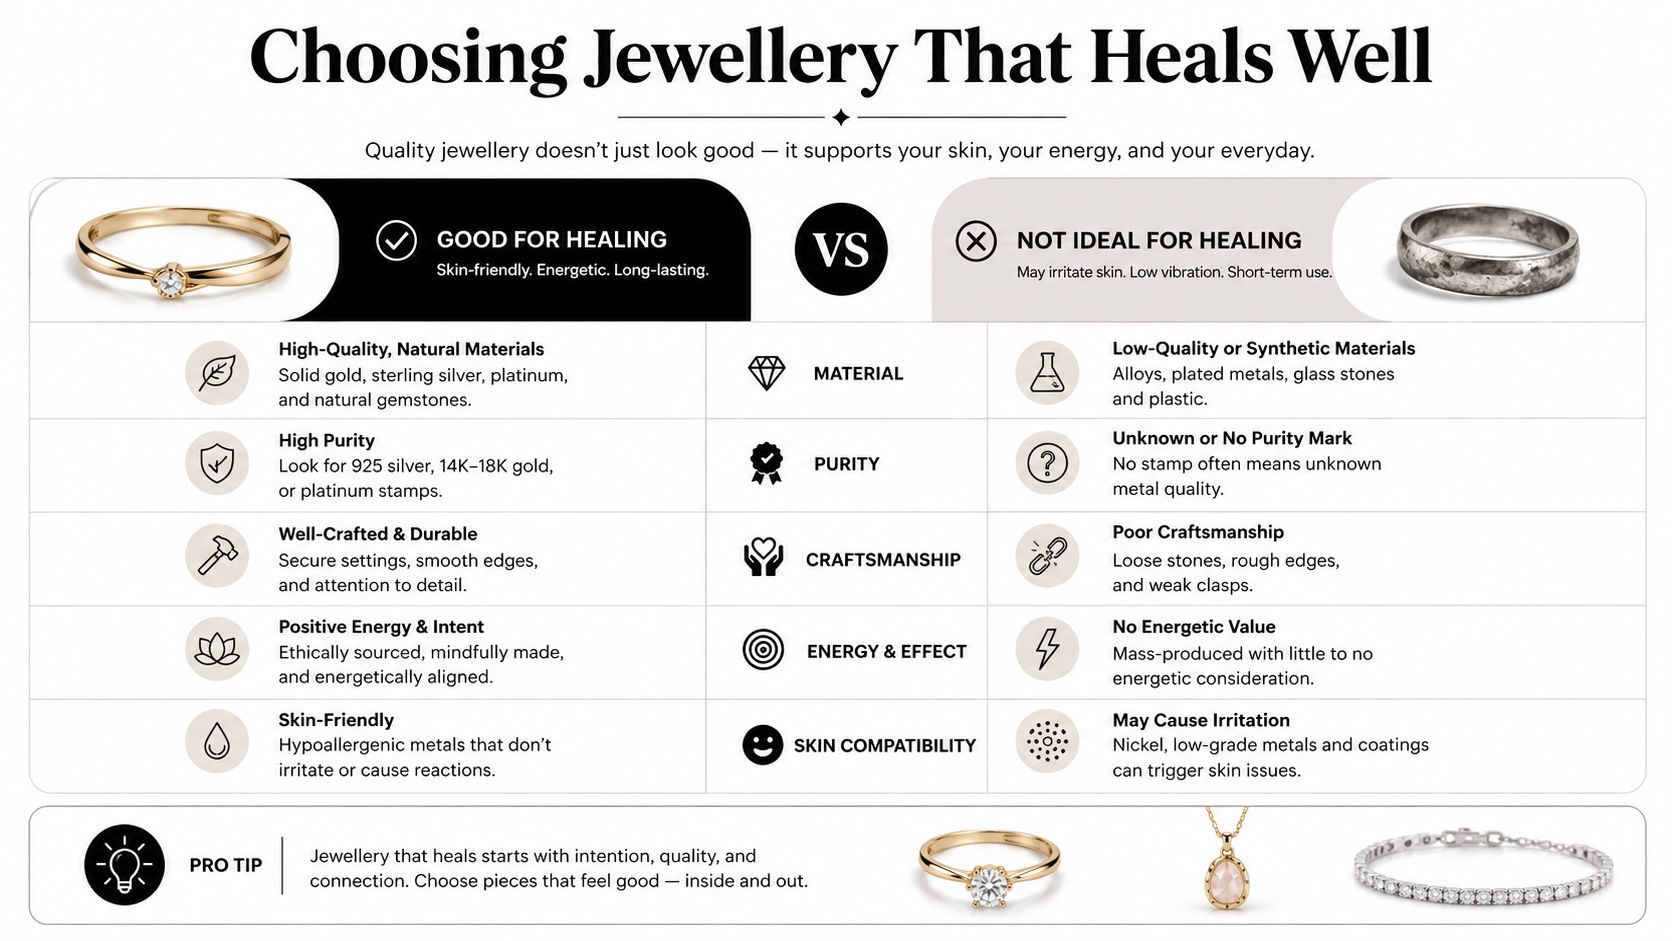
Jewellery isn't decoration during healing, it's the structure the piercing has to live around. For a navel piercing in the UK, the standard starting point is typically 14G (1.6 mm) with an initial curved barbell length around 7/16 inch (11 mm) or 10 to 12 mm to allow for swelling (UK navel jewellery sizing guide). That sizing matters because too-short jewellery can compress swollen tissue, while too much length can snag and keep the area angry.
What to ask for, and what to avoid
A curved barbell is the usual healing shape for most navels. It follows the body's contour more naturally than a ring and tends to create less pressure at the entry and exit points. The wearable bar should be chosen for your anatomy, not your outfit mood, because the wrong length can increase friction, migration, and rejection risk.
You can also spot poor choices early:
- Plated or costume metals often irritate skin that's trying to settle down.
- Externally threaded pieces can drag when they're inserted and feel rougher at the ends.
- Bars that are too short early on can embed as swelling builds.
- Bars that are too long can catch on clothing and prolong irritation.
A smart way to think about jewellery is in two phases. First, you need a bar that gives the piercing room to swell without wobbling everywhere. Later, once the area is fully settled, a shorter wearable length may make sense for comfort and everyday movement. That's why a downsizing appointment matters.
For material choices, use the safest baseline available in your studio, then ask what your piercer stocks for long-term wear. If you're comparing options, this guide on titanium piercing jewellery is a useful reference point for skin-friendly metal choices.
What Happens on the Day
Most navel appointments are quick, but the best ones never feel rushed. You'll usually check in, confirm consent, choose the jewellery, and talk through placement before the needle is opened. The marking step matters more than many first-timers realise, because a millimetre too high or too low can change how the bar sits when you move.
What you'll feel in the chair
The piercer will clean the area, mark the entry and exit points, then ask you to look in a mirror. If something feels off, say so. It's completely normal to ask for a re-mark before the piercing happens, and it's far easier to fix placement on paper or skin marker than after the fact.
The actual piercing sensation is usually sharp and brief rather than prolonged. Most of the discomfort comes from the anticipation, the clamp or tissue hold if one is used, and the first few moments after the jewellery goes in. You should expect some tenderness, a little bleeding, and a quick aftercare run-through before you leave.
If the bar feels too tight in the chair, speak up before you walk out.
That's the moment to confirm whether the wearable length gives enough room for swelling. It's also the time to ask how the jewellery should sit under your clothes, because a piece that looks fine in the mirror can behave differently once you bend or drive home.
Leave with the aftercare instructions clear in your head. You don't need a dramatic routine, you need a repeatable one. The appointment itself is just the opening move, the healing happens in the weeks that follow.
Your Twice-Daily Cleaning Routine
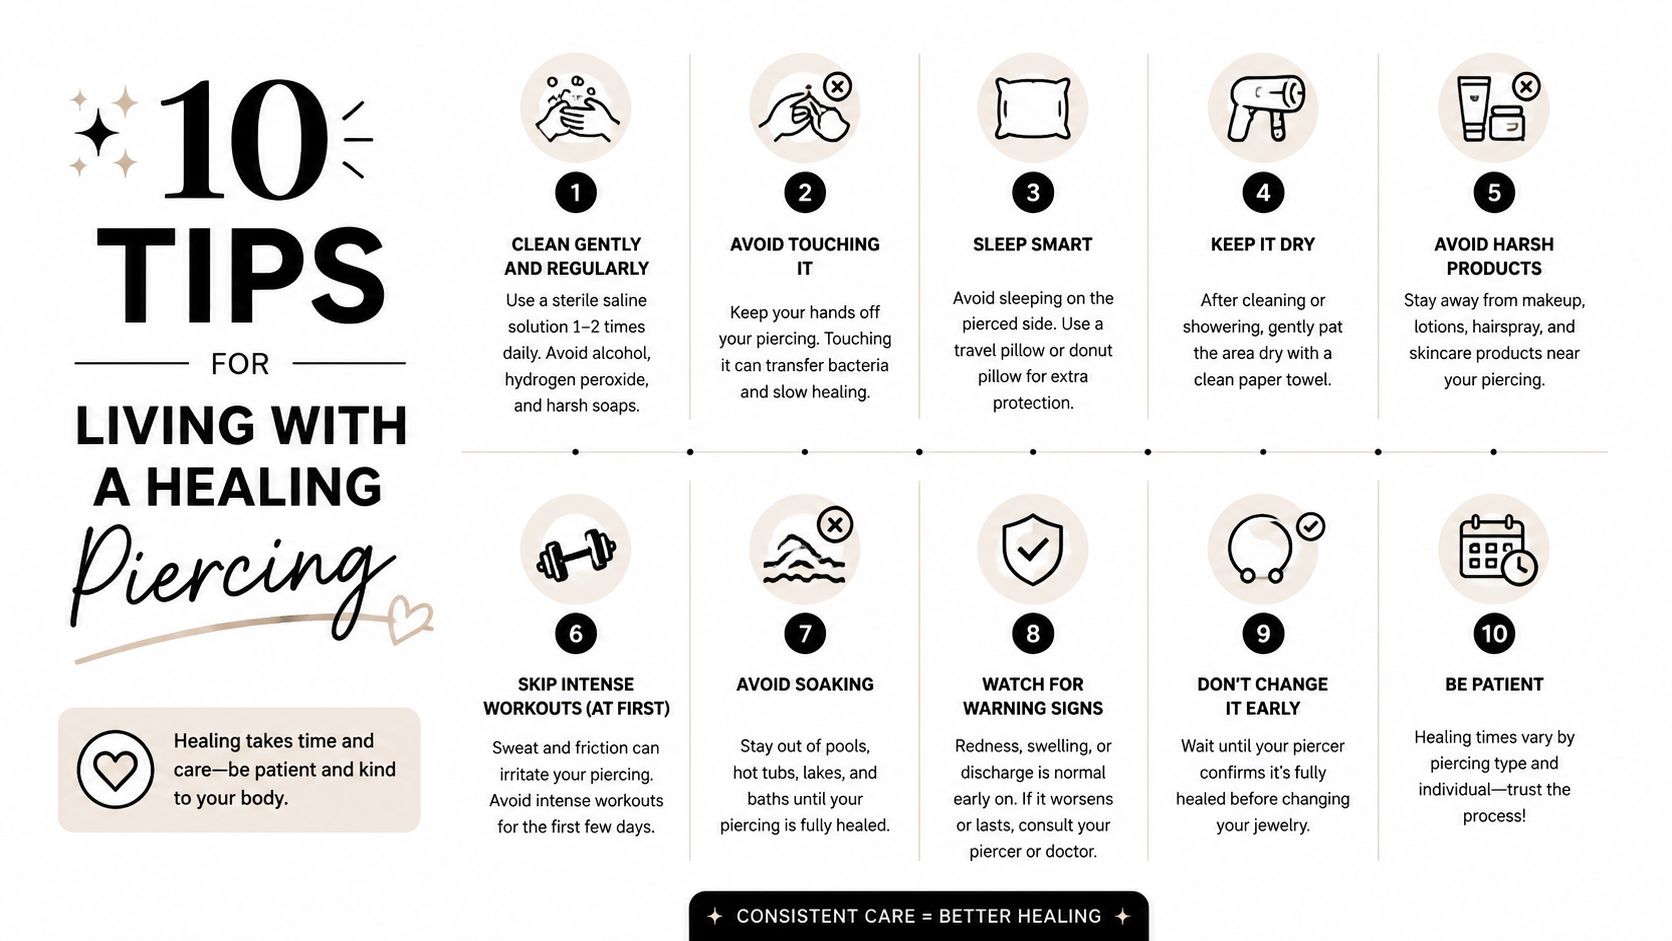
The cleanest routine is usually the simplest one. Wash your hands, clean with sterile saline, rinse away residue, and dry gently. Do that twice daily, and repeat after heavy sweating or accidental contamination. Overcleaning can irritate the wound barrier, so more effort doesn't equal better healing.
Keep the routine gentle
Use sterile saline on the front and back of the piercing, then let it soften any crusted discharge before you dry it. Don't twist the jewellery to “work the solution through”, and don't pick at dried fluid. You're trying to reduce friction, not create it.
Outdated advice still circulates, including rotating jewellery and scrubbing with harsh products. A peer-reviewed clinical review in PubMed Central recorded older advice to wash daily with antibiotic soap and rotate the jewellery during healing (PMC clinical review on body piercing care). That's useful history, but modern aftercare leans away from unnecessary movement because the piercing doesn't heal faster when it's being turned and handled.
A few habits help the routine work:
- Wash hands first: every time, no shortcuts.
- Use sterile saline: not homemade mixes.
- Pat dry carefully: cloth towels can snag fibres.
- Leave the jewellery alone: movement creates irritation.
If you exercise, shower, or get caught in sweat, clean the site afterwards rather than letting salt and friction sit there. If you've been swimming, the safest plan is to avoid the water altogether until the piercing is healed. For saline product basics, this saline spray guide gives a simple reference point without overcomplicating the routine.
Living With a Healing Piercing
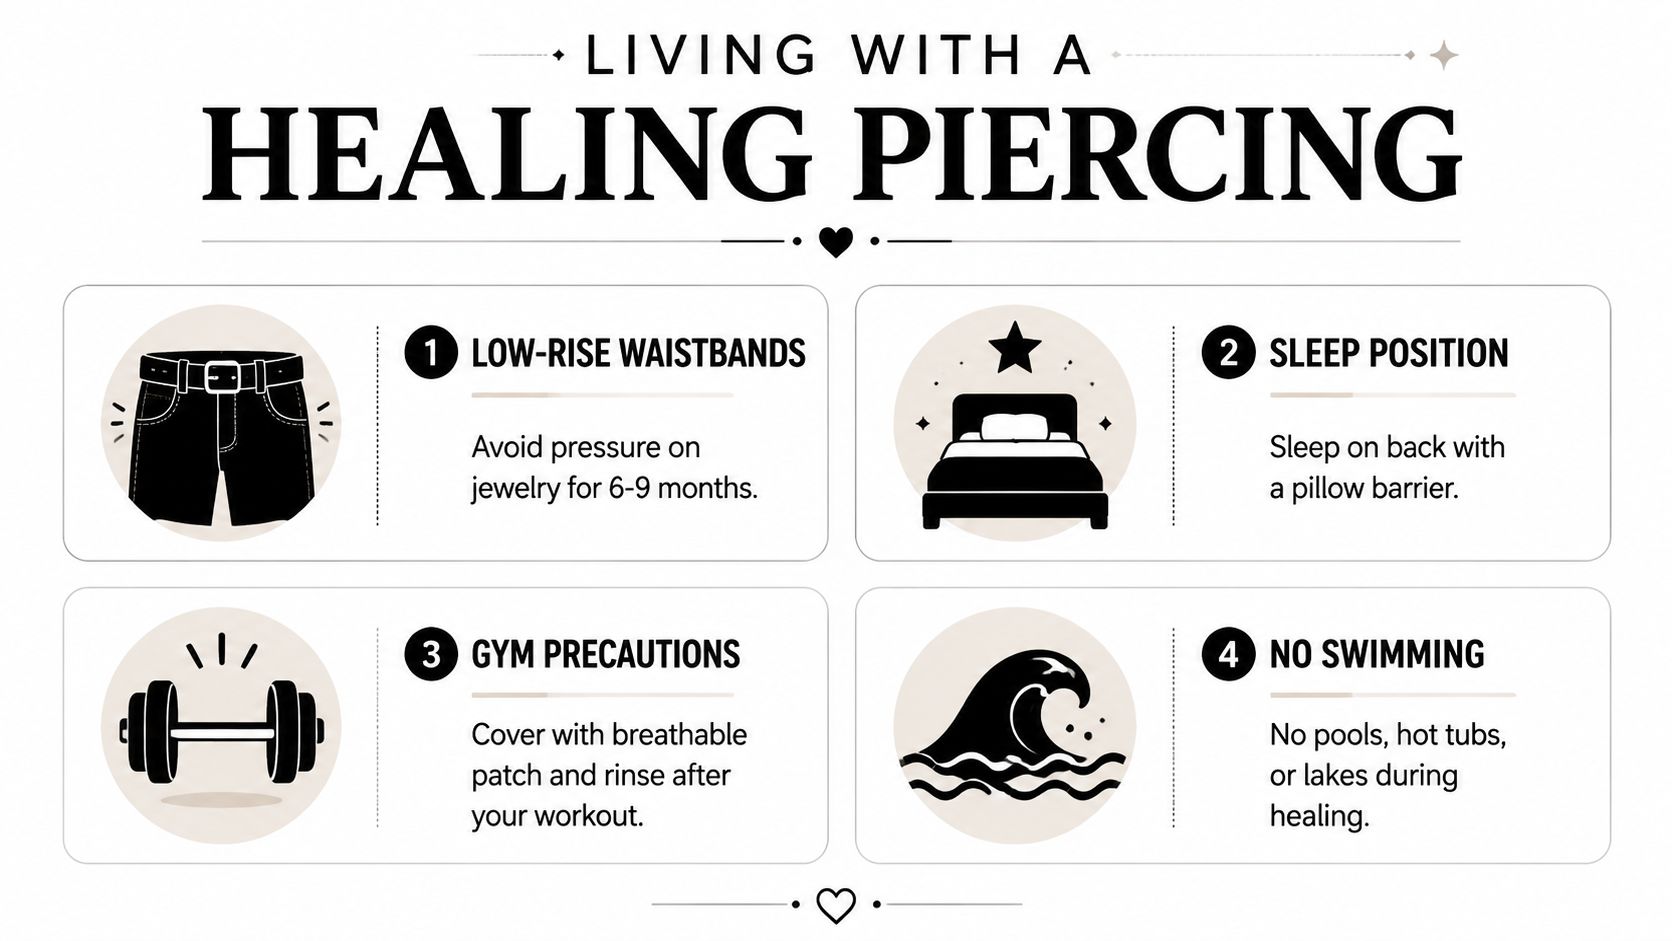
A navel piercing does not heal in a bubble. NeilMed's navel-piercing guidance says the piercing takes a minimum of 6 to 9 months to fully heal, and that window is long enough for work, exercise, travel, and sleep habits to affect it every day (NeilMed navel piercing info). If you want a broader sense of what that timeline usually looks like, this guide on navel piercing healing times fits alongside the day-to-day advice here. That is why practical adjustments matter more than hoping the area will just be left alone.
Real-life friction points
Office work is a common trouble spot. If your trousers press across your waist when you sit, the bar gets compressed again and again through the day. A looser waistband or a softer front panel can spare you a lot of irritation, and I have seen more problems come from a desk chair and a stubborn waistband than from the piercing itself.
Sport needs a different setup. A breathable hard-plastic eye patch secured with an elastic bandage can cut down contact during activity, and the site still needs to be rinsed afterwards. That matters most with bending, twisting, or core-heavy training, because the abdomen moves constantly and the jewellery can be tugged by motion.
Sleeping position matters too. Sleeping on your back is kinder than pressing into the piercing all night, and a pillow barrier can help stop you rolling onto it. Travel adds another layer, because long car journeys, flights, and tight clothing can keep the area compressed for hours.
A few adjustments make daily life easier:
- Choose low-rise or loose waistbands during healing.
- Wear breathable fabrics that do not trap sweat.
- Protect the site in sport with a breathable cover.
- Skip swimming venues like pools, hot tubs, lakes, and the sea until healed.
The clients who do best are not the ones who put life on hold. They are the ones who spot the friction points early and change the routine before the piercing starts to get sore again. If your job, workouts, or holiday plans keep rubbing the area, adjust them before the jewellery has to keep protesting.
Troubleshooting and When to Call a Piercer
Redness, crusting, and a bit of tenderness can all be part of ordinary healing. What matters is the direction things are going. If the site is calmer over time, you're probably on track. If it's getting hotter, tighter, or more painful, the jewellery or the environment around it needs attention.
Know the difference between nuisance and warning sign
A small irritation bump usually points to friction, pressure, or jewellery that isn't sitting well. Migration looks different, because the skin between the entry and exit points can start to look thinner as the piercing shifts. Embedding is more urgent, especially if the jewellery starts disappearing into swollen tissue or the ends seem stuck in place.
Infection signs are the ones that should push you towards medical advice, not just piercing aftercare. Thick discharge, spreading heat, worsening pain, or a feeling that the whole area is angry rather than just one spot are reasons to speak to a GP. A piercer can help you spot irritation and placement problems, but they can't diagnose or treat a true infection.
Don't keep fiddling with a problem piercing and hope it settles on its own.
Use this decision pattern instead:
- Mild redness and crusting: monitor, clean gently, avoid snagging.
- A bump after friction: reduce pressure and check jewellery fit.
- Visible migration: contact your piercer promptly.
- Heat, spreading pain, or thick discharge: see a GP.
If you're in the UK and want in-person guidance, Piercing Near Me can help you find support through its Croydon and Bournemouth options, and you can call 01202 900050 (Bournemouth) / 020 8686 7730 (Croydon) or WhatsApp 07752 913846 (Bournemouth) / 07902 490584 (Croydon) for booking help. If you're comparing studios or want to check availability, visit Piercing Near Me and book with a team that understands anatomy, jewellery fit, and realistic aftercare.
Trackbacks/Pingbacks